Monday, November 19, 2012

Onions, Onions, Onions


After putting up the post about French-fried onions, I realized that many of my friends find preparing onions something to be avoided at all costs. Isn't it inevitable that you will end up with smelly fingers and burning, teary eyes?

Not necessarily! There are of course lots of suggestions out there for avoiding the tears, including some special kitchen goggles just for protecting eyes from the sting. Over the years, however, I have discovered some much simpler ways to avoid the "onion problem." Herewith, ideas that may help you as well:

  • If ever there was a time to have a sharp knife to work with, this is it. Dull knives seem to mash the cells of the onions, releasing far more of the volatile smells that lead to tears. I prefer serrated blades for both peeling and cutting onions.

  • Stand away from the onion!  If you are especially troubled by onion fumes, try to keep them as far away from your face as possible while peeling and cutting. For example, peel them while standing over the sink, with your hands as far down in the sink as you can reach.

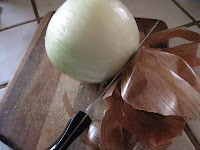
  • Cut a small slice off the top of the onion and then begin to peel.  When possible, pull much of the onion skin off with the blade of your knife rather than cutting it. You want to take off only the papery outer skins. The farther in you cut, the more you will be exposing yourself to the source of tear-problems.

  •  If you really struggle with onion odors, you can peel the onion under water at the sink. However, this makes it quite a bit harder to get the skin off. When the onion is peeled, however, you are still going to have to move to the cutting board to do the dicing and slicing.
  • In general, it will be easier to take the peeling off if you do not cut the root end off until most of the rest of the peeling is removed. 


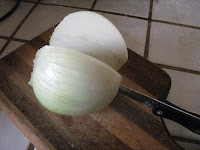
  • Use a cutting board! Unless you are making onion rings, cut the onion from pole to pole instead of around the equator. Then lay half the onion flat on the board and cut into pieces of the desired size. If you want onion rings, cut in half at the equator of the onion and then, balancing carefully, begin cutting the onion into rings from the center to the ends.


  • If you have a very large amount of onions to chop or slice, you may use your processor (blenders rarely work well to get an even chop). Just be warned--when you take the cover off, the full concentration of vapors will hit you in the face unless you turn your head away!!
  • If an onion has some soft spots, you can safely cut these off and use the rest of the onion. However, do be aware that these onions (usually soft because they are beginning to over-ripen) may have a more pungent odor.
  • In the same way, onions that have started to sprout are perfectly safe to use--and the sprouted sections will have the flavor of fresh green onions. Just cut away any soft spots that may have formed around the top and around the sprouted sections.

Finally--practice, practice, practice. The more onions you cut, the easier it will get--honest!


Homemade "French-fried Onions," Cream of Mushroom Sauce, and Classic Green Bean Casserole


 It's that time of year again. For many, Thanksgiving is synonymous with roast turkey and stuffing, with lots of pies to follow.

For others, the really mandatory dish at the Thanksgiving day feast is Green Bean Casserole...and please don't try to make any adjustments to the tradition.  Since I have been given the task of bringing vegetable sides to this year's dinner, I will be responsible for making the green beans along with some roasted squash and perhaps one more choice.

So how can a "frugal" cook justify spending $15 or more for a pound of the traditional garnish when I just bought onions for 23 cents a pound? Surely these can't be difficult to make...can they?

Off to the search engines to find methods and recipes, a very simple task with over a million hits for "French fried onions recipe." Blog after blog talked about the ease of making these, along with praise for the fresh flavor and lack of preservatives the homemade crisps provided.

I was hooked. I started out with just two onions, but one was large enough that I ended up with over 4 cups of the thinly slivered pieces or "strings," the name given these on a couple of blogs. In the end, I only fried up less than half of them, still ending up with over 12 oz of finished product.

My results? These were pretty easy, though there are some hints that need to be followed to come up with nicely golden and crisp pieces. The time (and dishes to be washed) was not overwhelming but certainly would be a factor in anyone's decision to make from scratch or buy. And the cost (not including the cook's time) would definitely be less. However, as noted below, there are some "leftovers" from the process that would need to be used rather than thrown away or the overall cost could be quite a bit more.

Here is my overall pro and con analysis--review and then decide for yourself if this is something you would want to try.

Pros
Overall cost, based on 38 cents a pound for onions (the "everyday" bottom price here when there are no specials) and current prices for other ingredients, would be a little over a dollar for the 12 ounces I ended up making. Almost all of this cost is coming from the 2 to 3 cups of canola oil that were required. (Under no circumstances would I reuse this!)  Part of this low cost also comes from using the remaining milk and flour mixture as noted below.

There are no preservatives and you can adjust for yourself the level of salt used. Many of the recipes on the web suggest soy or other gluten-free flours, and that could easily be done, another plus if you have special diets to consider.

The amount of time it took to make this was relatively short, less than an hour from start to finish--and I was able to do some minor clean up chores around the kitchen while watching (closely!) each batch of strings as they fried. This could also be a fun activity to do with others in the kitchen as well.

These will store well if cooled completely before putting in a tightly sealed (preferably glass) container, so they can be made ahead to have on hand for the holidays. They can be frozen, but should be thawed completely before opening the container.


Cons
I really don't like frying things, and this involves the usual frying mess of thermometers, cookie sheets covered with paper towels, and grease to be disposed of. For me, the yuk factor is pretty high.

If you are not very careful about shaking off excess flour, the oil will quickly darken and even begin to taste burned. I used a strainer to dip out some of this between batches, but it takes some practice to avoid problems with this. If you end up with too much browned matter in the bottom, you might want to start over with new oil, but that adds more dishes (you'll need another pan unless you are ready to wait for the first oil to cool) and added cost of oil.

While less than an hour from start to finish may be "short" for someone with time to spend in the kitchen, trying to squeeze in this chore along with all the other holiday preparation could be just too much to add to the cook's to-do list.

If you don't have time, patience, or desire to use the "leftover" milk and flour mixture, the cost will be quite a bit higher and would certainly bring into question any savings you might have hoped to realize.

Bottom line:
This may be a fun thing to try once or twice and it could even be a good option if you are trying for a gluten free topping. Otherwise, you have three options:

  • Convince the traditionalists that they don't need this low-nutrition topping anyway (how about seasoned bread crumbs browned in a little butter with some slivered almonds tossed in instead?)
  • Bite the bullet and buy the smallest container you can get away with
  • Top the casserole with onions simply sauteed in a little butter and bread crumbs. They might not be as crisp, but the flavor will be at least as good, and the calorie content has to be lower.


French Fried Onion Strings for Toppings

1 large or 2 medium onions, thinly cut in julienne slices--about 2 to 3 cups
2 c milk
2 c flour
2 t salt, or to taste
2 t onion powder (or substitute onion salt for part of regular salt)
canola oil for frying--start with 2 to 3 cups

1.  Pour the milk into a flat bowl. Combine the flour, salt, and onion powder in a somewhat larger flat bowl.


2.  To prepare the onions, peel and quarter from pole to pole, not across the equator. Thinly slice each quarter into julienned "strings" and put into the milk. Allow to soak at least 5 minutes or so.


3.  Spread a layer of newspaper on a large baking sheet and cover with two thicknesses of paper towels. (You will want to have more newspaper and paper towels ready for later batches too.)

4.  Pour about 2 inches of oil into a medium pan or skillet and begin heating over medium-high heat. Insert a deep-frying thermometer in the oil (don't allow it to touch the bottom of the pan) and heat the oil to 375 degrees.

5.  When the oil is almost ready, take a handful of onion strings from the milk, drain lightly and toss in the flour. Still using your hands, lift and shake the onion strings to get as much excess flour as possible from falling into the oil. Drop the coated strings into the oil all at once (be careful not to let it splash!) and stir lightly. A "handful" was about a cup or so of the coated strings, just the right amount for my pan. Don't try a larger pan. If you add all the onions at the same time, you will have difficulty getting them to cook evenly, so using the smaller pan and doing only a few at a time will yield much better results--and will require less oil overall.

6.  Allow the onion strings to brown completely and then lift out with a slotted spoon or strainer. Spread on the prepared paper towels to drain and then wait for the oil to return to 375 degrees before adding the next batch.
While waiting for the oil to heat up, you may want to use your strainer or slotted spoon to lift out some of the browned flour at the bottom of the pan. You may also need to add more oil after a few batches--if so, be very sure to allow the temperature to return to 375 before adding more onions.

When finished, allow the oil to cool completely before disposing.


Now, for the extra milk and flour--and small pieces of onion that are still going to be hiding in that flour mixture--use it to make your own sauce for the green bean casserole or any other "hot dish" application where cream of mushroom soup is called for.


Cream of Mushroom Sauce, with Onions

2 T butter and 1 T canola oil (or all oil)
8 oz fresh mushrooms, cleaned and sliced
1/2 c seasoned flour from fried onions--include onion bits that may be in the flour
1 3/4 to 2 c milk--use "leftover" milk from the fried onions if you have it
1 chicken or vegetarian bouillon cube
salt, seasoning salt, and black pepper to taste

1.  Saute the mushrooms in the butter and oil over medium heat. Cook until the mushrooms are golden and tender.
2.  Stir in the flour, making a roux--that is, stir the mixture together until it is evenly mixed and the flour has completely"disappeared" into the oils. Continue to cook for a minute or two more.


(Okay, that looks a little scary, doesn't it! Never fear. If you have only the butter/oil mixture and the mushrooms in the pan so far, the flour will blend into the oils in the pan without a problem. Just keep stirring until you can't see any of the white flour. Be brave!)

3.  Stir in 1 3/4 cups of the milk, cooking and stirring until the mixture bubbles and thickens. Add additional milk to reach desired thickness. Taste and adjust for seasoning.


The sauce you have just made can be used wherever a recipe calls for condensed cream of mushroom soup. This will make the equivalent of two of the familiar red and white label cans. The onion in the flour (and flavoring the milk as well) provides a subtle boost very like the familiar canned soup flavor, and without any of the preservatives.

Variation:

If you decided not to make your own onion topping, you can still make this mushroom sauce. Just finely dice 1/2 cup or so of onion and saute with the mushrooms.

With both the French-fried onions AND the condensed soup for the sauce ready, now you are ready to put together the "classic"green bean casserole--the really easy part!

Classic Green Bean Casserole

16 oz package frozen green beans--French cut preferred
1 can cream of mushroom soup OR 1/2 recipe from above
1 T Worcestershire OR soy sauce--optional
1 c (or more if you like) French fried onion pieces

Thaw the beans but do not cook. Stir in the mushroom soup, about a third of the onions,  and Worcestershire or soy sauce if used. Pour the mixture into a 1 1/2 quart casserole dish and top with the remaining onion pieces.
Bake at 350 degrees about 20 to 25 minutes, until bubbly.

Variation--if fresh beans are used, cook until just tender crisp, drain, and then proceed with the recipe.

Slow Cooker Italian Pasta


We had a "CrockPotLuck" at church today, with everyone asked to bring a favorite dish made in a slow cooker. Our wonderful kitchen committee would provide all the homemade desserts, as well as biscuits, corn, bread, rolls and vegetable and fruit trays. Truly a feast to be thankful for.

Though the weather has been warm for mid-November in Minnesota, it seemed likely that there would be quite a few chilis and soups, so I decided to try for something a little different. Looking at the cupboard, I decided on a vegetarian pasta dish. However, I knew this could be a little challenging, since pasta has a way of getting overcooked, mushy, and unattractive if not handled carefully in the slow cooker.

The following recipe turned out beautifully. The method does need to be followed pretty closely, even if you change the amounts of the various ingredients. I would not advise cooking this, even on LOW, for more than 3 to 4 hours. It could be kept on the WARM setting for many cookers for another hour or so. The goal is to avoid ending up with pasta that is mushy, having absorbed all the sauce and leaving a pretty dry, pasty mixture. If in doubt, you might want to try making this or some other pasta dish in the slow cooker at home before planning to take it to the next office or church potluck!

I have added a few notes after the main recipe to adjust for some of the substitutions.

Slow Cooker Vegetarian Fettuccini

canola oil
1 large onion, chopped (about 1 to 2 cups)
1 stalk celery, including leaves, diced (about 1/2 to 1 cup)
1/2 green or red bell pepper, diced (about 1/2 cup)
3 to 4 large cloves garlic, minced
1 small to medium zucchini, grated (about 2 cups)
8 oz baby mushrooms, sliced
2 c cauliflower, broken into tiny flowerets
1 c pureed roasted butternut squash (or 8 oz pkg frozen)
28 to 32 oz prepared spaghetti sauce
15 oz can garbanzo beans--do not drain
15 oz can dark red kidney beans--do not drain
1 to 2 t dried oregano, to taste
1 t dried basil, to taste
1 t Italian seasoning, to taste
black pepper to taste
1 T balsamic vinegar (optional)
1 lb fettuccine pasta, broken into 2 to 3 inch pieces
6 to 8 oz pasteurized processed cheese, cubed
parmesan cheese (optional)

1.  Saute the onion, celery, and green pepper in a small amount of oil over medium high heat, stirring occasionally. When the onions are translucent and starting to brown, stir in the grated zucchini and garlic. Continue to saute for another 5 to 10 minutes, until the zucchini begins to soften. Turn this mixture into a 5 to 6 quart slow cooker and begin heating on LOW.

2.  Pour a little more oil into the same pan used for the onions and heat to medium high. Add the mushrooms and cook  until the slices are golden and limp. Add these to the slow cooker as well. Pour a few tablespoons of water into the pan and stir to "deglaze" the pan--use a spatula to scrape the bottom of the pan and pour these juices and scrapings into the slow cooker too.

3.  Stir in the mini-cauliflowerets, the squash, spaghetti sauce, and beans. Rinse out each can or jar with a few tablespoons of water and add to the mixture in the slow cooker. Add the herbs and taste for seasoning.

 4.  Bring a pot of water to a boil and add the pasta. Cook only until the pasta has barely begun to soften, perhaps only 2 to 3 minutes. It should still be very firm and stiff. Drain, reserving the cooking water.

5.  Stir the pasta into the vegetable mixture, along with the cubed processed cheese. The mixture should be quite "soupy." If necessary, add a little of the pasta cooking water. Taste again for seasoning, adding the vinegar and more herbs or salt as needed.

6.  Cover and cook on LOW for 2 to 4 hours--no longer. If desired, top each serving with Parmesan cheese.

If the mixture thickens too much, add more spaghetti sauce, a little tomato sauce or just a few teaspoons of water.

This recipe serves 12 to 14 and can be frozen. If your plan is to save some for later, it would be best to set that amount aside before cooking in the slow cooker.

Adjustments:

Frozen cauliflower can be substituted for fresh, but this should be added only about 20 minutes before serving

Frozen zucchini can be used, but this should just be added to the slow cooker without simmering with the onions.

Two 4 ounce cans of sliced or diced mushrooms, including liquid, can be  substituted for fresh, adding along with  the  other ingredients in Step 3.


Thursday, November 15, 2012

The Last Beets from the Garden--a Fall Salad


On a late fall visit to Sekapp's Orchard just outside of town, I couldn't help but envy the baskets of beets, some of which were as big as baseballs. The beets from my garden were, as usual, very small and not very plentiful. In fact, almost the entire crop fit on the roasting pan when I prepared them last week. 
Still, even the tiniest ones have lots of the sweet, earthy flavor I love about beets, and I have been enjoying them completely unadorned.

Today, I was looking for a colorful salad to go with an otherwise "white" meal of mashed potatoes and baked fish. While broccoli would be one spot of color,  the menu still needed something more to brighten the plate.

Those roasted garden beets to the rescue. Combined with a few other colorful ingredients, they became a key ingredient in a bright, easily prepared and, incidentally, high in antioxidants salad and a nice reminder of the garden harvest I have been blessed with this year.

One caution--this is a quick to make salad, but it should be prepared just before serving, since the beets do have a very strong tendency to share their color with the other ingredients, especially the cucumbers. If you do make it a bit ahead, you may want to wait to add the beets until just before serving.


Fall Purple and Green Salad

1 c sliced or diced cooked beets (mine had been roasted, for an extra bit of sweetness)
1 c sliced mini cucumbers; if the larger cucumbers are used, dice them
1/2 c thinly sliced red onions
1/2 large orange, peeled and sliced, with each slice cut in quarters
about 4 c shredded Romaine or green leaf lettuce
prepared or homemade dressing--either raspberry vinaigrette or honey mustard would be good
freshly ground black pepper

To prepare the lettuce: wash and then roll each leaf into a kind of a tube. Cut across the leaf to form fine shreds. Place in a large serving bowl.
Slice or dice the vegetables and oranges and add to the lettuce.
Drizzle the salad with dressing and toss. Pass the black pepper for each person to add.

Variations:  

Drained, canned beets can be used instead of freshly roasted ones.

If you keep mandarin oranges in the cupboard, they could be substituted for the orange pieces here--and would probably be an even brighter addition to the salad.

Feta or fresh mozzarella could be added for extra protein--and flavor--if you need a little boost in that direction.

Dressing

If you want to make your own dressing, I had published a sweet vinaigrette earlier this year. You can find that at:

http://frugalfastfun.blogspot.com/2012/08/farmers-market-day-and-quick-salad.html

Raspberry Vinaigrette Dressing

2 T raspberry apple juice frozen concentrate--do not reconstitute
1-2 T balsamic vinegar, to taste
1/4 c canola oil or a light olive oil
1/2 t each dried basil, rosemary, and thyme
sugar to taste
salt to taste
1 T water

Crush the dried herbs in a mortar and pestle or process lightly in a small blender.
Combine all ingredients and whisk well with a fork or wire whisk. Allow flavors to blend at least a few minutes before tossing with greens.
NOTE-You may be surprised at how much sugar you will need to add to reach the sweetness you may have become accustomed to in prepared dressings, perhaps a tablespoon or so.


Monday, November 12, 2012

Marinating Chicken Breasts for Future Stir-Fries


Never be afraid to consider those marked down meats and produce at your favorite store. Check the appearance of the food and how far from the "use by" or "good until" date, but then take advantage of the great bargains to be had.

That is advice I heeded last week when I found a package of boneless, skinless chicken breasts marked half off. The pull date was still two days in the future, and the package looked to be without any damage or ontoward signs of neglect. So home I came with almost two pounds of well-trimmed boneless meat for just under $2.50, not a bad deal in today's market.

The problem, of course, is that boneless, skinless chicken breasts can be very dry if not prepared properly, so I set off to the internet to see what kinds of marinade suggestions I might find. I ended up trying a somewhat sweet and fruity mix that I plan to use as a pre-prepared addition to a couple of different stir-fries.

Note that one significant difference from many marinade recipes is that I did not discard the marinade mixture but instead added it to the meat after it was well-browned. The mixture was then allowed to simmer and cook down for about 8 to 12 minutes more (just enough to be sure the chicken was cooked through). This intensified the flavor of the marinade in the final product and should provide a lovely sauce for those vegetables.

...and here is the best part:  I only used two thirds of that package, barely $1.70 worth of meat. This amount will provide enough for at least 6 servings of stir fry, perhaps even 8 if you have enough other ingredients in the mix (or if you include a salad topped with some nuts and/or cheese for a high protein side). Less than 30 cents a serving for meat? Not bad!


The end result of this marinating and quick cooking was moist, flavorful, and tender chicken, with really very little effort. Since this could easily be doubled, it would be a great make-ahead dish for freezing for up to a month or so if tightly wrapped.

Teriyaki Marinated Chicken Breasts

1 T honey
1 T soy sauce (use light if you have it)
1 to 2 T teriyaki sauce
2 T freshly squeezed orange juice (including pulp)
1 to 2 t grated fresh ginger
3 small cloves garlic, minced
1 1/2 to 2 lb chicken breasts, cut into nuggets
canola oil 

1.  Mix all ingredients except the chicken. Add the chicken pieces and stir to be sure all are well coated.
2.  Allow the chicken to sit in the marinade 20 to 40 minutes. (The smaller the pieces, the shorter the time.)
3.  Pour enough canola oil into a large heavy skillet (cast iron preferred) to just provide a thin even coat to the pan. Heat the oil on high heat until it is just shimmering. (NOTE:  Avoid using non-stick pans for this recipe, as it is best not to allow them to pre-heat like this.)
4.  While the pan is preheating, drain the chicken, reserving the marinade liquid.
5.  Place the chicken pieces in the pan without crowding, reduce heat to medium high,  and allow to brown on all sides. If necessary, you may need to put half the pieces in to brown, remove them to a plate and brown the rest, adding a bit of oil if necessary to keep the second batch from sticking.
6.  When all the pieces are browned, return any that had been removed to the pan and pour on the reserved marinade. Turn heat to medium-medium low, cover, and continue simmering for a few minutes, until a test piece is fork-tender and no longer pink inside.

If not using immediately, cool the chicken in the marinade for about 15 minutes and then refrigerate with the liquid. You may also divide the meat and juices into meal-sized portions and freeze for later use.


Stir Fry Chicken

approximately 1 cup marinated and pre-cooked chicken nuggets, with liquid
canola oil
1 large onion, chopped
1 to 3 cloves garlic, minced

Any or all of the following vegetables:
1 to 2 ribs celery, chopped
1/2 to 1 c diced bell pepper, green, red, and/or yellow
1 to 2 c shredded cabbage
1 c broccoli or cauliflower, cut into bite-sized flowerets
1 c fresh or frozen corn
1 c frozen peas
1 c sliced carrots
1 c peeled and cubed butternut or other squash
2 to 3 c fresh greens--spinach, chard, etc. OR 8 to 10 oz frozen greens

Seasonings--choose your favorite mix:
Curry:
1 T curry powder, or to taste
1/2 t grated fresh ginger
1/2 t cumin
(other seasonings like garam masala, etc., may also be added)

"Italian":
1 t oregano
1 t Italian seasoning
1/2 t basil, or to taste
1/2 t black pepper

"Mexican":
1 t cumin--or more to taste
1/2 c chopped cilantro
1 to 2 t chili powder
1 t oregano

1.  Prepare vegetables for cooking and have ready.
2.  Heat oil in large heavy skillet over medium to high heat--I do not have a wok, but this would be the ideal time to use one if you have it.
3.  Add the onions, garlic, (and celery if using) and saute briefly, just to soften.
4.  Turn the heat to medium high. Stir in the vegetables, adding first those that will require the most cooking. Continue to add vegetables, stirring occasionally to be sure they are cooking evenly. About halfway through, add the chosen seasonings. Any greens should be added near the end, cooking them just enough to wilt and tenderize. If using any frozen vegetables, add them in the next step with the meat.
5.  When the vegetables are almost done, stir in the chicken and its juices, along with any frozen vegetables that may be used. Stir well, turn the heat to medium-low, and cover. Taste and adjust the seasonings as desired.
6.  Continue to cook only until the meat (and vegetables) are heated through, about 5 to 10 minutes at most. Though there should be enough moisture from the chicken marinade and vegetable juices, you may need to add a tablespoon or so of water to avoid scorching.

WARNING:
The approach just mentioned, with the last few minutes involving reduced heat and  covering for a few minutes will not result in "authentic" stir fry and may produce more of what some purists will call "braised" vegetables. So be it. This approach should still give you only lightly cooked vegetables and a good overall blend of flavors.


Friday, October 26, 2012

Green Tomato Mincemeat

Homemade mincemeat? Doesn't sound especially frugal, fast, or fun, but this one meets at least two of the three criteria for this blog. It isn't especially fast, though it doesn't take as much time as it may sound, and one batch (or maybe two if you have lots of green tomatoes) will provide plenty for a season of baking. If you have tomatoes salvaged from that first killing frost, and maybe even some windfall apples at a bargain rate from the orchard, this will be much less expensive than purchased mincemeat. And the fun can come from being able to make something from America's past, a real heritage recipe. Home-schoolers working on history lessons from the last couple of hundred years might find this a fun project to try too.

If you do a search for green tomato mincemeat, you will find many recipes that do not take the extra step of steeping the tomatoes. While there is no doubt some loss of vitamins in this method, you will find that this approach results in a far more "traditional" flavor, without a hint of "green tomato."

Oh, and despite the name, this is a totally vegan recipe, and very low fat as well.   

From this:

 To this:


Green Tomato Mincemeat

4 lb ground green tomatoes (about 4 to 5 cups)
4 lb ground apples (unpeeled, preferably mixed varieties--about 4 to 5 cups)
12 oz (2 c or so) raisins--if you like a more raisin-y flavor, add up to a cup or so
1/2 lb. brown sugar
2 3/4 c white sugar
1 1/2 t salt
1/2 c plus 2 T cider vinegar
1 1/2 c strong coffee
2 t cinnamon
3/4 t cloves
3/4 t nutmeg

(NOTE:  Beause of the high acidity of the tomatoes, do not use aluminum or cast iron pans for this recipe.)

1.  Put at least 3 quarts of water in a large pot and bring to a boil. Use the pot that you will ultimately be cooking the mince meat in, to reduce dishwashing. 

2.  Cut the tomatoes in chunks and press through the grating blade of a food processor.
(NOTE: IF you still have an old-fashioned meat grinder, you can use that instead of a food processor.)

3.  Turn the ground tomatoes into a large bowl and pour boiling water over, just to cover. Add to the water in the pan and allow it to return to a boil.

4.  After 5 minutes of steeping in the hot water, pour the tomatoes into a colander and drain. Return to the large bowl and again cover with boiling water. Allow to sit for another five minutes, drain, and repeat the steeping and draining one more time.


5.  Meanwhile, quarter and core the apples, cutting out any spots but leaving the peeling on. Put these through the grating blade of the processor along with the raisins.


6.  Put the drained tomatoes, apples, and raisins in the large pot and add the remaining ingredients. Stir well and bring to a boil. Reduce heat and allow to simmer 20 to 30 minutes, stirring often to avoid sticking.


7.  To finish cooking:

A) Place in a 6 quart slow cooker with the cover slightly ajar. (As shown in the photo, just place a wood spoon under the cover.) Cook on low for several hours or overnight, stirring down occasionally.  After a few hours, taste and add more sugar if needed--the green-ness of the tomatoes and tartness of the apples will affect how much sugar you ultimately need.

OR
B)  Place the uncovered pot in a 300 degree oven and continue to cook, stirring every half hour or so, scraping down the sides as you do. After an hour or so, taste and add more sugar if needed.

OR
C)  You can continue to cook the mixture on top of the stove. Turn the heat to low, leave the pot uncovered, and stir often to avoid sticking. Taste for sweetness as above. 

8.  With any of these methods, continue to cook until the mixture is the thickness you desire. Long, slow, cooking will gradually caramelize the apples, deepen the spices, and in general, make for a very rich, full-flavored mixture.

9.  Cool and refrigerate or freeze in pie-sized portions--about 3 to 4 cups each. This amount should make enough for 3 to 5 pies. You may also want to freeze some in 1 or 2 cup portions for other recipes.

Beside pie filling, this makes an excellent yeast coffee cake filling, and I will soon be including a moist cake that features mincemeat and applesauce.


Wednesday, October 17, 2012

Green Tomato Salsa

The time has come. A killing frost finally shut down my tomatoes last Thursday, while I was again out of town. Thanks to my daughter-in-law, however, I have pounds and pounds of fruit she picked and boxed up, ready for me to use.


The first order of business was sorting. I took the best of the best and put them in single layers in flat cardboard boxes, covered loosely with newspaper. These went directly to my "root cellar"--my unheated garage that is  tucked under one wing of the house, a  perfect temperature for keeping fruits and vegetables well into the winter. If these do as well as prior years, I can expect to still have tomatoes ripened for our holiday meals in November and December.

Another group of tomatoes was picked out because they looked most likely to develop spots quickly.  These would be handled immediately, in salsa and perhaps a try at fried green tomatoes. Finally, the remaining greenies would also go into the garage, ready for a batch of green tomato mincemeat and some other new recipes after I get back from one more fall weekend away.

For now, the house is redolent of cumin and peppers and onions and cilantro--a wonderful warming fragrance that cries out for some fresh tortillas rolled around some refried beans and topped with salsa verde! Hope you were able to salvage a few green tomatoes to try this recipe too.


Green Tomato Salsa--Mild to Medium

Step 1
2 lb green tomatoes
4 oz yellow onion
3 to 4 medium to large green chile peppers--or more!
3 to 5 cloves garlic
1 1/2 t salt
3/4 t cumin
3 T water
1 T olive oil

Coarsely chop the four vegetables and combine with remaining ingredients. Cover and simmer about 10 minutes, until tomatoes are just starting to get tender. If the tomatoes are very green and not juicy, you may need to add just a small amount of water, but avoid if possible.

Step 2
1 T lime juice
1/2 t lime zest
2 t sugar or to taste (see NOTE)
1/2 c chopped cilantro, including stems

Stir the lime, sugar and cilantro into the first mixture. Adjust lime, sugar and salt to taste. If you desire more heat, you could also add a finely chopped jalapeno or more finely chopped chiles at this point. Return to heat and cook another 5 to 10 minutes at most.

For the sake of your processor, allow the salsa to cool for a few minutes. Pour the mixture into the processor and pulse until just barely chopped. If desired, a tablespoon or so of chopped cilantro may be stirred in after processing. (If you don’t have a processor, you can use a blender, but you may have to divide the mixture into two or more batches.)

Chill and store the salsa in the refrigerator for up to a week. The salsa can also be frozen, but be aware that  some peppers change in their “heat” level upon freezing—sometimes hotter, sometimes milder. 


NOTE:  "Green" tomatoes can be a loosely descriptive term, since some of the tomatoes you will try to save from frost will be almost ready to turn red (or yellow, depending on variety), while others will be bright green and as hard as little green apples. The greener ones will be much more tart and often are more strongly flavored. Some will look green on the outside but will really be very close to ripening--as the picture below illustrates. 


If you have a choice, try to include some at various stages of ripening in your salsa, as illustrated by the ones I used today. Then, be prepared to add more sugar or lime, depending on how "green" your tomatoes really are.  

Hotter Variations and Other Substitutions

Increase the number of chiles, don't remove the seeds and/or ribs, or use other kinds of peppers to your taste--jalapeno, serrano, anaheim. This is a recipe that is easily adaptable to all tastes. 

If you don't have any fresh chiles, you could add a can or two of diced chiles or jalapenos after the cooking is complete.

If there are no fresh or canned peppers available hot enough for your taste, add a few drops (or more) of a good Mexican hot sauce. Our family likes the Valentina brand that is available in both supermarkets and Mexican food stores even here in the Midwest.

If you don't have a lime, lemon juice and rind can be substituted, but the lime will give this a much more "authentic" flavor.

Sunday, October 14, 2012

Chocolate Bread Pudding

Here's a quick dessert to make, using up some of that bread that is getting too stale for sandwiches. This recipe is a little more like a cake than a custard, and is best served warm with ice cream, whipped cream or even just some warm coffee cream poured over it. Raisins or nuts would be good add ins--or you could use leftover raisin bread for the base.


As with most bread puddings, the better the bread, the better the dessert, but you can use just about any kind of bread you have available, even buns. The real secret is to be sure the bread is dried well, so that it does not become gummy during the baking. And, as with almost all chocolate desserts, be careful not to overbake, to keep a slightly fudgy texture.

Chocolate Bread Pudding

1 t butter
2 c roughly torn bread pieces, about 2 inches or so in diameter
1/2 c semi-sweet chocolate chips
1/4 c sugar (may increase to 1/3 c if a sweeter pudding is desired)
1 1/2 T baking cocoa
8 oz can evaporated milk (or 1/2 15 oz can)
1/4 c milk
2 eggs
1 t cinnamon
1 t vanilla


1.  Melt butter in bottom of 9 inch pie pan or 8 inch casserole dish.
2.  If the bread has not been previously dried, spread the chunks in the pan and put in 250 degree oven while preparing the remaining mixture.
3.  Mix together  the chocolate chips, cocoa powder, sugar, milk, and evaporated milk in a microwave safe bowl. Heat about 3 minutes at low to medium power, level 4 to 5, stirring occasionally. The mixture should be warmed and the chips beginning to melt.
4.  Remove the chocolate from the microwave and beat in the eggs, cinnamon, and vanilla. Stir until very well mixed.
5.  If the oven has been at 250 degrees to dry the bread, remove the bread from the oven and increase the heat to 325 degrees.
6.  Add the dried bread pieces to the chocolate and egg mixture and stir just until well mixed. Pour all back into the prepared pie pan or casserole dish.
7.  Bake at 325 for about 15 to 20 minutes, just until a knife inserted in the center comes out clean. Do not overbake.  Serve warm with ice cream or whipped cream. Serves 5 to 7 or 8.

Pizza Soup


It was one of "those days," the ones that seem to be just non-stop meetings and chores. I started with 7 am and 9 am meetings and then would be having friends over for lunch, so I needed something that would be pretty low maintenance and as much make-ahead as possible.

We are finally having the kind of cool days that make me ready to bake some bread and fill the house with warmth and fragrance, so that was actually the start of my menu planning. While there would be children at our lunch, the usual macaroni and cheese or pizza choices wouldn't be good to go with the bread, so soup was the next option.

In our family, just about any soup will be almost inhaled by the kids, but other children are not always so enthusiastic. Since I was thinking about pizza, I decided on a soup that would include pizza flavors. Add in fresh fruit--black grapes, bright green honeydew and bright red and white apple slices--and the menu was set. Peanut butter and jelly would also be available for those who just weren't into soup at all.

The recipe below reflects just how I made the soup, with no sauteeing of the onions and carrots, because I ran out of time the evening before. However, I do recommend the variation noted at the end; it will provide a deeper flavor that is worth the few extra minutes.  Note that this is a vegetarian recipe. If you have meat eaters who want an even more pizza-ish soup, you could add some browned Italian sausage or pepperoni slices along with the corn and seasonings.

Pizza Soup

1 medium onion, chopped (about 1 cup)
8 oz baby carrots, cut in chunks
28 oz can or jar of prepared spaghetti sauce, garden vegetable variety (or your favorite)
15 oz can diced tomatoes ready for chili (this brand is mild; you could use tomatoes and chiles if you prefer a little heat)
2 to 3 c finely shredded cabbbage
1 c pearl barley
oregano, fennel seed, Italian seasoning, black pepper
10 to 12 oz frozen corn
water as needed

Optional ingredients:  1/2  c diced green or red bell pepper,  1 to 3 ribs celery, sliced, 1 6 oz can mushrooms

Garnishes:  Parmesan and/or mozzarella cheese; black olives

1.   Place all ingredients except the corn, seasonings, and water in a large slow cooker. Turn on HIGH and cook for about an hour or so.

2.   Add seasonings--I would start with about 1 teaspoon each of dried oregano and Italian seasoning and about a teaspoon of fennel seeds that have been crushed in a mortar and pestle. Sprinkle in as much black pepper as your family might prefer; I used about one half teaspoon.

3.   Stir in the corn (while still frozen) and enough water to provide the consistency you prefer. Turn the heat to LOW and cook another 6 to 7 hours, until carrots are just tender, and barley is well-cooked.

4.  Taste and adjust for seasonings before serving. Serve garnishes for each person to add as desired.

Alternate Method:

Over medium high heat, saute the onions, carrots, and barley (and celery if used) in about 1 T canola or olive oil. Cook until the carrots are just beginning to soften slightly and the onions are golden. Stir often.  Turn into slow cooker on LOW and continue as above. The time needed to finish cooking may be slightly less.


Pork Roast for Fall--Cook Once, Serve Two or More Times


Pork is particularly well-priced right now, a perfect season for it since it pairs so well with many fall fruits and vegetables. I was able to buy this roast for only $1.39 a pound so have enough for at least 15 to 20 servings at a remarkably low price. With the continuing impact of the drought, I do wonder if we will look back next year at this price and wonder how we ever saw such bargains. For now, we can be thankful for the bargains and take advantage of them whenever possible.

While there is a little prep time involved with this recipe, the result will enable you to serve guests, to freeze some for a later meal, and/or to make sliced roast sandwiches, pulled pork, stir fry, burritos, etc. If so inclined, you could feed a family of four an entire week for a little over $10, and never duplicate the menu!

Autumn Pork Roast--and More
The Roast...

approximately 7 1/2 lb pork shoulder roast, bone in
1 large onion (about 2 cups), cut in julienne strips
2 to 3 c finely chopped apples, cored but not peeled (OR 1 to 1 1/2 c unsweetened applesauce)
1 T canola oil (optional; see NOTE)
1 t dried rosemary
1 t ginger
1/2 t cinnamon
1/8 t nutmeg

1.            Cut the roast in two approximately equal pieces.(Cutting the roast into two pieces allows more surface of the meat to be in contact with the apples, onions, and seasonings.It also provides for more even cooking overall.)
2.            Heat the canola oil or trimmed fat (see NOTE) in a cast iron or other heavy skillet. When almost smoking, add one of the pieces of roast and brown on all sides. When all sides are browned, transfer to a large roasting pan. Repeat the browning with the second piece of meat.
3.            Cover the roasting pan and place in a 350 degree oven
4.            If using chopped apples, cover and microwave for about 3 to 4 minutes, until very tender.
5.            Saute the julienned onion in the juices in the skillet, cooking just until they have begun to brown. Stir in the apples or applesauce and seasoning.
6.            Spread the onion and apple mixture, with the juices, over the roast. Add a small amount of water if necessary to cover the bottom of the pan with liquid. Cover the pan and return to the oven.
7.            Turn the heat to 300 degrees and continue roasting for 3 to 4 hours, until the internal temperature is at least 145 degrees (though many, including myself) will prefer to cook longer, almost to the point of the meat falling apart, or 160 degrees or so.
8.            Remove the roast from the oven and allow to sit for at least 15 to 25 minutes. Skim the juices into a pan and thicken for gravy if desired or just serve with the meat juices as is. As the meat is sliced and served, provide salt and pepper to taste. (I do not salt the roast itself since that concentrates the saltiness only on the edges. As a result, most people still add more salt before eating, so you can reduce the ultimate sodium content with my approach.)
NOTE—the roast that I was using was so lean, there was not enough fat to adequately cover the pan while browning. If there is fat to be trimmed from the roast, cut it off and dice. Put it in the pan while heating to provide a thin layer of fat for browning, instead of using the oil. 

Slow Cooker Alternative
After sauteeing the roasts, place in a large (6 1/2 to 7 1/2 quart) slow cooker. Add the vegetables and cook on low for 5 to 6 hours, depending on your cooker.


...And More

Here are more detailed suggestions for using the meat as the basis for several meals. Unless otherwise noted, these are for four servings each.

Day 1     Set aside one of the roasts for use later in the week (or freeze for later menu planning). Slice the remainder of the one served the first day and reheat in the microwave, with mashed potatoes and two vegetables, one yellow/orange, one green. On the golden side of the plate, try baked squash or carrots braised with some onion and celery as in the photo. For the green part of the palette, try broccoli or braised greens from the garden. Or, if you have some available, put steamed red cabbage on the plate as pictured.

The reserved juices can be thickened slightly with corn starch for a gravy for the potatoes and/or the meat. There should be enough meat for serving 6 to 7 people, so this could be an ideal meal for sharing with guests.  If fewer people are served, you can freeze the leftover meat and sauce for a later meal. If you have some divided freezer trays, you could also make your own frozen dinners with all of the leftover ingredients.

Day 2     Cut four thin slices off the second roast. Place each on a slice of good whole wheat (or rye) bread and add mustard, lettuce, Swiss or other cheese, and whatever other things you like for a hearty sandwich. Chewy hard rolls are another good bread alternative. Skip the lettuce and heat the sandwiches to go with a tossed salad and some apple cranberry sauce. 

Day 3     Prepare your favorite stuffing (from a mix if that fits your schedule best). Stir in half a chopped apple and/or some dried cranberries if desired.  Oil a microwave-safe serving dish large enough to arrange four thin slices of pork roast over the bottom. Spread the stuffing over the meat and return to the microwave to heat thoroughly. This goes well with some of the squash from the first day or cole slaw or a plate of mixed fruits.

Day 4 and/or Day 5   Time to go ethnic. The pieces of meat around the bone can be diced and used in a stir fry or with cheese, beans, salsa, etc., as the filling for hearty burritos. In fact, my roast ended up providing enough meat for both a stir fry and burritos.

Additional ideas   If you still have some meat and/or bone left, you could add this to your favorite split pea or lentil soup, for just a little extra heartiness. (Stirring a little into macaroni and cheese would be another option too.)  Though the meat doesn't have the seasonings of sausage or pepperoni, it could be added to a pizza, with extra oregano, fennel, etc., added for more zip.

And we didn't even get to Pulled Pork, a great way to use up those bits and pieces along with any extra juices. Just take all the scraps and stir them into a little of your favorite barbecue sauce, put on a bun and microwave until heated through. Can't get much easier (or more frugal) than that!

Freezing   The meat may be frozen to use for additional meals. Simply slice (or dice) and place in small plastic bags, each enough for four servings (or the size that best suits your household). Seal tightly to keep air out and then place the small bags in a larger freezer bag. Label with the date and use within two to three months.

The bottom line is this:
Sometimes that enormous looking roast that is at a bargain price can result in not only saving dollars on the budget; it can also save you time since the cooking is done once and then the meat is ready for all kinds of other meals. 


Cooking Hint for the Day:

To julienne onions:            Peel a whole onion and cut in half from pole to pole instead of around the equator. Cut each half in half, pole to pole. Lay each quarter flat on the cutting board and slice in thin slices, again pole to pole. If the onion is very large, you may want to make one more pole to pole cut to reduce the size of pieces. The result should look like this: