Saturday, December 30, 2017

Pumpkin Apple Bread


Perhaps we are far enough away from the pumpkin spice madness to try one more pumpkin recipe. This could be helpful if you still have a little pumpkin--canned or homemade--left from all that holiday baking. These also make good take alongs for any New Year's Eve party you may be invited to. Not quite so sweet as all those cookies and maybe even a little "healthy" with all the fruit.

This is in the category of "quick breads" and really does come together quickly, especially if you have a processor or immersion blender to quickly chop the apples.


Pumpkin Apple Bread

1 c pumpkin puree
1/3 c canola oil
1 c sugar
2 eggs
1 1/2 c flour—may substitute whole wheat flour for up to half a cup of the flour
1 1/4 t baking soda
1 t cinnamon
1/2 t nutmeg
1/4 t cloves
1/4 t allspice
2 c (packed) cored, but not peeled apples, finely diced (about 2 large or 3 medium)
1/2 to 1 c chopped walnuts (optional)
1/2 to 1 c chopped dates (optional)

1.  Beat together the pumpkin, oil, sugar and eggs.
2.  When well-blended, gently add the sifted dry ingredients and mix until just blended.
3.  Fold in the apples and nuts and dates, if used.
4.  Pour into two well-oiled medium loaf pans, about 5 X 9. Bake at 350 degrees for about 25 to 30 minutes, until a toothpick inserted in the center comes out clean.  
5.  Allow to sit in the pans for about 3 or 4 minutes and then turn on to racks to cool.

Wrap tightly and refrigerate if kept for more than a day or two. As with most breads of this type, these loaves slice much better the next day.

Size changes:

For all sizes, bake at 325 degrees when using either glass pans or disposable aluminum pans, to avoid the crust getting too brown before the centers are done.
The recipe can be made in a single large bread loaf pan; allow about 35 to 40 minutes to bake.
"Mini" loaf pans can also be used with the recipe making about 6 or so. These should be baked for only about 20 to 22 minutes.
You can double this recipe and use three 5 X 9 pans for slightly higher loaves.


Saturday, December 9, 2017

Butternut Squash Cake


The Monday after Thanksgiving, I stopped at my favorite orchard to pick up another bushel of apples for the apple-butter-making party we'd be having later in the week. While there, I thought I'd pick up another pumpkin or two, for a few cakes and other things. Unfortunately, that very morning they had decided to compost the few pumpkins they had left because there had not been any call for them after the holiday so no more pumpkins for me this year.  Since my "root cellar" garage has more than enough butternut squash for the season, that probably was just as well.

So today was the day to make squash cake. If that sounds bizarre to you, consider the great carrot cakes and pumpkin bars or muffins you have often enjoyed. Here's a great frugal secret: for many (most) of these desserts, you can easily interchange carrots, pumpkin, and butternut squash. Since all are relatively mild (especially the squash and pumpkin), the flavor differences will be very hard to detect.

Old-fashioned carrot cake is the kind of recipe least amenable to these substitutions, though you can shred raw pumpkin or squash chunks just as you would carrots. However, many years ago, I found a carrot cake recipe that used mashed, cooked carrots, and that has been a family favorite ever since. I most often baked it in a Bundt or angel food cake pan, but it also works well in a standard 9 X 12 pan, and that is how I prepared this squash cake today. Note the addition of a tiny amount of black pepper, not enough to really taste it but enough to add a little zest to the overall recipe.

The topping is my old standby, sometimes-it-hardens-and-sometimes-it-doesn't-fudge-frosting or, when it doesn't set, just fudge sauce. It's not really the recipe (many others in the family have used this repeatedly), it's me and my impatience with the cooking, cooling, and/or beating. No matter the final consistency, the flavor is wonderfully fudge-like, my favorite kind of chocolate.

I want to be upfront about my checkered history with the recipe. When I post recipes on this site, I check and double check to be sure they will turn out satisfactorily as given. Just be forewarned that this frosting may not reliably set up to a picture perfect finale. However, it is so very flavorful that I am including it, with the thought that most of you will probably do a lot better than I in getting it to set just right. Because, even if it doesn't, the flavor will be so good, you probably won't even notice.


Chocolate Butternut Squash Cake

2 c sugar
1 c butter or margarine, softened but not melted OR 1/2 c butter and 1/2 c canola oil
1/3 c baking cocoa
4 eggs
1 c cooked and pureed butternut squash
2 c flour
2 t baking powder
1 t cinnamon
1/4 t ground black pepper
1/2 c milk
1/2 c broken pecans or walnut pieces (optional)

1.  Cream the butter, cocoa,  and sugar together until very smooth. (A stand mixer is especially good for this.)
2.  Add the eggs one at a time, stirring well after each addition. Continue beating until the mixture is very light. (I once had a home economics teacher say that you should be able to take a bit of the batter between your fingers at this stage, and you won't be able to feel any graininess from the sugar, as it will all have dissolved. Not totally necessary, but this is the stage when you want to do most of the beating.)
3.  Gently stir in the squash puree, mixing until well blended.
4.  Sift the flour, baking powder, cinnamon, and black pepper together. Add these dry ingredients to the egg mixture alternately with the milk, stirring well after each addition. Fold in the nuts if used.
5.  Pour the batter into a well-oiled and floured a 9 X 13 loaf OR 10 inch tube pan. (OR see NOTE below.)
6. Bake at 350 degrees for 40 to 45 minutes for the 9 X 12 pan or 55 to 60 minutes for the tube pan. Allow the cake to cool for about 15 minutes before turning it out of the pan.

NOTE:  Combine about a tablespoon of flour and a teaspoon or so of cocoa and use this mixture to dust the pan instead of plain flour.


Chocolate Fudge Frosting

1 1/2 c sugar
1/4 c baking cocoa
2 t cornstarch
1/2 c milk
1 T butter
1 t vanilla

1.  Combine sugar, cocoa, and cornstarch in a large, heavy pan. Pour in the milk, and stir until well blended.
2.  Boil the mixture over medium heat, until it forms a soft ball in cold water. Stir occasionally to keep from sticking.
3.  Remove from heat and allow to sit (stirring occasionaly) until cool. One way to cool this quickly is to put some ice cubes or crushed ice in a very large bowl or pan and place the saucepan of frosting in the center. The main problem with this approach is that some water could splash into the frosting, almost certainly assuring that you will not be able to get the frosting to "set."
4.  Beat in the butter and vanilla and continue beating until the frosting is shiny and smooth. If you have a small electric beater, that can be a good tool at this point, as you will need to beat for a few minutes to really get the thickness you want. Spread immediately on the cake--usually easiest to do while the cake is still warm, but not hot.

A few additional thoughts for newer cooks:

How do I "sift" the dry ingredients together if I don't have an old-fashioned flour sifter?
The reason to do this sifting step is to be sure to get all the dry ingredients--especially the baking soda or baking powder in these recipes--completely mixed. You can duplicate the sifting action by combining the dry ingredients in a large bowl and mixing thoroughly. The best tool for this is actually just a plain fork from your table. If you notice any lumps (especially likely for the soda and baking powder at times), be sure to use the fork to completely break them up.

How do I know if the frosting has reached "soft ball" stage?
As I noted above, I may not be the best person to ask this, as I don't think I have always achieved it! However, here's a nice, scientific, site that provides perhaps more than you ever wanted to know about this. https://www.exploratorium.edu/cooking/candy/sugar-stages.html

This video actually shows what that "soft ball" should look like.

 https://www.youtube.com/watch?v=Fe0xNKsZ7WA

If you find yourself impatient in watching it (as I did!), that represents the same kind of impatience you'll probably need when waiting for the frosting to really be cooked enough.

Why do I need to do more than just oil the pan? 
 You will probably ask this question only once, before you try to turn a cake out of a pan in one piece! Sometimes, you may get lucky and be able to get a whole cake on to the plate, but much more often, only oiling the pan will result in a large chunk of the cake stuck to the bottom of the pan.

So, if the recipe directions tell you to oil and flour the pan--do it! The best way to accomplish this is to use a small spoon to shake a little flour over the pan. Then tap the pan and swirl it around to get the flour evenly applied. Add more flour as needed and then shake off any excess--you really don't want to have lumps of flour on the crust of your baked cake either.

I have added a NOTE to this recipe that suggests mixing flour and cocoa to use to dust the pan instead of plain flour. This is a relatively new hint for me, and I really, really recommend it for any chocolate cake. I had read about using cocoa instead of flour for doing the dusting, but I thought it might work to just use some of each. Sprinkling the two separately was hard to make the coating evenly distributed--as illustrated below. However, the cocoa did make a much more attractive crust than flour alone. Mixing just a little of both came out to be a really nice application.


Freezing Avocados

The day after the Super Bowl, I stopped in at my local Fareway and discovered they were clearing out some beautiful avocados for 25 cents each. (They also had big bunches of cilantro at 3 for $1 along with their usual good specials.)

Unable to pass up such a bargain, I brought home 12 large avocados and let them soften a few days. After I had made a few batches of guacamole and had enjoyed others in salads, I started to wonder if I could freeze the eight still sitting on the counter, now perfectly soft and ready to eat.

According to the California Avocado Board--who better to know--I could actually freeze these without making them into guacamole. Their instructions are here:

http://www.californiaavocado.com/blog/september-2015/how-to-freeze-california-avocados

Reading through their site, including many of the comments that suggested variations, I decided to try this approach:

1.  Place a small amount of lemon juice in a shallow dish. I used ReaLemon straight from the refrigerator.
2.  Wash each avocado and cut in half. Remove but retain the pit.
3.  Put each half cut side down in the lemon juice. Add the pit and roll it around a bit to get lemon juice on most of the surface.
4.  Cut pieces of plastic wrap about 6 to 8 inches X he width of your wrap. Lay a piece of the wrap across the cut side of one half. Press the pit into the depression from which it came.
5.  Carefully fold the wrap back over the pit, taking care not to pull the wrap away from the first half.
6.  Place the other half back onto the side with the pit and press tightly. Press any overhanging plastic wrap around the sides of the avocado.
7.  Place the wrapped avocados in a freezer weight plastic bag and seal, pressing out as much air as possible. (I put the freezer bag into yet another heavy plastic bag, just to be sure.) Label and freeze immediately.

So, did it work?

Yes, decidedly so.  The last of these kept for several months, coming out of the freezer as well as any purchased frozen avocados. They were perfect for guacamole, avocado toast, etc. Though I didn't slice any of the thawed ones for a salad or other garnish, I believe they would have worked well in that way too, if sliced and served while still not quite thawed.

I have successfully repeated this approach, but they do take a bit more freezer space than just mashing the avocado and stirring in a little lemon or lime juice before packing into plastic bags and freezing them into compact, flat little packages. The secret to either approach is to be sure to package the avocado in an air-tight manner, to keep browning to a minimum.

Monday, October 30, 2017

Fall Harvest Muffins


Many years ago our family put together a cookbook of some of our favorite recipes. Included in the Breads section was one for Pumpkin Apple Streusel Muffins my sister Linda had gotten from a neighbor. She noted that this had long been a family favorite.

It was several years before I got around to trying the recipe, and then it was in early fall, when I didn't yet want to bake up the pumpkins still decorating my front walk. I did, however, have plenty of butternut squash, so I roasted a couple and substituted that puree for the pumpkin.

While I was working on making the recipe my own, I decided the original recipe had a little more sugar and fat than what I was looking for, so I played with those amounts as well. The spices? That relatively large amount sounded just right--and it was. No wonder these were muffins their family looked forward every fall.

In the end, the muffins turned out beautifully, even with my tweaking, and I still like to make a batch or two when I have lots of squash and apples ready to use. Now I just wish I could share a muffin or two with my little sister.

Fall Harvest Muffins

1 1/3 c sugar
1 c roasted or steamed butternut squash, pureed
1/3 c canola oil
2 eggs
2 1/2 c flour
1 T pumpkin pie spice (see NOTE)
1 t baking soda
2 1/2 c finely chopped apple--don't peel


Streusel Topping

4 t softened butter
1/4 c brown sugar--I used dark brown sugar but "regular" light brown sugar is also fine
1/4 c flour
1/2  t cinnamon

NOTE:  If you don't have pumpkin pie spice, you can substitute the following: 1 t cinnamon, 3/4 t ground ginger, 1/2 t nutmeg, and1/2 t allspice. You may also add 1/4 t ground cloves if you like, though I usually prefer not to include this.

1.  Combine the streusel ingredients with a fork, mixing until well blended. Set aside.

2.  Prepare two 12 unit muffin pans by spraying or oiling each cup very well--OR just line each with a cupcake paper.  Preheat oven to 350 degrees.

3.  Combine the sugar, oil, eggs, and squash in a large bowl and beat until smooth.

4.  Sift the flour, pumpkin pie spice, and baking soda together and add to the pumpkin mixture, stirring ust until well mixed. The batter will be very thick.

5.  Fold in the apples and, again, stir only until all the ingredients are well mixed.

6.  Spoon the batter into the prepared muffin pans. Using a teaspoon, lightly sprinkle some of the streusel evenly over the tops of each muffin.


7.  Bake at 350 degrees for 20 to 22 minutes, until the tops spring back when gently touched. Cool for about 5 minutes before removing from the pan.

Makes about 24 muffins.


 Variations:

Use 1 cup canned or freshly prepared cooked pumpkin puree in place of the squash.

Add 1/2 c chopped walnuts to the streusel mix OR stir into the batter with the apples.

Add 1/2 c dried cranberries or raisins with the apples.

Thursday, October 26, 2017

Quick and easy appetizers or coffee break snack


For some of us who prefer savory over sweet, many morning coffee gatherings don't provide a lot of options. So when I was called on to bring a treat for one of these occasions this week, I decided to make these quick little bites to go with some apple slices and a quick bread.

With a local store featuring a dozen eggs for 49 cents and still some onions and green peppers from the garden, the cost was minimal, and they are very fast to make too, nice when you have an already busy morning planned.

Because they also work well if made the night before, you might want to bake them ahead in full size muffin cups, refrigerate, and then have them ready for the family to pop into the microwave for only 10 to 15 seconds--instant protein-charged breakfast!

-->
Mini Egg and Cheese Bites

2 T olive oil
a total of 2 c finely chopped onion, pepper, and mushrooms
½ c chopped cilantro
8 eggs
¼ c flour
½ t baking powder
1 t seasoning salt
1 to 2 t Italian seasoning, to taste
1 t black pepper
1 1/2 c grated Cheddar cheese (5 oz)

1.  Saute the onions, peppers, and mushrooms in the olive oil on medium heat until the onions are golden and all are quite limp. If necessary, add a few drops of water to keep the onions from burning. Add the cilantro about a minute or two before removing the vegetables from heat.

2.  Meanwhile, beat the eggs, flour, baking powder, and seasonings until completely blended. Stir in the cheese and mix until completely incorporated. Fold in the vegetables.

3.  Using baking spray or oil, liberally grease 24 miniature muffin cups. Spoon the batter into the cups.

4.  Bake at 325 for 15 to 20 minutes. Serve hot out of the oven or at room temperature. Salsa is a nice accompaniment.

Variations:

Omit the mushrooms or peppers if you don't care for them, or substitute finely chopped broccoli.

Saute 1/2 c finely chopped onions as in the recipe above. When they are just beginning to turn golden, stir in 1 to 2 cups finely shredded spinach or kale. Cover and cook for about 2 to 3 minutes more, until the greens are just limp.

Substitute basil, thyme, or other fresh herbs of your choice for the cilantro.


Thursday, September 14, 2017

Quick Raspberry Muffins, AND a Quick Bread


This post shows the versatility of many batters.

It started out as just a muffin recipe, one that has been sitting in my draft folder for months. I've made these muffins several times, but this week, with the first of the fall crop of raspberries just really getting up to speed, I was looking for a recipe for a loaf bread--you know, the kind like those ubiquitous banana breads that show up at morning coffees.

Knowing that there are great similarities between the two types of baked goods, I took the muffin recipe and, with hardly any tweaking, had quickly stirred up a couple of loaves of wonderfully moist bread, a little on the tart side but excellent with a little honey butter spread.

The one problem with this as a loaf bread is that the amount of batter is a little too much for a "standard" 9 X 5" loaf pan. As noted below, you can use the standard pan and a "miniature"  3 X 5" pan or a few muffins.

Since I had plenty of raspberries this week, I doubled the recipe and used it for three loaves made in 8 1/2" X 4 1/2" pans.

While the batter is the same, the baking temperature and time will be different. The baking temperature should be 375 degreesfor muffins but only 350 degrees for loaf breads. Unsurprisingly, the time in the oven will also vary, with the muffins and smaller loaves requiring less time than the large loaf.

Whether you want muffins or loaves of bread, this is a wonderful recipe, especially if you have only a cup of raspberries and want to stretch them over several servings. The applesauce can take advantage of the early fall apple crop too. Oh, and note how very little oil is used--a nice bonus!


First, Muffins

Perhaps your picture of a muffin is one of those huge, overly sweetened and garnished desserts masquerading as a breakfast bread at your local coffee place. However, they once were rather plain Jane sides for a light meal of soup and salad or even a fairly healthy after school snack for kids. The nice thing about traditional muffins is that they really do live up to their "quick bread" categorization, and it isn't hard to whip up a batch with little equipment or time.

First, there is the "muffin method," which means you will just stir the dry ingredients in a bowl (no sifter needed), form a "well" in the middle, and then add the liquid ingredients all at once. Stir only until the mixture is just blended, no more, even if there are a few lumps here and there. An ordinary table fork or a wood spoon will do for the stirring, and you really should avoid using any kind of mixture. (Overbeating muffins results in a toughened texture and little "tunnels" in the finished product.) If you have special add-ins like berries, grated carrot, raisins, or nuts, you will fold them in at the very end, again mixing only until the added ingredients are well distributed through all the batter.

One of my least favorite parts of muffins is preparing the pans. You can use cupcake liners, but the muffins often end up sticking to these little papers. My preference is to use a cooking spray (like Spam), but kids who may be helping you sometimes enjoy the messy job of rubbing oil all around all the parts of each muffin "hole."

If you started preheating the oven just before you began putting the dry ingredients in a bowl, it will probably be heated just about the same time that you have the first pan of muffins ready to go. Then it's time to wait maybe 15 minutes or so, and, voila, hot bread to go with the rest of the meal. What could be easier?

For me, raspberries are the "frugal" choice, since I have these in abundance in my backyard garden. However, strawberries, blackberries or raspberries could all be substituted. Even chopped peaches and nectarines could work; with these, I would probably add a half teaspoon of almond extract.

Nuts--walnuts, almonds or pecans--are another nice add-on, either sprinkled over the top or stirred into the batter with the fruit.

Whichever variation you like, do give these quick recipes a try the next time you have a few extra minutes to spend in the kitchen.


Old-fashioned Raspberry Muffins

1 c whole wheat flour (OR use all unbleached flour)
1 c all purpose unbleached flour
2 t baking powder
3/4 c sugar
1 t cinnamon
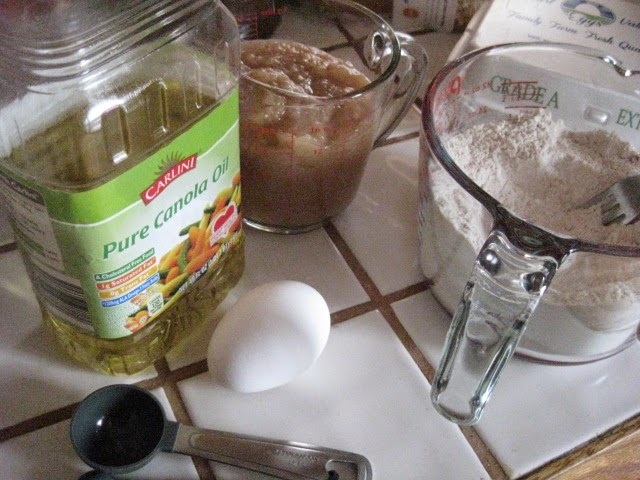
1 1/2 c unsweetened applesauce
1 egg
1 T canola oil
1 c fresh or frozen raspberries; if using frozen berries, thaw and drain the juice (save it for other uses like adding it to a smoothie)
1/2 c coarsely chopped walnuts (optional)

1.  Stir the flours, baking powder, sugar, and cinnamon together in a large bowl until they are well-mixed.

Make a "well" in the center of the mixture. (This means that you will form a depression in the middle of the dry ingredients where you will pour the liquid ingredients all at once.)


2.  Measure the applesauce into a 2 cup measure and then add the egg and oil. Stir together until they are all well-mixed.


3.  Pour the applesauce mixture into the dry ingredients and stir gently with a fork or wood spoon, just until there are no streaks of the flours left. Don't worry if there are a few lumps.

4.  Fold in the raspberries, and walnuts if used. Stir just enough to swirl them evenly through the batter.


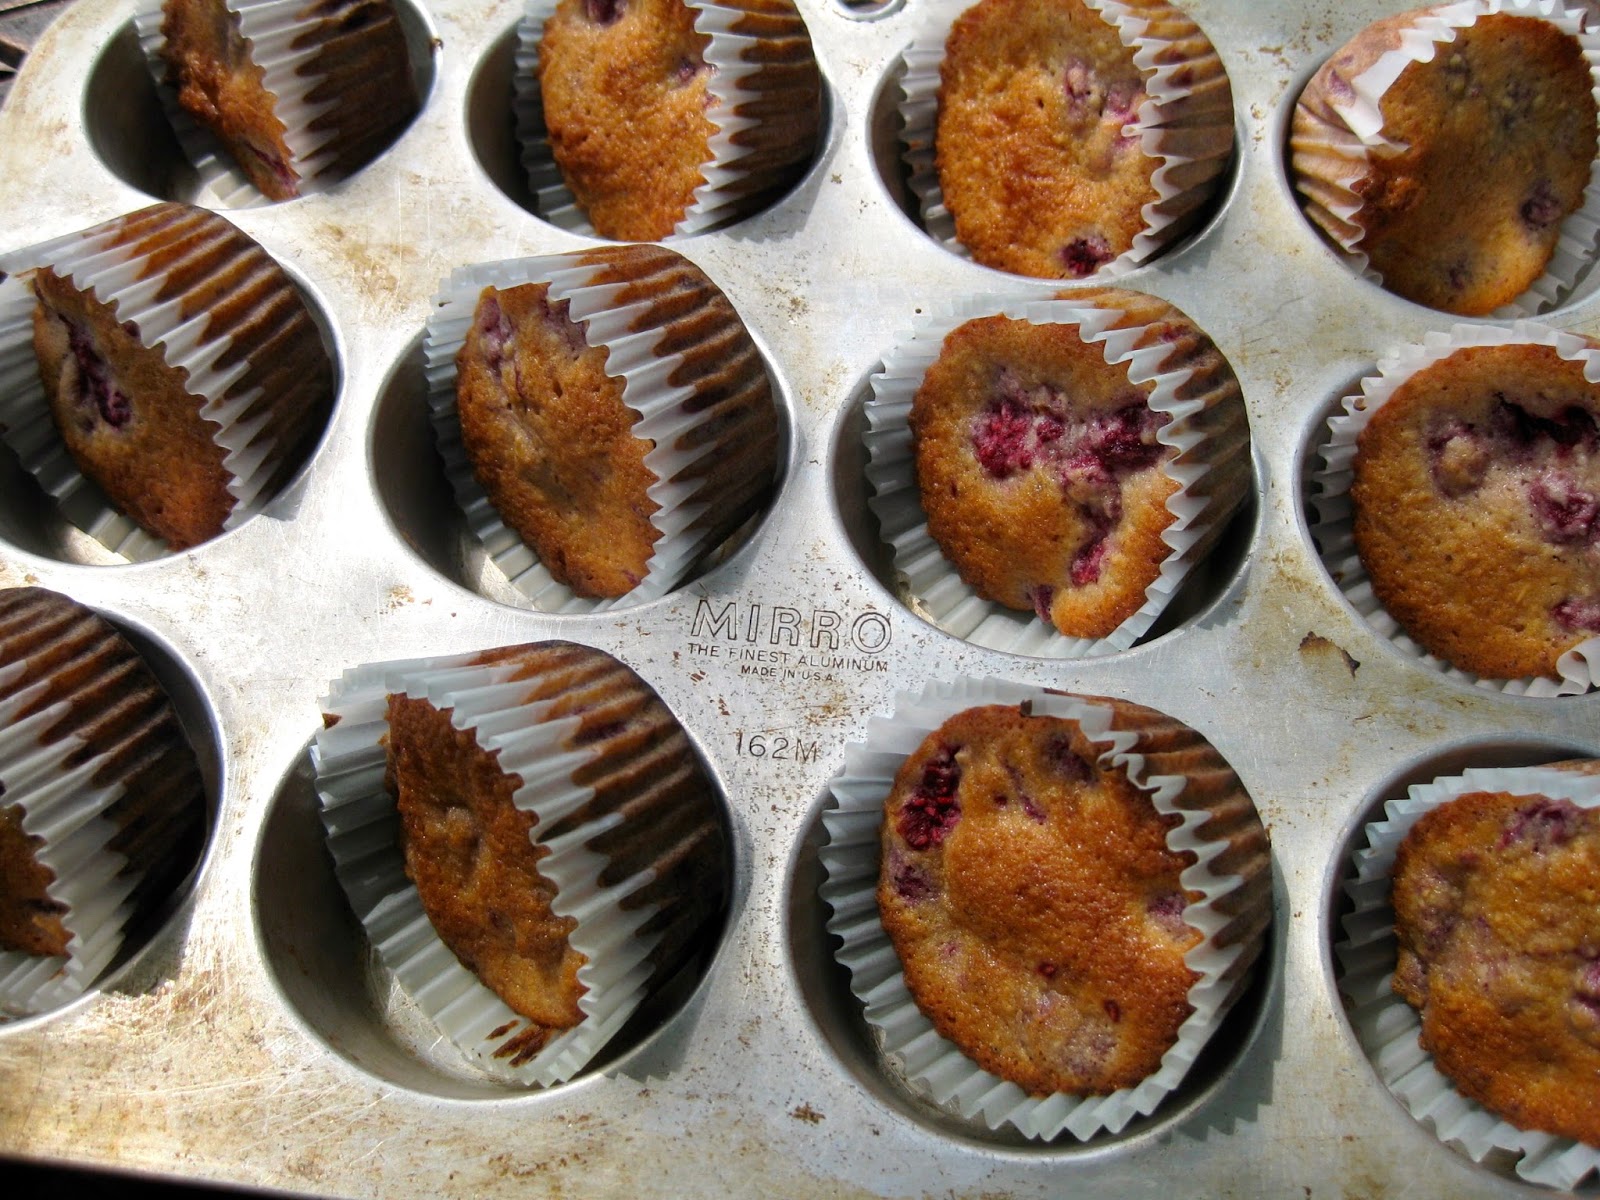
5.  Spoon the batter into well-oiled muffin pans, filling each one about half full, or use cupcake liners. Bake at 375 degrees for 15 to 16 minutes. Don't worry if you do not have enough pans to bake all the muffins at once; just set the batter aside until the first pan is baked.

6.  Remove from oven and leave in the pans for 3 or 4 minutes. Then take the muffins out of the pans and place on a cooling rack. Serve warm or cold.

This recipe makes about 18 muffin. As you can see at the edge of this photo, you can also make some muffins and a loaf of bread, following the baking instructions below.


These go well with butter or cream cheese and perhaps a drizzle of honey or even a bit of raspberry jam. Since raspberries are bit more tart than some other fruits, a sweet topping may be warranted.


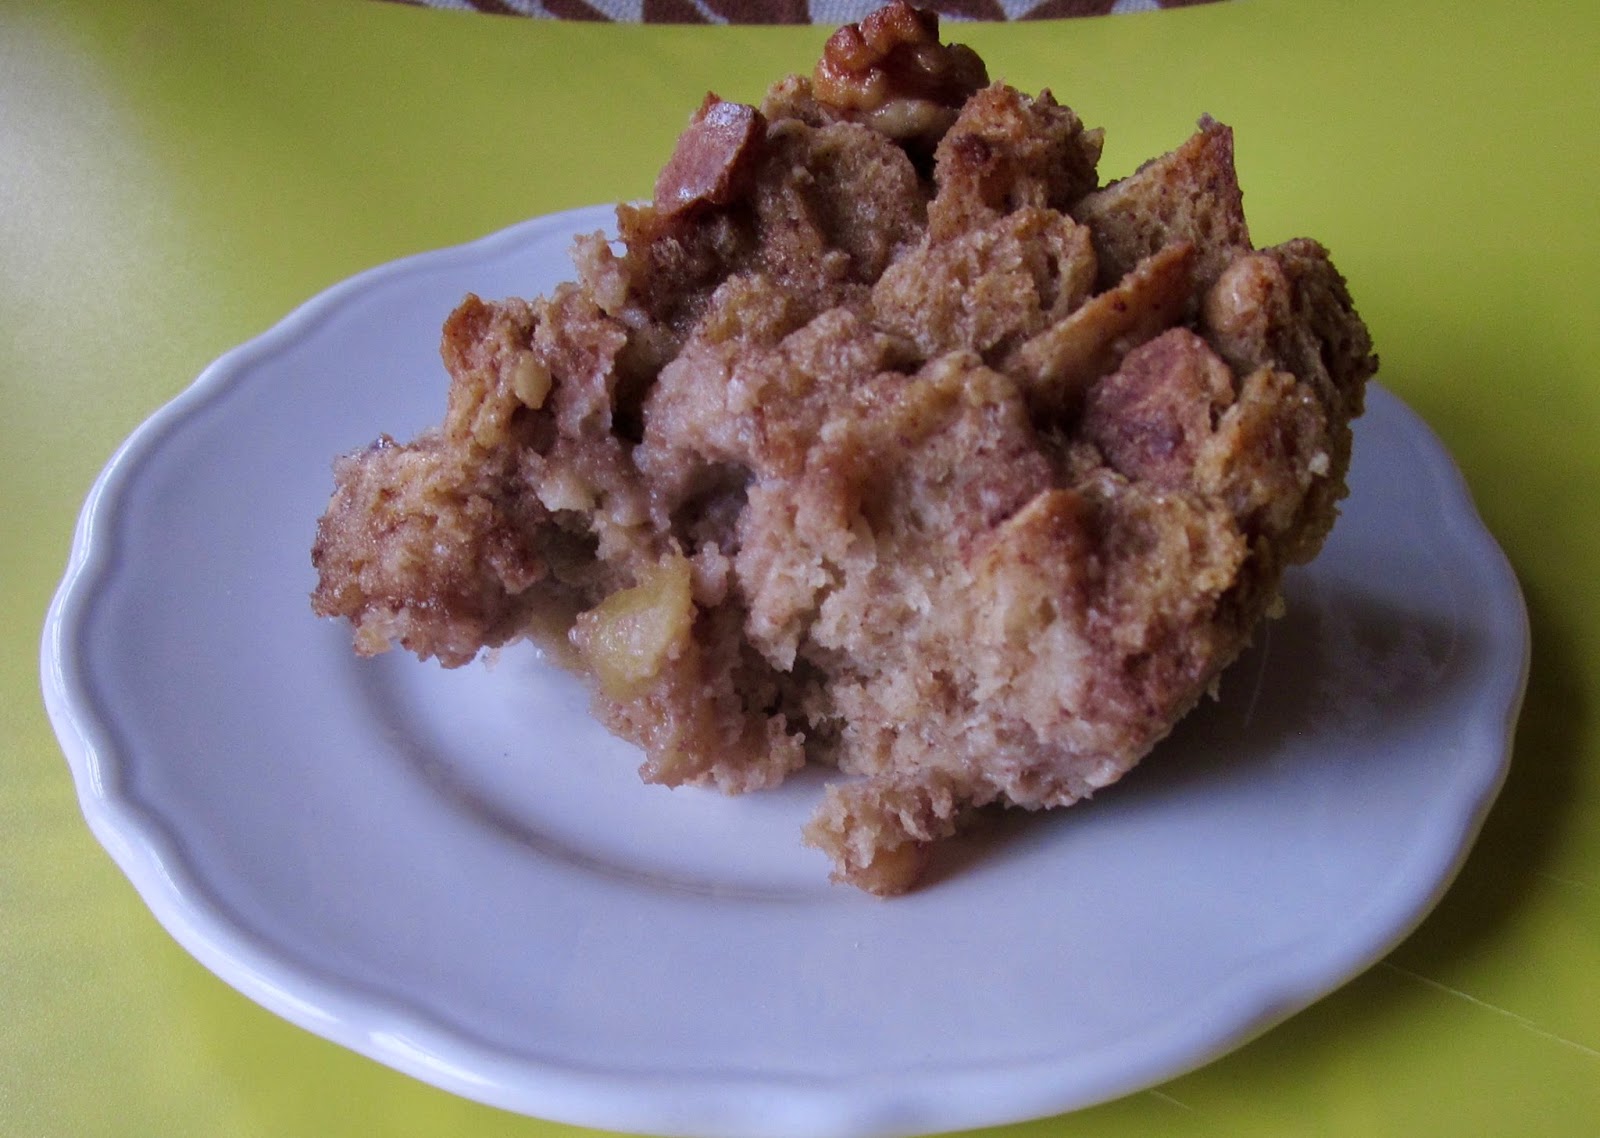
Or...Raspberry Applesauce Bread

Follow the recipe above, through step 4. Bake at 350 degrees, in a well-oiled 9" X 5" loaf pan for about 40 to 45 minutes. If you do this, I would suggest putting some of the batter in a small (3 X 5 or so) pan or making 3 or 4 muffins with part of the batter, as it filled the loaf pan very, very full,  Bake the small loaf or muffins for about 20 minutes. Allow to sit in the pans about 5 minute before turning on to a rack to finish cooling.

As noted above, a double recipe will be enough for three 8 1/2" X 4 1/2" loaves.


Thursday, August 17, 2017

Savory Carrots in the Microwave


This one is easy. 

Friends were coming for dinner and I was planning to serve a garden salad and scalloped potatoes and ham--yup, even in the summer, potatoes served in this old-fashioned way are just the right kind of comfort food. Even with the salad, however, I thought one more brightly colored food would be a good addition, and carrots seemed a just right addition to the plate. 


However, plain old cooked carrots are not always a favorite, so I looked to my little herb garden for inspiration. Using the microwave would keep the kitchen cool, and a little olive oil without any added water would highlight the sweet flavor of the carrots.  
The result was frugal--carrots are reasonable at any season of the year; fast--the simplest of  preps, along with the microwave, took care of that; and fun--trying out fresh herbs from the garden is a great way to experiment with new flavor combinations.

Note that a key to the success of this recipe is to be sure to cover the carrots tightly while in the microwave. A glass casserole dish with its own cover is ideal for this.  


Oh, and be sure to use plenty of olive oil--it's healthy and helps ensure the flavors of the herbs really come through. 

Savory Carrots

1 pound carrots, scrubbed and sliced in thin rounds

1 T olive oil
1 to 2 t chopped fresh basil (or about 1/2 t dried)
1 t fresh thyme leaves (or about 1/2 t dried)
1/4 t dried marjoram (I didn't have any fresh; if you have some, probably a teaspoon would be enough)
sprinkle of garlic powder
salt to taste

1.  Place the carrots in a microwave safe bowl and sprinkle with the herbs and salt.
2.  Drizzle the olive oil over the carrots and toss lightly, just enough to evenly distribute the herbs through the carrots.


3.  Cover tightly and microwave on high about 3 minutes. Stir well and return to microwave for another 3 to 4 minutes, until the carrots are just tender.
Serves 3 to 4.

Saturday, July 22, 2017

"Peanutty Pops"

Years and years, and years, ago, I cut a recipe off the back of a package of Knox Unflavored Gelatine (sic), pasted it to an index card, and have had it as a key recipe ever since. This has always been a favorite of any kids who wander into the house, tasting a lot like the commercially available fudgsicles--do I need to do a copyright symbol for that?

I have updated the recipe and method only slightly, but overall, I share this pretty much as it was shown on the package. Thanks, Knox, for a family heritage recipe!

(Site note: I have been trying for several years to never post an entry without photos to attach. However, this is a special request that I haven't prepared myself today, so here it is for now. Will have to make some just to get some photos I guess!)

Peanutty Pops

1 envelope unflavored gelatin
1/3 c sugar
1 c water
1 c peanut butter
1 c chocolate milk--see NOTE

1. Stir the gelatin, sugar, and water together in a 1 quart measuring cup or similar LARGE bowl, making sure it is well mixed. Allow to sit for about 5 minutes.
2. Microwave on high until the mixture begins to boil and is clear. Be watchful--it will boil up and spill over very quickly! Remove from the microwave and allow to cool slightly.
3. Beat in the peanut butter and then gradually add the chocolate milk. When completely blended, pour into popsicle molds, insert sticks, and freeze.

NOTE:  Mix Nesquik or a similar powder into a cup of milk, as directed on the package. You can also use a package or two of hot cocoa mix prepared with water or, for extra richness, milk.

If you don't have popsicle molds, other small glasses (or bathroom size disposable cups) may be used. If you don't have molds, freeze the mixture until just slushy before inserting popsicle sticks so they remain as upright as possible.

Monday, July 3, 2017

Sour Cherry Cake


Many years ago, I became part of an extended family that celebrated almost every birthday, anniversary, new baby, etc, within the large, geographically close-knit clan. That meant at least monthly get togethers, usually in the evening after the many farmers in the group wer through with their chores. There were sometimes sandwiches but most of the time these were dessert events, and kitchen tables would be covered with rows of 9 X 13 pans full of cakes, tortes, and kuchens.

Many kinds of chocolate desserts were year round favorites and every cook was known for at least one special favorite. As the seasons changed, so did the offerings, with lots of fruit based choices throughout the summer.

Here in the upper Midwest, we can't grow sweet cherries in the backyard, but "sour cherries" or "pie cherries" were often found in country yards and orchards, and the German heritage of this family meant lots of cherry recipes could be found.

One of these is labeled "Grace's Cherry Cake" in Great Grandma's recipe box. However, over the years, because Grandma herself often made the cake when she found out how well liked it was, it began to be called "Grandma's Cherry Cake." That is the name I will be including in the recipe below.

In many parts of the country, fresh "sour" cherries are never available, and even here where the trees still grace many back yards, they are hard to find even at farmers' markets. If you aren't able to go out and pick your own, you can substitute a 15 oz. can of pitted cherries (NOT cherry pie filling!), draining the fruit before stirring into the batter.
x
For those of us blessed with our own (or family or friends') cherry trees, however, this is a wonderfully easy and inexpensive salute to summer. And, since it only uses a cup of cherries, even a small harvest on your tree will make a nice-sized cake.

NOTE: Two changes to the original recipe:
  • This initially called for 4 T sour milk, but plain yogurt works well and is something I always have on hand. If you want to go with  sour milk, measure just under a quarter cup of milk and then stir in about 1 t vinegar or lemon juice. Allow the milk and acid to sit briefly before adding to the batter.
  • The original also called for cake flour, but all-purpose flour works perfectly well instead.


Grandma's Cherry Cake

1 c sugar
1/2 c butter
3 eggs
1/4 c plain yogurt
1 1/2 c flour
1 t soda
1/2 t cinnamon
1/4 t cloves
1 c pitted sour cherries--if fresh, include juice; if using canned, drain before adding

1.  Combine the butter, sugar, and eggs and beat with a mixer until very thick and creamy. Add yogurt and mix well.
2.  Sift together (or stir in a large bowl) the flour, soda, cinnamon, and cloves. Gradually add to the liquid batter and beat just until well blended.
3.  Fold in the cherries.
4.  Pour the batter into a very well-oiled 9 X 12 pan, and bake at 350 degrees for 25 to 30 minutes.

If using a glass or disposable foil pan, bake at 325 degrees.


 5.  Cool and frost with a powdered sugar icing topped with coconut (our family favorite) or nuts.


Thursday, May 25, 2017

Apple Walnut Bread Pudding


Two years ago I posted a couple of "strata" recipes for possible brunch menus, one savory and one sweet. (You can find that post here:  http://frugalfastfun.blogspot.com/2014/05/sweet-and-savory-stratas.html)

Today I was looking for a bread pudding for a dessert that would incorporate apples. Guess what: that sweet strata (very similar to a French toast dish) can be tweaked only slightly to turn into a dessert.

This recipe is quite a bit smaller, as it won't be a main dish as the strata might be. It also has slightly different proportions, with a little more topping in proportion to the bread pudding base, in keeping with its place on the menu as a dessert.

Perhaps most of all, the flavor combination will be changed quite a bit by substituting walnuts for pecans. While these nuts are interchangeable in many recipes, there will be a definite difference in the final flavor. For me, apples and walnuts are a perfect flavor combo, and walnuts are relatively inexpensive this year. However, you can stay with pecans if that is your preference.

As with the strata, this is best served warm--and as a dessert, it really calls out for either ice cream or whipped cream if those are things you enjoy.

A word about Mapleine: 

I grew up with this a part of our kitchen staples. My family never was able to afford "real" maple syrup, so my mother always made the syrup she served over pancakes and French toast with a simple sugar syrup (about 1 1/2 to 2 cups sugar to 1 cup water) flavored with a teaspoon of Mapleine.

For many years I was unable to find Mapleine where I lived, and other brands of maple flavoring never quite came close to real maple syrup. Moving to the Midwest, I did find Mapleine in the stores and have been happy with the current formula, even though the little Seattle company that developed it was bought by the big spice company, McCormick.

Since I still rarely have maple syrup on hand, I make this bread pudding with Mapleine, but I have provided a variation if you have real maple syrup available. Either way, this is a great dessert any time apples are reasonably priced.


Apple Walnut Bread Pudding

Filling
3 c cubed firm bread--may be slightly stale or even dried
4 eggs
1/3 c brown sugar
1/2 t Mapleine or other maple flavoring 
1/2 t vanilla
1 c milk, or a bit more (may use evaporated milk for added richness)
1 t cinnamon

Topping

3 T butter
1/3 c sugar
2 c finely diced apples--no need to peel
1/2 t Mapleine or other maple flavoring
1 c coarsely chopped walnuts

1.  Spread the bread cubes in a well-greased 9 inch pie pan or 9 inch square pan.

2.  Beat the eggs, sugar, flavorings, cinnamon, and milk together and pour over the bread.


If the bread is not completely covered by the egg mixture, add a small amount of milk and press the bread cubes more firmly under the egg mixture.

3.  Melt the butter and sugar together in a heavy pan and add the apples.


Cook over medium to high heat, stirring often, until the apples are tender and the mixture is starting to caramelize.


4.  Remove from heat and stir in the Mapleine and walnuts. Pour the apples evenly over the bread mixture.

5.  Cover tightly and refrigerate for at least four hours.


6.  Remove the pudding from the refrigerator. Preheat oven to 325.  Uncover the pudding and bake for 30 to 40 minutes, until a knife inserted near the center comes out clean.


NOTE: if you are using a lightweight pan, like the disposable aluminum pie pan shown in the pictures, put the pan in a slightly larger pan or oven-safe bowl with water to just below the top of the bread pudding. This will ensure that the bottom and edges do not brown too much before the center is completely baked. Remove from the oven carefully when done, to avoid getting any remaining water into the pudding.

Allow to sit for 5 to 10 minutes before serving.

Variations:
Substitute 1/3 cup maple syrup for the brown sugar and maple flavoring. Reduce the milk to about 3/4 cup, adding more only as needed to completely cover the bread. Using maple syrup instead of maple flavoring in the apple topping, however, does not result in nicely caramelized apples, so I would not try any substitution of syrup here.

Add 1/3 cup water to 1/2 cup dried cranberries or raisins and microwave for about a minute. Cool slightly and then add to the eggs and milk mixture before pouring over the bread in step 2. 


Saturday, April 1, 2017

Maple-y Apple Bread Pudding


Sometimes, "leftovers" can become a wonderful base for a new dish. That is especially true of a really good bread pudding.

For the best bread pudding, you need really good bread. Sorry, soft and squishy "WonderBread" types won't work too well, at least for the bulk of your pudding.

No, instead you need some fairly firm, preferably whole or multi-grain bread that was a little chewy when fresh. And then you need to let it "age" a bit. This is a great place to use up that extra loaf of bread you ended up with when you got too exuberant in making a big batch of the real homemade stuff. Or maybe your family doesn't carry about the ends of the bread or the "artisan" loaf you bought for sandwiches had ends too small to make really adequate sandwiches. These are the ideal components for making today's dessert, a rich and creamy pudding that certainly doesn't seem at all related to stale bread.


So, while this is a pretty easy dessert, it does take a bit of preparation time, especially in the gathering of the bread that is the basic ingredient. For more on stale bread, see the notes below the recipe.


The other plan ahead part of this dish is that it should be prepared at least several hours before baking, to allow the flavors of the custard to thoroughly infuse the bread. That actually can be an advantage, since you can make this up to a day or two ahead, cover tightly, and keep refrigerated until an hour or so before planning to serve.

So now to the recipe.  Make this when you can get good apples at a seasonably reasonable price, and you'll have a fairly budget-friendly dessert you'll be proud to serve friends and family. It also is a little healthier than many desserts, with good amounts of protein and calcium from the eggs and milk.

This recipe makes enough to serve 10 to 12, so it is easily halved. For good measure, I've even included those amounts, along with some hints to make this even more of a budget-friendly dish.

Maple Flavored Apple Bread Pudding

Custard

6 c cubed firm bread--either slightly stale or dried (in the oven at 200 for about 20 to 30 minutes)
8 eggs
2/3 c brown sugar
1 t Mapleine or other maple flavoring
1 t vanilla
2 c milk--may need a bit more
2 t cinnamon

Apples

1/2 c butter
1/2 to 2/3 c sugar, depending on apples and your preference
4 c finely diced apples--no need to peel
3/4 t Mapleine or other maple flavoring
1 to 1 1/2 c coarsely chopped walnuts

1.  Prepare the apples. Melt the butter and brown sugar together in a heavy pan and add the apples. Cook over medium heat about 15 minutes. Stir in the walnuts and cook another 10 to 15 minutes until the apples are tender and the mixture is starting to caramelize. Remove from heat and stir in the Mapleine. Allow to cool a few minutes.


2.  While the apples are cooking, spread the bread cubes in a well-oiled 9 X 12 inch pan or baking dish.

3.  Beat the eggs, sugar, flavorings, cinnamon, and milk together.


Pour this mixture over the prepared bread, pressing the bread cubes firmly under the liquid. If they are not all covered, pour a little more milk over the top and stir in gently.


4.  Cover tightly with foil and refrigerate for at least four hours or overnight.

5.  Remove the pudding from the refrigerator. Preheat the oven to 325 degrees. Bake for 20 minutes while covered. Remove the foil and return to the oven. Bake another 30 to 35 minutes, until a knife inserted in the center comes out without any liquid clinging to it.

(If using a disposable pan as shown in the pictures, the pudding will cook more evenly if you use two pans, one inside the other, with a few tablespoons of water between. Set the pans on a large baking sheet. This will ensure that the edges will not get too brown before the middle is done.)

May be served warm (with a little ice cream melting over the top?) or cold. Serves 10 to 12.

NOTES

About "Mapleine"

I don't do too many product placement comments, but my mother used Mapleine all through my childhood, and I have continued including it in my meals over the years. Sadly, it is harder and harder to find this in most grocery stores. Here in our city, the local Fareway store still stocks it--thank you Fareway!--and you can find it on the internet, on Amazon, Walmart and other suppliers.

In case you don't believe me when I say this is so much better than any other maple flavors, just check out the reviews here:

https://www.mccormick.com/spices-and-flavors/extracts-and-food-colors/extracts/mapleine-imitation-maple-flavor

Of course, if you want to make this recipe with real maple syrup (NOT the Mrs. Butterworth type substitutes), just substitute maple syrup for the brown sugar and start with perhaps a quarter cup less milk.


About "Stale" Bread

A particularly good way to save money on food is to cut down on waste...well, duh.

However, it sometimes seems as though we can never quite finish a loaf of bread or bag of hot dog buns before they get too stale (or, worse yet, moldy) to use. Just a little proactive thinking can keep you from throwing out perfectly good food, with very little extra effort.

First, check out this site for some ideas on making bread crumbs:

https://frugalfastfun.blogspot.com/2012/07/a-frugal-fast-and-cool-pie-crust-and.html

If instead you want to make dried bread cubes, for use in a bread pudding, as croutons, or even for stuffing, here's a quick "tutorial" that may help.

Step one:  Pull the bread out of whatever wrapper it's in and cut or tear into pieces about an inch square. Don't worry if they aren't totally even, just approximately the same size.

Spread the bread cubes in single layers on a baking sheet. You could just set this aside (in an unused oven for example) for a couple of days until dried, but the flavor is usually better if you toast the cubes in a 180 degree oven for 20 minutes to half an hour, until each piece is well dried. Do be sure to dry thoroughly before putting into a tightly closed container. If they are not dry enough, they will get moldy! You can keep these on the shelf for a few weeks if you aren't ready to use them right away.

If you are planning to use all of the bread for stuffing or croutons, you could sprinkle with desired herbs before toasting. Just stir a few times while drying to be sure that the seasonings are well mixed. If you take this approach, you will probably want to use the bread cubes within a day or two, to preserve the flavors at their best.

Half a recipe

This makes a 9 X 9 square inch pan. Use these amounts, following the same method as in the recipe above.

3 c bread
4 eggs
1/3 c brown sugar
1/2 t Mapleine
1/2 t vanilla
1c milk
1 t cinnamon

3 T butter
1/3 c sugar
2 c finely diced apples
1/2 t Mapleine
1/2 to 3/4 c coarsely chopped walnuts

And, finally, some cost cutting changes, when the budget is really tight

Cut the butter back (in the larger recipe) to only a third of a cup--or even less, though the richness will be affected.

Reduce the amount of walnuts--or eliminate completely. This will change the flavor quite a bit, but it is also a possibility if anyone is allergic to tree nuts.

Make this when foods are seasonally well priced--apples in the fall, eggs at various times in the year when on sale--like right before Thanksgiving, Christmas or Easter when stores are enticing home bakers to stock up.


Thursday, March 16, 2017

Chocolate Butterscotch Chip Bar Cookies


All of us have had those times when we have volunteered to bring cookies for a potluck or snacks for some meeting, only to realize the night before the event that we really aren't in the mood or don't have the time to bake even the simplest drop cookies. So we shift our thoughts to a bar cookie recipe or reach for that box of brownie mix we keep for "emergencies."

That was where I found myself this week. Big plans for making a batch of a favorite butterscotch and chocolate chip oatmeal cookie. All the ingredients ready and even some promises made for what I'd be bringing. And, unfortunately, not a whole lot of time to make the size batch I'd need.

It didn't take much tweaking to alter that old recipe, turning it into a form that took less than 20 minutes to make, from getting out the bowl to putting the pan in the oven. The result was a bar cookie that was a little chewy yet with a bit of a crisp crust--a little unexpected, since most of these recipes tend toward the chewy or "cake-y" side.

This is yet another of the ways that I have found to use mayonnaise in baked goods. Compared to the cost of butter, this (especially when using a store brand of mayonnaise) reduces the cost of the cookies substantially. With the complexity of flavors of all the ingredients, there will be not a hint of this unusual ingredient in the final product.

Oatmeal Chocolate Chip Bar Cookies

1 1/2 c brown sugar, packed
1 c real mayonnaise
2 eggs
2 t vanilla
1 t almond flavoring
2 1/4 c flour
2 t cinnamon
1/2 t nutmeg
1/2 t ground ginger
2 t baking powder 
2 ½ c quick (not instant) or rolled oats
1 ½ c chocolate or butterscotch chips—or mixed half and half

1. Combine the mayonnaise and brown sugar and cream until well blended. Stir in the eggs, vanilla, and almond extract, and continue beating until light and fluffy.


2. Sift together the flour, baking powder, and spices, and gradually add to the sugar and butter mixture.

3. When well blended, stir in the chips and mix thoroughly.


4.  Add the oatmeal, a cup at a time, making sure the batter is evenly mixed.

5.  Spray or oil well a jelly roll pan. Pat the dough evenly in the pan, making sure that the edges are at least as thick as the center.

6.  Bake at 325 degrees for about 25 to 30 minutes, until the center springs back when you press lightly on it.

This recipe makes about 48 to 60 squares, depending on your preferred size for cutting.


Special notes:

If you have a glass or insulated pan, use it instead of lighter pans, to be sure the edges don't bake before the center is done.

These are easiest to cut while still quite warm.  A hint I learned a long time ago for cutting brownies, bar cookies, and sheet cakes is to use a plastic, disposable knife. These not only are safe for your nonstick pans; they also cut cleanly and often more easily than a sharp knife.


Sunday, March 12, 2017

Cake in a Saucepan


Some of our old family recipes go back to generations of frugal Midwesterners and further to New England roots, but others have even more interesting back stories. The origins of this cake fit in that latter category.

Back before food stamps, "commodity foods" were distributed to clients of our county's Department of Social Services. With one of their social workers in the household, I had access to the recipe folders  prepared to help recipients use the fairly significant amounts of the basic foods distributed each month.  Peanut butter and oatmeal (along with processed cheese, dried egg powder, etc.) were very commonly included, so it was important to suggest ways to use up these otherwise bland foods.

It was in one of these recipe flyers that I first found a recipe for an oatmeal cake with a broiled peanut butter topping instead of frosting. The cake was moist, flavorful, and easy to prepare, so I made it often for our family. In the years since, I have worked out several variations of what we fondly came to call "welfare cake" but none of these had included chocolate.

One of the things I have always liked about this cake is the ease of making it--in a saucepan no less. Quick to make, quick to clean up, this was a natural for a mid-week dessert for a group of hungry kids.

While not at all a "health food," the somewhat reduced sugar and fat amounts along with the increased protein and fiber from the oatmeal and peanut butter help justify serving it at the end of a simple sandwich and salad meal. Probably the longest part of the prep is waiting for the oatmeal mixture to cool before adding the eggs, but you can use that time to mix together the peanut butter topping ingredients. Overall, a nice moist cake that is good warm or cold.

Chocolate Oatmeal Cake with Peanut Butter Topping

1 1/2 c water
1 c rolled or quick (not instant) oats
1/3 c butter
1 c semisweet chocolate chips
1/2 c sugar
3/4 c brown sugar, packed
2 eggs
1 1/2 c flour--either unbleached or whole wheat
1 t baking soda

1.  Combine water, oatmeal, and butter in a large saucepan. Bring to a boil and cook about 1 to 2 minutes.


2.  Remove from heat and add chocolate chips, stirring until the chips are completely melted. Set the mixture aside to cool slightly. (Prepare the Topping while this is cooling.)


3.  When the oatmeal is cooled to lukewarm, stir in the sugars and eggs and beat well.


4.  Sift or mix the flour and soda together and add to the rest of the ingredients in the saucepan. Stir just enough to be sure the mixture is completely blended.


5.  Pour the batter into a well-oiled 9 X 13 pan and bake at 350 degrees for about 25 minutes. (If using a glass pan, heat the oven to only 325 degrees.)

6.  When the cake is just done--a toothpick inserted in the center should come out without any liquid batter adhering to it--remove it from the oven and quickly pour the Topping over it, spreading it as evenly as possible. You will need to spread it back toward the middle, as the tendency will be for the very liquid topping to flow away from the higher center to the edges.


7.  Return the cake to the oven, on the highest rack, for about 5 to 10 minutes, until the topping is beginning to bubble around the edges.

Allow to cool well before cutting.


Topping
1/2 c sugar
1/4 c water
1/2 c peanut butter

1.  Combine the sugar and water in a large bowl or 2 cup measuring cup and microwave, covered, for about 3 minutes, until the sugar is totally dissolved and the mixture has come to a rolling boil.


2.  Remove the sugar mixture from the microwave and stir in the peanut butter. Stir carefully, as the syrup is very hot.  As you can see, it's really kind of ugly at this stage; that's okay!


Variation:

Sprinkle with chopped peanuts while the topping is still warm.