Thursday, March 17, 2016

"Red Flannel Latkes" (aka Vegetable Pancakes)


I love to start a weekend off with a savory breakfast. Skip all those sweet breads and pastries; just give me a veggie-filled omelet or scrambled eggs, hash browns (the real kind, not those greasy patties), and salsa and I'm set for the day.

My refrigerator had been filling up this week with small portions of various fresh vegetables, and I wanted to empty it out so I could justify going to the store for more. An old standby for this kind of day is my endlessly adjusted recipe for potato pancakes (latkes). Today I had some roasted beets that needed to be used up too, so I decided to do a variation on what my Mom often made as a supper dish, Red Flannel Hash. The result was a plate of very colorful patties with a very savory taste.

The very brightness of these patties could be a little off-putting for some, but they might just strike a fun chord for kids used to lots of artificially bright snack foods. As noted below, it is easy to vary the mix of vegetables so you could just cut back a little (or a lot) on the beet component. Or, if you are really ambitious, for a Christmas brunch, make these beet latkes and then make another batch with mostly spinach and/or broccoli, for both red and green options.

What I have included below is a photo of the vegetables I used today, with the recipe free-form enough to accommodate a large number of variations. Obviously, your choices will determine the overall nutritive value of the breakfast, but consider the kinds of nutrients found on this single plate of food:  antioxidants, Vitamins A, C, D (the dry milk powder), protein, "good" fat (olive oil), and fiber. And while there will be some bit of oil in the preparation, the overall calorie load is still quite low.


Another good thing about these patties is that you can often include vegetables that may not be "acceptable" on their own to one or more family members. Start slowly, with mostly potatoes, onions, and some carrots, but then slip in a little spinach or broccoli. (Or, if the kids like broccoli but not spinach, include some of each, so that the "green" will just seem to be their usual favorite.) Increase the amount of carrots or grated butternut squash gradually too. Serve these up with ketchup as you would French fries, and don't worry about making them very low salt, at least at first. That too will come gradually as the flavors of the vegetables become more familiar--and liked--over time.

This is really a time when a processor is a wonderful kitchen tool. However, if you don't have one, you could use an old-fashioned grater for most of the vegetables and finely dice things like peppers, onion, or celery. The key is to keep the pieces small enough that all the vegetables will blend their flavors well.

A note on the other ingredients:  The corn meal provides body for the mix and will absorb some of the liquids from the grated vegetables. The dried milk powder performs a similar function. If you don't keep this on hand, you could substitute half a cup of unbleached flour, though the nutrition (and flavor) will not be as good.

Now it's time to try this out. Check out the vegetable crisper and put together your own variation on these savory patties, whether for a weekend breakfast or a midweek supper. Either way, you may find this to be a new favorite go-to recipe for getting veggies into even the most intransigent eaters.


Red Flannel Latkes

4 c mixed shredded vegetables--be sure to include at least one potato (for body) and 1 medium onion and, for the red flannel version, at least one large beet
1/2 c yellow corn meal
1/2 c dried milk powder
1 t seasoning salt, or to taste
1 t each basil and oregano, or your own favorite herbs
4 eggs
olive oil

1.  Shred vegetables in a processor or grate and dice as needed. When measuring the four cups, press the vegetables lightly in the measuring cup.

2.  Stir the corn meal, dried milk powder, and seasonings into the vegetables, blending well. Set aside for about 15 minutes or so. This will allow the dry ingredients to absorb some of the juices from the processed vegetables.
3.  Add the eggs to the vegetable mixture and stir well.
4.  Pour about a teaspoon or so of olive oil into a cast iron or other heavy non-stick skillet and heat on medium high until the oil is just shimmering.

5.  Drop tablespoons of the batter into the pan and flatten with the back of a spatula. Cook until the bottom is well browned, about 3 to 4 minutes, and turn. Flatten again--you want to be sure the centers are cooked through before the outsides are too brown. If necessary, turn the heat down a bit.
6.  Remove the patties from the pan, placing on paper towels to drain if desired. Add another teaspoon or so of oil and add more batter. Repeat these steps until all the batter is used.

This serves two to four, depending on the number of side dishes being served with the patties.

Possible Vegetables to Choose

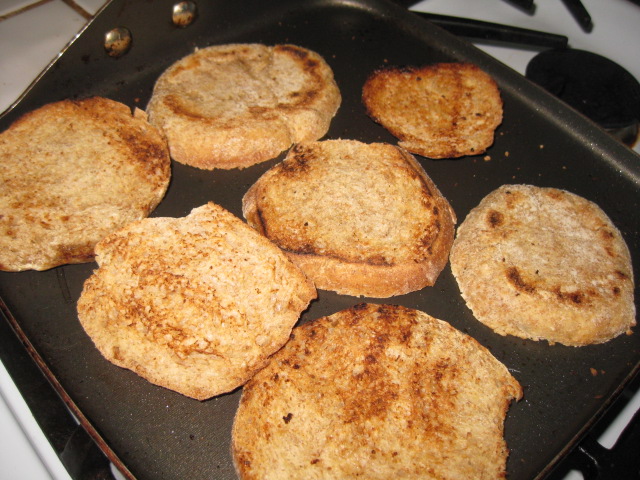
Here is a plate of latkes made with a mix of potatoes, zucchini, and carrots: 


Unless otherwise noted, the vegetables you choose should be raw rather than cooked
  • onions--a must!
  • potato--especially helpful in holding the finished product together; use raw potatoes or firm, boiled or baked potatoes
  • carrots--these can be raw or cooked but still firm
  • peppers--bell peppers, poblanos, green chilies, whatever you like and have on hand
  • celery--probably better to dice rather than put through the processor; at least with mine, the processor tends to leave long strings that don't soften on cooking
  • cabbage--may be a bit surprising, but this is a wonderful addition for both sweetness and depth of flavor
  • broccoli
  • cauliflower
  • zucchini or summer squash--you may need to drain these after shredding if they are a large part of your vegetable mix
  • raw winter squash, grated
  • greens of all kinds--spinach, kale, collards, etc.; just make sure they are well chopped or shredded
  • parsley or cilantro
  • garlic
  • roasted beets

Vegetables I haven't found especially workable, but you might have better success:
green beans
peas, either in the pod or not
corn
tomatoes--way too juicy to work well

I have never tried asparagus, cucumbers or eggplant and don't plan to, for a variety of reasons. Haven't tried kohlrabi either, but I would guess that would be fine. 


Happy St Patrick's Day Cabbage


I find it very interesting to see how we Americans take festive or historical days from other cultures and give them our own spin and importance, Cinco de Mayo for example.
Today we celebrate another of these adaptive holidays, St. Patrick's Day. While lots of people will be celebrating with sometimes raucous parades and lots of green beer, some of us frugal types will relish the opportunity to buy some of those "Irish staples"--cabbage, potatoes and corned beef--at their lowest annual prices.

Several years ago, the New York Times carried an article that praised the lowly cabbage and gave some suggestions for using this versatile vegetable. Before we get to the many options I have here on the blog, you might want to check that item out:
http://www.nytimes.com/2011/01/12/dining/12vege.html?ref=dining

For now, I have once again stocked up, buying as many heads of cabbage that I could store in my refrigerator and garage "root cellar." Kept cold, cabbage will stay fresh and ready to eat for weeks, so I can be assured of a supply for salads, soups, and more.

Use the Search box above to find all the many entries for cabbage-containing dishes I have included over the years. Or just go to one or more of the few selected links below:

Cole Slaw
First, whas it probably the most frequent use for cabbage today, cole slaw. The following post includes the non-creamy kind of slaw with no mayo. It's a great piquant side for sandwiches or "casserole" main dishes.
http://frugalfastfun.blogspot.com/2014/03/the-best-cole-slaw-ever.html

 
Maybe this year you could make corned beef sandwiches (on rye of course) with a side of cole slaw instead of the "traditional" corned beef and cabbage that many people really don't like.


Soup
Another old standby for cabbage is as an ingredient in vegetable soups. Here, the variations are endless, and you could start by just adding finely shredded cabbage to your favorite soup recipe, along with the vegetables that need up to an hour of cooking. Use a little if you are trying to introduce your family to this "new" addition and more as you begin to find out how much added good flavor the cabbage provides.

The soup found at the following link is a surprising one if you think of cabbage as only a smelly, slimy side your mother forced you to eat. Here, the combination of squash, cabbage, and onions results in a flavorful soup that will have everyone coming back for seconds. As a vegan option with lots of bright-colored vegetables, it's a nutritious power house as well.
http://frugalfastfun.blogspot.com/2015/03/sweet-and-simple-vegetable-soup.html

This Potato Soup post includes cabbage only down in the bottom list of variations; I think I would move it up to a more prominent place if I were to write the entry again. In fact, I just made the clam chowder variation this week with several cups of finely shredded cabbage included, and it was a winner.
http://frugalfastfun.blogspot.com/2015/02/basic-potato-soup-with-lots-of.html

And then there is this soup, made with lots of "leftover" vegetables and beans. While the recipe calls for just a cup of shredded cabbage, I almost always include at least double that amount. Again, as noted in the comments, this is just a starting guide for making wonderful soups using the foods you have in your kitchen at any given time.
http://frugalfastfun.blogspot.com/2014/05/rainy-day-soup-weather.html

No beans? Then let's try barley as an added, vegetarian, protein boost.
http://frugalfastfun.blogspot.com/2014/05/black-bean-and-barley-vegetable-soup.html


Sides
Not ready for soup? How about this?
http://frugalfastfun.blogspot.com/2015/04/curried-cabbage-and-carrots.html


Well, you get the point. Cabbage is something that can be a great addition to your menus, now or any time of year.  So pick up a head or two and start shredding away!


Still to come:  Stuffed Cabbage! With all these wonderful outer leaves, I am ready to spend the weekend preparing several batches to pop in the freezer. Watch for it here on the blog soon.

Monday, March 14, 2016

Raspberry Cranberry Preserves


Sometimes I include recipes here that barely fit my overall blog objective, and today's entry is one of those. It is not particularly fast and, if you don't have raspberries in your yard or in the gardens of friends or family, it is unlikely this would ever fit the "frugal" definition. (And I did have a lot of frozen cranberries because I had been able to get several bags on sale for 39 cents each after the last holiday season, keeping my overall cost very low.)

 It is fun, however, to be able to produce jars of this sparkling and slightly tart spread that goes well on toast, waffles, or as a side to a pork roast or other meats. It is also a superb ice cream topping, as the tartness combined with the ice cream really emphasizes the fruit flavor.

Even though neither raspberries or cranberries are in season right now, my freezer needed some clearing out, and so cooking some up into an almost jam was a perfect wintery afternoon project.

Probably the trickiest part of this recipe is the need to be sure to stir the cranberries and sugar pretty constantly in the first 10 minutes or so, because the sugar can quickly burn if left unattended. Use a good heavy pan if you have one.

While the amount of sugar may seem large, remember that this is a kind of jam, and many recipes of this kind (especially those with commercial pectin) have more sugar than fruit. While I would never call these "low sugar" preserves, the sweetener amount is lower than for most mixtures of this type. And remember, both cranberries and raspberries are very tart fruits.

As with other jams, the best test to see if the mixture has "jelled" is to put a small plate in the freezer and then drop a teaspoon or so of the hot fruit mixture on the plate. If running your finger through the middle of the jam leaves a clear path, the preserves are done.

Raspberry Cranberry Preserves

6 c raspberries, fresh or frozen without sugar
3 c cranberries, fresh or frozen
5 c sugar, divided
1/2 t cinnamon
1/2 t cardamom
1 t ground ginger
1/2 t nutmeg
2 T frozen orange concentrate--do not dilute

1.  In a large bowl, stir 3 cups of sugar into the raspberries and allow to sit for about an hour.


2.  Meanwhile, add the remaining 2 cups of sugar to the cranberries in a heavy, deep pan--the final mixture will boil up, so be sure your pan is large enough. Turn the burner to medium low and begin cooking the cranberries and sugar while stirring pretty constantly. In about 10 minutes or so, the sugar may be completely dissolved and the cranberries will begin "popping." You may turn the heat up to medium high at this point to hasten the overall process.

3.  Continue cooking the cranberries until all the berries have popped and the mixture is beginning to thicken, about 5 or so additional minutes. Pour in the raspberries and sugar mixture and continue cooking on medium high until the mixture has returned to a rolling boil.

4.  Stir in the spices and orange concentrate and continue cooking for another 20 to 30 minutes, until the mixture sheets off a spoon or until a finger or rubber spatula drawn through a few drops put on a chilled plate hold their shape.

5.  Pour into hot jars and seal. If you plan on keeping this for an extended period, process in a hot water bath canner for 15 minutes.

This makes about 4 to 5 pints.

Variation:  If desired, stir in one to two teaspoons of vanilla or almond extract after taking the preserves off the heat.


-->

Old-fashioned Bran Muffins


When preparing to make some quick bread for a morning coffee, I started my usual online search, looking for muffins using the apple butter and raisin bran that I wanted to use up. While there were lots of recipes using these, almost all were unfortunately much higher in sugar and fats than I wanted.

Not that I should have been surprised.

I'm not sure when it started, but the lowly muffin has evolved over the past decade or so from pretty basic and sturdy individual breads to be a side for unpretentious meals into giant sweets that often differ from cupcakes only by having a streusel type topping instead of frosting. Nothing I saw in my search was very inspiring.

Fortunately, I still have my recipe card file, pretty frozen in time, with very few entries added in the past 5 to 10 years. There, in the large bread section, was a subtab for "Muffins, Biscuits, Cornbread." These were the decades old recipes I had used over and over for after school snacks for my kids.

One of the most used recipes was one cut off the back of a raisin bran cereal box and taped to pretty now battered index card. It was a good basic recipe but without the apple butter I wanted to use up.

No problem. As usual, I ended up playing with the original recipe and ended up with muffins that were a hit with kids and adults. They aren't covered with lots of streusel and they have only a couple of tablespoons of oil, but they are tasty snacks you can feel pretty comfortable giving to the kids as a filler food while they wait for dinner.

Apple Butter Raisin Bran Muffins
 
2 c raisin bran
¼ c raisins
1 c water and ½ c dry milk powder (OR see Substitutions below)
½ c apple butter (OR see Substitutions below)
1 egg
¼ c sugar
2 T oil
1 1/4 c flour
1 T baking powder
1 t pumpkin pie spice
¼ c walnuts

1.  Stir the raisin bran, raisins, water and dry milk powder in a large mixing bowl and set aside for 20 to 30 minutes.

2. Fold the apple butter, egg, sugar, and oil into the raisin bran mix and beat until evenly blended.


3.  Sift the flour, baking powder, and pumpkin pie spice together and gently sift it into the liquid ingredients. Add the walnuts and then mix only enough to moisten all the dry ingredients. Don't overbeat.


4.  Drop the batter into well-oiled muffin pans and bake at 375 degrees for 15 to 18 minutes for large muffins, 12 to 15 minutes for mini-muffins. Allow to cool a minute or two before removing from the pans.

This recipe makes 12 to 15 full-sized muffins or 12 full-sized and 12 mini-muffins. It probably would make about 4 dozen mini-muffins though I haven't yet made the entire recipe into the smaller muffins.

Substitutions:

Instead of dry milk and water, use 1 c milk, skim, 2% or whole, whatever you have.
Instead of apple butter, substitute applesauce and increase the amount of sugar to 1/2 cup. Increase the amount of pumpkin pie spice to 1 1/2 to 2 teaspoons, depending on your preference for spiciness.


Some general muffin hints

As noted, muffins need a gentle hand once the dry and moist ingredients are mixed. Overbeating can lead to tougher breads and sometimes relatively large "tunnels" in the muffins that are not too attractive.

If you don't have enough pans to bake the muffins all at once, don't worry. You can let the remaining batter sit on the counter while the first batch is baking.

Be sure you have oiled (or sprayed) the pans well. With the low fat content here, the breads are going to be much more likely to stick if you don't do this. You can use cupcake liners if you'd like, but the muffins are more likely to stick to the papers than cupcakes might--for the same reason that there is less fat in the batter. If you'd like, you can use the cupcake liners and then spray those lightly with non-stick spray.


Apple Oatmeal Bar Cookies--or Cake


Long ago and far away, I copied this recipe on to a scrap of paper that I later glued to a standard recipe card that went into the file with the rest of recipes I collected. As much as possible, I always tried to document my sources, but this one says only,  "From a magazine in a dr's waiting room about 72 or 73."
 
From the first time I tried it, I realized the original was quite bland, so I have continued to increase spices and make other changes until I arrived at this more interesting version.

From the start, I also realized that the name, "Apple Oatmeal Bars," seemed misapplied. Given the 8 inch square pan it called for, this was much more like a cake, and I usually served it as such. However, one day, when I was looking for a bar cookie recipe using apples and oatmeal, I decided to try this one in a different pan. The result was a much more satisfying bar cookie, especially with the addition of a light powdered sugar frosting topping.

Whichever way you decide to serve it, this is an excellent recipe to keep around for a dessert that will fill your kitchen with old-fashioned home-baked aroma.

Apple Oatmeal Bar Cookies--or Cake

1/3 c oil
3/4 c brown sugar
2 eggs
3/4 c flour
3/4 t baking powder
1/2 t baking soda
1 1/2 t cinnamon
1 t ground ginger
1/2 t nutmeg
1/4 t cloves
1 c oatmeal
1 1/2 c finely diced apples (pack lightly in measuring cup)
1/2 c coarsely chopped walnuts

1.  Beat the oil, brown sugar, and eggs together until smooth and light colored.

2.  Stir in the oatmeal and diced apples and stir just until they are evenly mixed in.

3.  For cake:
Pour the batter into a well-oiled 8 inch square pan. Sprinkle the nuts evenly over the top and press in lightly with the back of a spatula. Bake at 350 degrees for 32 to 35 minutes, until the center springs back when pressed lightly with a finger.

For bar cookies:
Pour the batter into a  well-oiled 9 X 12 inch pan. Sprinkle the nuts evenly over the top and press in lightly with the back of a spatula. Bake at 350 degrees for 18 to 20 minutes, until the center springs back when pressed lightly with a finger.
NOTE:  For this version, you may want to increase the amount of nuts sprinkled over the top.

4.  Serving suggestions:
For cake:
Serve warm or cooled, topped with whipped cream or ice cream. (If you REALLY want to make this special, serve it warm with ice cream and then a drizzle of caramel sauce over the top.)

For bar cookies:
Make a thin powdered sugar icing and drizzle lightly over the bars. Allow the frosting to set before cutting.


Saturday, March 5, 2016

Bruschetta


Sometimes, having leftovers is not a bad thing. 

Leftover breads, for example.

Earlier this week, I made whole wheat hard rolls for pulled pork sandwiches. Not knowing exactly how many people would be at lunch, I made a large batch of dough--when you're working with yeast breads, it takes hardly any effort to make more. So we had plenty of rolls and there were more for a light supper with a friend. Still, there were three large buns waiting to be used. My first thought was to freeze them, but then I remembered that I would need to take some finger foods to a fellowship gathering.

Hearty rolls = great base for bruschetta. All the other things I'd need were also in my refrigerator, so it didn't take long to turn three large sandwich buns into twenty four appetizer-sized bruschettas.

A key to bruschetta is to use good bread as a base. However, the bread can be a little dry, and that's okay; in fact, it might just keep your base a little firmer.

You also don't want to have the bread layer too thick, because the real flavor should come from the toppings. When using leftover rolls or buns, this will almost always mean you will want to slice the rolls into more layers than for a sandwich.

To begin, I cut each of my unsliced rolls into four thin pieces. When using pre-cut rolls from the store, just cut each half into two slices. Then, because these were large, sandwich-sized rolls, I cut each of these slices in half.

As for the toppings, I had several "basic" ingredients already in the house. There are many options in putting together bruschettas, but mine are at least a little Italian in character. Use what you have in the refrigerator, experimenting a bit until you get the flavor combination you like.

I bought some sun-dried tomatoes packed in oil when they were on a great sale awhile ago. These will keep for quite a long time in the refrigerator so long as you always keep a good layer of oil over the top of the tomatoes. As you will see in this recipe, that oil becomes an important, flavor-adding ingredient too. I also had gotten some fresh tomatoes on sale, so I could use those to stretch the more expensive sun-dried ones and also get the benefit of the brighter color the fresh ones brought.

Mushrooms have been on sale so I had some of those, and I buy black olives in a large bag from Costco. These two will keep for an extended time in the refrigerator so long as you make sure there is always bring covering the olives. If either of these are not available or too pricey for this week's budget, they can be omitted.

As for the garlic powder: definitely plan to use minced fresh garlic if you have it, but always have garlic powder on the shelf for those times when the fresh cloves have all been used up for the last recipe.

As for the cheese: There seems to be a little bit of a split opinion on whether "real" bruschetta has cheese. To be honest, one of the main reasons I include cheese is that putting it under the broiler just long enough to melt the cheese is to hold the overall topping ingredients together. Without that "glue," I sometimes feel that half the tomatoes and other toppings all end up falling back on the plate--or the floor or my lap or anywhere except where I want it to be.

One side benefit of doing a little research on whether or not real bruschetta has cheese, I discovered that the original Italian dish was developed as a means to use up leftover bread and marinary sauce. So I guess today's recipe is extra authentic in that regard! A perfect recipe: tasty, quick to make, and frugally using the best of yesterday's bread!


Mushroom and Sun-dried Tomato Bruschetta

4 oz fresh mushrooms, chopped
1/2 medium onion, finely chopped
1/4 c sundried tomatoes, packaged in oil
1 T oil from the sundried tomatoes
1/2 t garlic powder, or to taste
1/2 t dried basil
1/2 t dried Italian seasoning
seasoning salt, to taste
2 Roma tomatoes, diced
2 to 3 T sliced black olives--optional
app 1 c shredded mozzarella cheese
3 large hard rolls

1.   Saute the onions, sundried tomatoes, and mushrooms in the sundried tomato oil over medium to low heat for about 15 minutes, until the onions are beginning to caramelize. Add the seasonings about 5 minutes before removing the mixture from the heat.


2.  Meanwhile, slice each hard roll into four thin slices.

3.  Heat a very lightly oiled griddle or cast iron skillet until quite hot. Lay the roll slices in the pan (you will need to do this in batches) and allow to brown on one side. Turn the slices over and brown on the second side.


Remove from skillet or griddle and cut each toast in half, making half moon slices. Place on a baking sheet.

4.  Preheat the oven to 450 degrees OR turn on the broiler.

5.  When the rolls are all toasted, stir the diced Roma tomatoes into the mushroom mixture. Place a generous spoonful of this mixture on each slice of the rolls and spread over the surface.


6.  If using the olives, sprinkle a few slices over the top of the mushroom mixture. Sprinkle the mozzarella over each bruschetta, covering the filling evenly.

7.  Place the tray in the oven and bake/broil just until the cheese is melted and barely starting to color. Do not allow to turn too brown!


Best when served fresh from the broiler.  Makes 24 bruschetta servings.