Saturday, April 12, 2014

Toast the Old-Fashioned Way


Though I have had a toaster in my home all my life, I rarely use this appliance and have it tucked away in a corner cabinet, behind a crockpot and a stack of cake pans. Not too long ago, I had some homemade bread a little less fresh than I wanted for a sandwich. Toasting is a great way to use bread that is still flavorful but just this side of stale, so it seemed time to drag out the toaster.

For one little sandwich? All that cabinet clearing just for one little sandwich? There had to be a better way.

And indeed there is. In fact, now that I have been reminded of this ancient method for making toast, I may never drag out the toaster again.

Almost as long as people have been making bread, they have been making some kind of toast. The earliest method seems to have been to put chunks of bread on a stick and hold them over a fire, much like we might toast marshmallows. Later when pans were hung over a fire area, bread began being toasted there. Only in the late 19th century did the toaster that we know today become a reality, and people continued with the more old-fashioned approach for years after the pop-up toaster became a standard appliance in most western kitchens.

Now, in a step backward in time, I have come to love the more old-fashioned approach, for several reasons:
  • It requires no specialized appliance, a nice thing when one's kitchen storage space is limited
  • All sizes and shapes of bread can be toasted, even the little ones that always seem to fall way down in the slots and need fishing out (dangerously, if you don't unplug the thing) with a fork or knife

  • The final product can be much lower in fat than a slice of toast taken out of the toaster and buttered while hot
  • This method may actually be quicker than a pop-up toaster, especially if you have several slices of bread that you want to toast.
  • This method leads right into grilled sandwiches of all kinds, just by adding fillings of your choice. 

Basics of Old Fashioned Toasting

The best pan for this is a cast iron (of course!) skillet or griddle, large enough to place several slices of bread flat in the bottom. If you don't have cast iron, any heavy, flat pan will do. Because you will be preheating the empty pan, avoid non-stick cookware.
Canola oil or olive oil, flavored if desired, are probably the best fats, but butter can also be used, by itself or mixed with a little oil. If using butter, you will have to be more watchful to be sure the toast doesn't burn.
It will be easier to do this on a gas stove rather than an electric one because of the responsiveness of the flame, but either range will work.

Method
 
  1. Heat the empty pan over medium high heat, adding only enough oil to barely cover the bottom. Even in a 12 inch skillet, you may not need more than a teaspoon.
  2. To test if the oil is hot enough, drop a few large crumbs into the pan. They should "dance"  and sputter a bit if the pan is hot enough.
  3. Arrange slices of bread flat on the pan. Allow to toast for a few minutes.  Lift a corner now and then to check on the progress; as you become comfortable with the length of time needed, you'll find yourself doing this less and less.
  4. When the first side is browned to your preference, flip the slices and continue toasting until done.
If a second set of slices will be toasted, add a bit more oil as needed. However, you may be surprised at how very little fat is needed with a well-seasoned cast iron skillet.


Other things you can do

Once you become proficient with this method of toasting, you can do all kinds of things, like toasting the bread for your sandwiches and grilling the fillings at the same time or toasting a couple of slices of bread and then, with a few more drops of oil added, frying up an egg or two in the same pan for breakfast with minimal clean up. And, as the photo below shows, you can even slice up slightly stale rolls into rounds that could be a great  base for your favorite bruschetta toppings.


Using up stale bread

And you can even turn dinner rolls, hot dog buns, etc., into garlic bread, mini-pizza bases, or toasts for using with spinach dip, etc. Talk about frugal--no more stale bread that has to be thrown away!

 As shown below, take a sandwich roll and slice it like a mini-loaf of bread, with most rolls able to be cut into four slices. Toast  these slices just as for full bread slices. The rounded part of the top slice of the roll can be pressed gently to be sure that all parts are toasted.


So that's it. Toast without a toaster. How easy is that!


Leftover Salads


Leftovers.

Images of warmed over, unappetizing lumps of food kind of plopped on a plate or microwaved in a sad looking take out container. Rarely does the term have any kind of positive image. Still, if you are trying to be a more frugal cook, using up leftovers needs to be part of your "kitchen skills."

Maybe you can revitalize your attitude toward leftovers if you start to think of these ingredients in the refrigerator as "idea starters," "creativity makers" for coming meals.

My mother was a creative cook, and she always found ways to u leftovers so they were appetizing and never dull. Probably one of the biggest disappointments with her leftover cooking was the problem of duplication. I remember often having a main dish that was so wonderful, we all asked her to make it again and, if there were guests, there would be requests for the recipe. Her answer would have to be, sorry, but I just stirred some leftovers together and then tasted for seasoning. Since there would never again be quite this same combination of ingredients to work with, that very appealing "casserole" or stew or soup couldn't be exactly re-created.

I was reminded of this today as I stirred up a main dish salad. After a potluck this weekend, a friend shared a wonderful pasta salad, enough for several servings. Yesterday I had some of this with turkey breast and squash, but today I wanted to lighten it up, and have enough to share with several guests. There was also just a tiny smidge--about 2 to 3 tablespoons--of the coleslaw I had made last weekend (posted here http://frugalfastfun.blogspot.com/2014/03/the-best-cole-slaw-ever.html.) Though the weather has turned cold again, it still was a day for a main dish salad with warm homemade rolls on the side, so it was time to make a Leftover Salad.

Salads like this are great for this time of the year, when I try very much to avoid the hard imported tomatoes that are the only fresh ones available. Some of the other summer salad ingredients are also harder to find. I haven't gone completely to local foods, but I do like to stay at least somewhat with the seasons as I choose salad ingredients. There were radishes and green onions on special this week, both very springlike tastes for me, and Aldi's was featuring cucumbers and mixed color bell peppers at very reasonable prices. (Yes, I know they aren't local, but the price was such that I could splurge a little here.) There is still cabbage in the crisper and some nice fresh spinach for color, so a salad could be pulled together quickly. The pasta salad and coleslaw each brought some dressing into the bowl, so I just tasted and added a little more (ranch dressing for this combination) as needed to dress the salad well.

The final salad proved to be just right for a hearty lunch. Some fresh strawberries (also on sale this week) and orange wedges made a great finale, and everyone had at least four servings of vegetables and fruit all in one colorful package.

Following is what I used in this salad, along with some suggestions for other additions that might be made. Note that the amounts given are very approximate and should definitely be varied, depending on what you have on hand.  When using something like a pasta or chicken salad, the key is to add this in small portions to the greens and then tossing the mixture well so that the thicker salads don't remain as big unmixed lumps in the overall dish.

Today's Leftover Salad

6 to 7 romaine lettuce leaves, coarsely chopped
about 1 to 2 c fresh spinach leaves, coarsely chopped
2 to 4 large radishes, sliced
about 1/3 large cucumber, diced
1/2 red bell pepper, coarsely diced
1 to 2 t finely chopped onion, to taste
1 to 2 T sliced black olives
2 c coarsely shredded cabbage
about 1 to 1 1/2 c pasta salad
about 1/2 c cole slaw, including dressing
ranch dressing (or dip) to taste

Toss all ingredients together and taste for seasoning, adding dressing as needed to moisten appropriately.

Other possible add-ins:
diced or shredded cheese, any variety
crumbled bacon or artificial bacon bits
diced turkey, chicken, ham, or roast beef
chopped hard-boiled egg
other lettuces or greens
broccoli, peas, corn, or other leftover cooked vegetables
shredded red cabbage
grated carrot
diced celery
broccoli or cauliflower
sliced mushrooms
nuts, sunflower seeds, etc.


Dressing choices:
The nice thing about including some "pre-made" salad leftovers is that you will be able to take advantage of the dressing already on that part of your ingredients. What is already included in your mix may well guide you in the rest of your dressing. For today's salad, the pasta had a mayonnaise dressing that had many of the same herbs as ranch dressing, so that was my choice for finishing the salad. Had the pasta salad been made with a basil flavored vinaigrette, I might have mixed up a little more oil and vinegar dressing or pulled a bottle of similar dressing from the refrigerator. The cole slaw's sweet and tangy vinegar dressing went well with the ranch dressing but would have also blended well with many others as well.

...or Fruits and a sweeter salad:
You can also take your salad in an entirely different direction by adding in fresh (diced apple, pear, banana, pineapple, strawberries, etc.) or dried (cranberries, raisins, diced dried apricot) fruits. My preference is to keep these sweeter elements out of salads that are more savory or vegetable-oriented, but feel free to expand your horizons with these leftovers as well. Who knows when you might come up with your own special, never to be quite duplicated recipe too!


Saturday, March 22, 2014

Best. Cole Slaw. Ever


Okay, so maybe t"the best cole slaw ever" is just a little too emphatic, but this recipe is one that I have been making for decades, and it always is greeted with acclamation and requests for the recipe. Now that I have a stockpile of cabbages from the St Patrick's Day sales, I have made a huge batch for a couple of dinners for others this week.

First, the original from a Midwestern church cookbook my mother had in her large collection. Unfortunately I didn't write down the specific title when I completed the now stained and faded recipe card. Since this makes such a large batch, I am also providing an adjusted version that is the
amount I usually use. However, you may want to go ahead and make a large batch while you have the processor or cutting board out, since this keeps in the refrigerator for as long as two weeks.

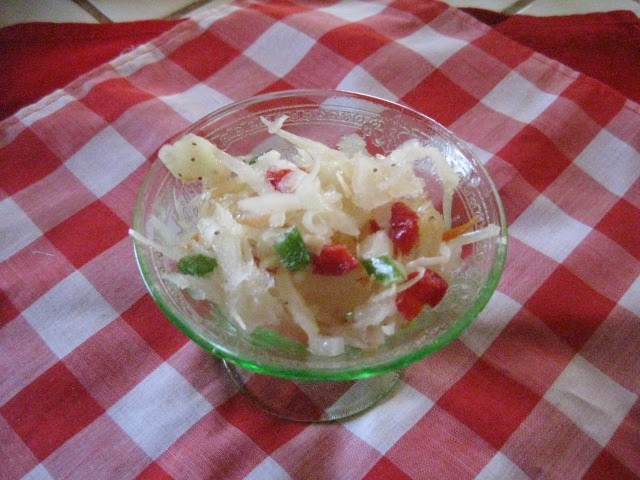
This can also be frozen. Be aware that, after thawing, the frozen slaw will have a slightly softer texture, almost reminiscent of good quality sauerkraut. Still a very refreshing, and slightly crunchy, salad with fish or lots of other meats.  (The photo at the top was taken after the slaw had been frozen.)

Overnight Cabbage Salad

1 large head cabbage
1 large or two medium bell peppers
1 large Bermuda onion


Grate together and cover with 3/4 c sugar and set aside.

Meanwhile, mix together in pan and bring to a boil:
  • 1 c vinegar--I usually use cider vinegar
  • 2 T sugar
  • 1 t celery seed
  • 3/4 c oil
  • 1 T salt
  • 1 t dry mustard
Pour over cabbage while still hot. Refrigerate at least 4 hours, but best after being refrigerated overnight.
Serves 10 to 12.
(If you are looking for more specific amounts, use 4 to 4 1/2 pounds of cabbage, and a total of about 1 1/4 pounds of onions and peppers.)


Refrigerator Cole Slaw

6 to 7 cups finely shredded cabbage
2 c diced bell pepper--use a mixture of colors or 1 whole pepper of your choice
1 c finely chopped onion
1/3 to 1/2 c sugar, to taste
1/2 c cider or wine vinegar
1 T sugar
1/2 t celery seed
1/3 c olive or canola oil
1 1/2 t salt
1/2 t dry mustard OR 1 T prepared yellow mustard

1.  Combine the cabbage, bell pepper, and onion in a large bowl. Sprinkle the sugar over the vegetables and set aside.

2.  Combine the vinegar, tablespoon of sugar, celery seeds, oil, salt, and mustard in a small saucepan. Bring to a full rolling boil and immediately pour over the cabbage mixture.

3. Refrigerate for several hours or overnight.

Variations
  • Add in 1 to 2 cups shredded carrots and/or diced celery.
  • Substitute dill seed for celery seed. If desired, a few sprigs of fresh dill can also be added.
  • While red cabbage may add lots of color, do NOT add to this mixture, as the dressing will cause its color to bleed into the entire recipe. If you want to use red cabbage for color, finely shred a small amount and stir it in just before serving

Corn Bread


When I was growing up, I was often jealous of those around me who had "ethnic" backgrounds that gave them lots of unusual foods and celebrations. A Midwestern farm kid whose family had been in the US since as far back as the 18th century, our food seemed plain and ordinary at times. Oh,  there were lots of summer garden meals with corn on the cob, tomatoes straight from the garden and big bowls of creamy mashed potatoes served alongside the chicken or beef that came from our very own farm animals. At Christmas, we made pfefferneuse, but these spicy German cookies were from a recipe shared by a good friend of my parents. When my sister married a Norwegian, we got to sample krumkake for the first time, and an Italian exchange student shared stories of what "real" pizza was like back in his home town.

Still, what "ethnic" food did we really have? I guess it took a move to the mountains of Virginia to start to understand that our cuisine really was a little bit unique. It didn't take very long to learn that stuffing (or dressing) at Thanksgiving could be very dry, with lots of cornbread and not at all like the much more moist recipe I had eaten all my life to that point.

And beans and cornbread? Ah, that is when I realized I really did still have some New England roots.

One evening, I invited a neighbor child to stay for dinner. What are you having was her first question, so I said we'd be having beans and cornbread. "My favorite," she squealed, so she called her mom and the permission was given.

Soon enough, we were sitting down to eat, and I brought the dark brown, molasses and mustard spiced beans out of the oven and placed the hot casserole next to the basket of still steaming yellow cornbread squares. As she gazed at the dishes before her, Marla's shoulders sagged and her expectant smile turned into a sad little face.

"I thought we were having beans and cornbread," she whispered.

"But we are," I explained, and then I stopped. I had been at another neighbor's home just a few days before and watched as she dumped pinto beans into a large pot and began cooking them for the evening meal. She stirred in some salt, but that was the extent of the seasoning she used. When I asked for the rest of the recipe, she said that was it; she hadn't had time to pick up any bacon or fatback to add to the beans, but this would be fine with the greens she was also cooking for the meal.

Then I thought back to some cornbread I had seen served at a restaurant near our home. It was flat and hard and "lily-livered" white, very different from the golden, sweet, and moist side I had enjoyed all my life.

Aha! The difference in regional cuisine couldn't have been illustrated more starkly. Marla gamely tried the dishes she was served and then, as I recall, we made some peanut butter sandwiches to make sure she didn't go home hungry. And though I have since learned to love pinto beans in their many (mostly Mexican) guises, I have not moved from my "classic" corn bread recipe--maybe the closest thing to an "ethnic food" I can summon up.

As presented below, this is virtually the same as the now stained recipe card from my high school home ec class. I now use stone-ground cornmeal exclusively, and I use either all butter, canola oil, or some combination of the two. I often substitute up to half of the flour with whole wheat flour, and I have discovered that the original four teaspoons of baking powder is really not necessary.

Following the main recipe is a variation using biscuit mix, making this an even quicker quick bread, and then, instructions for making a cast iron skillet cornbread that has a lovely crunchy crust even as the center is moist and rich with sweet corn flavor.  (Sorry, friends from the south, but I just have to call this the "real" recipe.)

...And not to worry:
Note the following photo. If you get a few cracks in the top of your baked cornbread--don't worry! That is just the way this quick bread sometimes bakes. In fact, it just shows that you have baked this yourself, from scratch.


The "Real" Corn Bread


1 c yellow corn meal
1 c flour
¼ c sugar
1 T baking powder
½ t salt
1 egg
1 c milk*
¼ c soft butter or margarine or canola oil

1. Sift dry ingredients together.
2 Add egg, milk, and shortening. Beat with egg beater, fork, or whisk until smooth, about 1 minute. 
3. Pour into a well oiled 8 or 9 inch square pan. 
4. Bake at 425 degrees for 20 to 25 minutes. (If a glass pan is used, reduce temperature to 400 degrees.)

*May substitute 1 cup water and 1/3 c nonfat dry milk powder. Mix the dry milk powder with the other dry ingredients. 


Serve warm or cold, with butter and jam or honey, or as a wonderful side for chili.

This doubles easily--use a 9 X 13 pan.


Biscuit Mix Variation

1 ¼ c biscuit mix (Bisquick for example)
1 c cornmeal
¼ c sugar
1 c milk
1 egg

Prepare as in original recipe.


Cast Iron Skillet Cornbread

Put about a tablespoon of the butter into a 9 or 10 inch cast iron skillet and put the skillet in the oven.
Turn the oven to 425 degrees and proceed to stirring up the cornbread.
When the oven has reached its full temperature, carefully remove the hot skillet from the oven and swirl to be sure the butter covers the entire bottom of the pan.
Spread the batter into the hot pan and return it to the oven. Bake for about 15 to 20 minutes.


Plan Ahead Corn Bread


One more thing--while you are mixing up a batch and have all the ingredients out for measuring,  measure out the dry ingredients for another batch (or more) directly into a quart-sized freezer bag. (This is especially good using the dry milk variation, stirring in the powder with the other dry ingredients.) Use your hands to mix the ingredients in the bag and label with date and information on the liquid ingredients needed, and you will have a "mix" just as convenient at one of those little boxes you might buy in the store--without all the extra preservatives and at a lot better price! These can be kept on the shelf for a few weeks and in the refrigerator for even longer.


Friday, March 14, 2014

Cabbage...and Fish?


This week is a great time for those of us who love cabbage. In every state I have lived in, the grocery stores all feature these fat green balls of crunchiness at really low prices in honor of St Patrick's Day. Since this is a vegetable that keeps very well (for weeks!) in the refrigerator, I like to make room in the vegetable bin to buy as many heads as I can store adequately.

Thanks to that "traditional" St. Patrick's corned beef and cabbage dinner, corned beef and red potatoes are also on sale, but what if you want to take advantage of the cabbage specials but are not eating meat right now (or ever, for that matter)? Since we are also in the middle of the Lenten season, most stores are also continuing seafood specials, and cabbage and fish are more readily paired than we might sometimes think.

Fish tacos are popular in more and more places around the country, and a very common side with these is cole slaw. Slaw is also a regular feature on fried fish dinner specials as well, so you will certainly want to consider that option. However, I have another suggestion, especially good if you end up buying more cabbage than you ever thought possible to use up. At 15 to 25 cents a pound for produce with almost no waste, how can the frugal cook not snatch up some bargains?

What follows is a recipe for braised cabbage and vegetables, a great side for fish fillets but also for pork chops or, for vegetarians, served with fried rice and a fruit tray. I made it today with butternut squash as I am trying to finish up my root cellar stash, but sliced carrots would be just as good in place of the squash.

The real key here is to cook the cabbage only until just done, with a bit of crispness still part of the overall mix. I think those of you who have only had cabbage boiled to death in way too much water (even if the liquid is flavored with corned beef spices) will be surprised at the sweet fresh flavor of this dish.


Braised Cabbage and Vegetables

1 to 2 T olive oil
2 c onion, julienned--one large
2 c cubed butternut squash (8 to 10 oz)
1/2 c coarsely diced green pepper--about half a large pepper
2 T minced garlic--about 6 to 8 cloves
4 c shredded cabbage--about 2 lb
1 c spaghetti sauce (optional)
water as needed
2 c frozen peas, not thawed
1 c coarsely chopped spinach leaves (optional)
1/2 to 1 t dried basil
1/2 t marjoram
salt and pepper to taste

1.  Heat oil in large skillet. Stir in onions and squash and saute over medium high heat until the onions begin to brown slightly and the squash is just beginning to soften a bit.
2.  Stir in the pepper, garlic, cabbage, and basil and marjoram. Stir in the spaghetti sauce and perhaps half a cup of water (or all water) and cover pan. Allow to cook about 10 minutes or so, stirring occasionally, until the cabbage is just barely softened. If the vegetables begin to stick to the pan, add a few more teaspoons of water.
3.  Taste for seasonings and stir in the peas and spinach. Continue to cook for about 3 to 4 minutes, just until the peas are thoroughly heated through and the spinach is slightly wilted.

Makes 4 to 5 servings.

Variations:
Substitute thickly sliced carrots for the squash.
Substitute broth for the spaghetti sauce and water.
Add more (or less) spinach or substitute chopped kale leaves for the spinach.


Now for the fish.

I used tilapia for the photos here, sprinkling filets lightly with a Cajun seasoned salt to add a dash of spice and color.  It cooked quickly in the microwave while the vegetables were simmering, so this made for a really fast meal. Add some rolls or rice for a starch and maybe some applesauce for a fruit side. (Think again of all the fried fish specials and how often they include applesauce along with the crispy fish and cole slaw.)


For details on microwaving fish for really fast meals, you can check out my last post, at http://frugalfastfun.blogspot.com/2014/03/getting-more-fish-into-your-diet.html

(Thanks to the Rochester (MN) Post Bulletin for their Food section photo this week--worked perfectly for this posting!)


Saturday, March 1, 2014

Getting More Fish into Your Diet


You've seen all the healthy eating suggestions that encourage getting more fish into our diets, but you really can't face another tuna casserole or tuna salad sandwich? You look at the price of fresh seafood and are sure your budget will never be able to handle these meals regularly--even if the kids would even eat them? Or you only think of fish as something that either adds lots of fat and breading--think fish sticks, etc.--or is just way too time consuming to prepare?

Well, here's an idea that you may not have thought of: use your microwave. With this approach, you can have a healthy meal on the table in the length of time it takes to cook some rice or make a salad, since the fish main dish will require minimal preparation or cooking time.

If you are unsure what kind of fish to buy, consider the lighter, milder kinds like tilapia, cod, etc. As your family becomes more "comfortable" with fish, you can branch out to stronger flavored kinds like catfish.  Salmon and trout are always wonderful of course, but they are often pretty pricey. 

What about fresh vs. frozen? For the busy, thrifty, cook and for most of us at a distance from major fishing markets, frozen is almost always going to be the best option. Look for larger packages that have individually frozen filets so you can pull out enough for your family in the morning, tuck these in the refrigerator, and they will be thawed to just the right level for preparing a quick dinner when you get home.

Now that we are entering the Lenten season, many stores will be featuring seafood specials, so you might be able to find many kinds of fish at some really good prices. Start out with one of these basic recipes and then begin to branch out on your own. There are really only two critical things to keep in mind:
  • Cover the fish tightly. I like to use a casserole dish with its own cover, but you can also use plastic wrap (don't let it touch the food!) or a pretty tight microwave cover. 
  • Because every fish filet is going to be slightly different in thickness and shape and because different kinds of fish have different cooking times, you should plan to test the fish every minute after the first minute or two. How?
    • The key to fish "doneness" is when it "flakes" with a fork. If you have always wondered what this means, just insert a fork into the thickest part of the filet and twist gently. If it is well cooked, the fish will pull apart slightly, just like when you put a fork into canned tuna.
Here are two possibilities for you to try. These can easily be scaled up or down, for 1 to 4 servings, with the time in the microwave adjusted accordingly.


Microwaved Fish Florentine


2 tilapia or other white fish filets, 3 to 4 oz each
1/3 c coarsely chopped onion (for added color, red onions may be used)
8 to 10 frozen, chopped spinach or kale--do not thaw
seasoning--marjoram, thyme, and dill are often favored, but choose whatever your family likes best
a sprinkle of salt--seasoning salt can add a dash of color to the dish, as seen in the photo at the top of this post

1.  Spread the spinach or kale in the bottom of a lightly oiled baking dish. Top with the onions, and then lay the filets across the top. Try to place the thickest parts of the filets near the outer edges. Sprinkle with your choice of seasoning and cover the dish well.
2.  Microwave on high for 3 to 5 minutes, checking for doneness after 2 minutes. If the centers of the filets are cooking slower than the thinner outer edges, rearrange as necessary.
3.  Serve immediately. May be topped with a bit of Ranch or other dressing if desired. You may also wish to serve this with Fresh Tomato Salad.

Serves 2.

Variation: If your family prefers, you can first saute the onions on the stove top in a little olive oil. If these are put into the baking dish while still hot, this will shorten the cooking time a bit.

Fresh Tomato Salad

1/3 large onion--about 3/4 c
2 to 3 tomatoes--about 2 c
1/2 cucumber
1/2 bell pepper, any color
1/2 t dried basil
1/2 t dried rosemary
salt to taste
2 t cider or wine vinegar
1 t sugar (optional)

1. Chop all the vegetables coarsely--may use a processor to do this all at once.
2. Stir in the seasonings and taste. Add sugar, if needed, and vinegar.
3. Set aside for at 15 to 20 minutes to allow flavors to blend. This may also be made ahead and refrigerated, but it will taste best if allowed to come to room temperature before serving.

Fish and Vegetables Au Gratin


1 sweet onion, cut in rings
1/4 to 1/2 red bell pepper, cut in large dice
8 oz fish filets
1 to 2 T prepared zesty salad dressing of choice
10 to 12 oz frozen vegetables--French cut green beans, broccoli, cauliflower, or a mixture
1/2 t Italian seasoning or other dried herbs of choice
1 c grated cheddar cheese
OR 1/2 c grated cheddar cheese and 2 slices American cheese
1/2 c toasted bread crumbs

1. Spread the onion rings and diced pepper evenly in the bottom of an oiled casserole dish. Lay the filets over the top and drizzle with the salad dressing. Cover tightly and microwave about 2 minutes.
2.  Spread the frozen vegetables over the fish and sprinkle with the Italian seasoning. Cover and return to the microwave for about 5 minutes, until the fish flakes and the vegetables are piping hot.
3.  Top with the grated cheddar cheese. If the American cheese is being used, lay these over the top. Finish with a thin layer of the bread crumbs. Return, uncovered, to the microwave for another minute or just until the cheese has melted.

Serves two to three.


Two More Things--Sustainable Seafood and Tilapia "Warnings"

As with so many of our food choices, there are lots of articles on the internet with warnings and concerns about fish. One of these relates to the varieties of fish to choose, both for our own health and for the global fish supplies. A reputable site with lots of information is seafoodwatch.org. They have a set of regional downloadable guides that you might want to print and carry with you when at the store. The national guide can be found at:

http://www.seafoodwatch.org/cr/cr_seafoodwatch/content/media/MBA_SeafoodWatch_NationalGuide.pdf

About tilapia: A few years ago a study was published that raised concerns about the levels of omega 3 and omega 6 fats in tilapia. As with so many of these kinds of things, the findings have been pulled out of context, magnified, and turned into dire warnings. Seafood Watch generally gives tilapia excellent ratings, and you can find a nice summary of the best science on this currently at http://www.snopes.com/food/warnings/tilapia.asp

Okay, One More Thing!


...about that fishy smell in the house:  If this is an issue for anyone in your household, the microwave minimizes this odors in the kitchen but can retain some of the aroma in the microwave itself. There is an easy cure however. Just put a cup of water with perhaps a tablespoon or two of lemon juice (use ReaLemon or a similar brand) into the microwave and heat to boiling.

Monday, February 17, 2014

Mushroom and Barley Soup


Another winter Monday, another round of snow shoveling. Today's snow was light and fluffy, with the air temperature at a "comfortable" 20 degrees. Still, it was nice to come back into the house to the aroma of homemade soup simmering on the stove.

Soup is one of the easiest of foods to make from scratch--really!--but it also is something that is hard to pin down to specific recipes. Part of this comes from the great American propensity for wanting carefully calibrated amounts in their cooking instructions, but good soup includes ingredients that just don't come in pre-measured amounts. Just how big is a "medium onion" and is the clove of garlic listed in the ingredients as big as your thumb or just a little cashew? Even if you are using a 15 oz can of diced tomatoes and chiles, the amount of seasoning varies from brand to brand--and sometimes from one year to the next. There are two other things that make homemade soups wonderfully unique (and sometimes hard to duplicate): broth and the exact choice of ingredients.

Broth (or Stock--see NOTE below)

And then there is the base of most soups--broth. Yes, you can buy fairly standardized broth in the store, and you might even find one that you like especially well. However, the cost is generally far higher than broth you make yourself, and there still is no better broth than that coming from your own kitchen. The problem here is that every time you make broth (or better yet, save it from a prior pork or beef roast or braised chicken), the seasoning will be slightly different, the concentration varying from batch to batch. The bottom line is that every time you make soup with a different broth for the base, there will be a different flavor result. Not a problem. Instead, this is when you get to taste and adjust, taste and adjust. Not quite salty enough? Easy to resolve, just a sprinkle more. But maybe the soup needs a little more "zip." Maybe, with some recipes, that means a bit of black pepper, a splash of hot sauce or a little diced jalapeno. More often though, it might mean a tiny bit of sugar (or more sweet ingredients--see below) or a splash of vinegar or Worcestershire sauce--or maybe even soy sauce or some other favorite condiment sauce. It's your soup, so you could to play with what you add.

What if, on the other hand, the broth starts out too salty? If it is just a little over the top, you can add some beans or starchy ingredients to the soup. If the salt is just a little too strong, just adding a cup or two of unseasoned rice, pasta, barley, lentils, or potatoes to the soup may take care of the problem. If it is really salty, you might try the old remedy of cutting a large potato in perhaps two or three chunks and let them simmer for a few minutes. You remove these potatoes and discard, taking a lot of the salt with them.

It is best of course to taste the broth before adding to the soup. If you realize early on that you have an over-salt problem, you may choose to cut the broth with water (or milk for a cream soup) before starting the soup. If you don't catch the problem before adding other ingredients, you can also double the vegetable and other ingredients and increase the water accordingly.

NOTE:       Do a quick search and you'll find a variety of explanations for the difference, sometimes completely opposite in the definitions of each. Probably the most consistent distinction is that stock comes from the cooking of a variety of ingredients including bones for non-vegetarian stocks, while broth is made with more meat. However, the bottom line is that the home cook can generally consider these terms interchangeably in any recipes. I will use broth in the rest of this post, just to keep things simple.

All Those Other Ingredients

Even though I have included a recipe here, with specific ingredients and amounts, the truly freeing part of homemade soups is the opportunity to be totally flexible. Unlike the more scientific world of baking, where even small differences in the amount of fat, leavening, flour, etc., can make or break a cake or muffin recipe, soups are where you can really get creative.

Let's use today's recipe for an example. This one includes carrot juice and a small amount of canned diced tomatoes. I have to admit that carrot juice is not typically in my pantry, but I found a great buy at Costco and tucked a couple of quarts into the freezer. A soup seemed an ideal time to use it, especially a soup where I might have otherwise added some sliced carrots. It turned out to be a good choice, but the soup ended up losing the bright color of the carrot slices; I happened to have the cup of tomatoes in the refrigerator, left over from an earlier soup of another kind, so that worked well to add a little color while not being a large enough amount to overwhelm with too "tomatoe-y" flavor.

I've added a suggested variation if you don't have carrot juice on hand, but that is only the start of variations you could make. And then you can keep going with your own variations. Maybe you are not crazy about celery, or only have one tired stalk left; reduce the amount or leave it out. I know that the broth I used had some poultry seasoning and sage in it so those flavors were already in the soup; you might want to add one of these--or maybe rosemary or some other herb--in addition to or in place of the herbs I used this time. And if you have some leftover vegetables in the refrigerator, maybe one or more of them might appeal to you in this soup too. But don't just dump every leftover into the soup just because it's there. Think first about the combinations. Asparagus is not going to work here, and as I mentioned, too much tomato would probably overwhelm the lovely mushroom/barley flavor combination. However, a cup or so of corn could  be a nice complement--and color brightener besides. Some chopped spinach or kale (kept in the freezer for just this kind of use) could also be a good addition.

I really do recommend this soup as a great way to enjoy mushrooms in a soup that even a lactose intolerant person could have. If you use a vegetable broth/stock as the base, it could even be a good choice for a vegan. (The butter is there because I find that just a little added to the mushrooms as they are sauteed adds great depth of flavor. That too could be left out for a vegan version.)


Barley Mushroom Soup


1 1/2 c hulled or pearl barley
5 to 6 c chicken or other broth

3-4 garlic cloves, minced
Olive or canola oil
2 T butter (optional)
1 large onion—about 2 cups—chopped
1 1/2 c diced celery
8 oz mushrooms, sliced (I used crimini or “baby bella”)
app 1 t each dried marjoram, basil, thyme, black pepper

2 c carrot juice
1 c canned diced tomatoes, with juice

1.  Cook the barley and garlic in the broth according for about  30 to 45  minutes, until just barely soft.
2.  While the barley is cooking, heat a small amount of oil in a large skillet over medium high heat. Brown the onions and celery slowly, stirring occasionally.
3.  When the onions become translucent and start to brown, add the butter if used and the sliced mushrooms. Continue sauteeing, stirring occasionally, until the mushrooms are well-cooked.
4.  Add the mushrooms to the cooked broccoli and stir in the remaining ingredients. Taste and adjust for seasonings. Continue to simmer for about 20 minutes or so to deepen flavors.

This soup is especially good the next day and can be frozen if desired. 
Serves 6 to 8.

 Variations:
Saute 2 to 3 cups of sliced carrots with the onions and celery and substitute added broth or water for the carrot juice. 
Substitute about a cup of cooked and pureed butternut squash for the carrot juice.
Add other vegetables or seasonings as desired. One to two cups of chopped frozen greens (spinach or kale) may be added in step 4. If still frozen, simmer for 30 minutes or so to be sure the flavors are well developed.
Substitute one to two 8 oz cans of mushrooms for the fresh mushrooms, including the liquid in the can. Do not saute with the onions; just add in step 4 directly from the cans.
You could even turn this into a Beef and Barley Mushroom Soup by adding leftover, diced, roast beef or steak, using beef broth instead of the chicken broth. Stir in the meat in step 4 and simmer for at least 20 minutes.