Saturday, June 23, 2012

Peanut Butter Cookies with Chocolate Chips


Friday was the last day of school for two of my grandsons and included a kindergarten graduation and presentation of the play, Little Red Hen. To celebrate, my granddaughter decided it would be fun to make a batch of cookies to share with all the family.

I had not realized that I had never put my favorite peanut butter cookie recipe on the computer, so we pulled out a wonderful piece of family history, a church cookbook from 1936. Inside the covers are some added recipes, some in the distinctive handwriting of my Grandma K and the others likely to be her mother's careful script. As we explored the cookbook's pages and looked at the old fashioned directions, I was glad we had an excuse to go to "the original source" and talk a little about family history as we stirred and baked.

Eleanor made note of the adjustments we had added and carefully copied our updated version on to another old-fashioned media, a 3 X 5 index card.  This was added to a cookbook the kids are putting together of things they have made at Grandma's house.  How wonderful to think that that recipe that may well have started out in the 19th century might still be making kids happy well into the 21st. 

Old Fashioned Peanut Butter Cookies with Chocolate Chips

2/3 c crunchy peanut butter (smooth may be substituted)
1/2 c butter, softened but not melted
1 c white sugar
1 c brown sugar, packed
2 eggs
3 T cold coffee
approximately 3 to 3 1/2 c flour
1 1/2 t baking soda
1 t baking powder
3/4 c miniature chocolate chips

1.  Cream the peanut butter, butter,  white and brown sugar. When thoroughly mixed, stir in the eggs and coffee.
2.  Sift about 2 1/2 to 3 cups of flour with the baking soda and baking powder. Add to the creamed mixture and combine thoroughly.
3.  Stir in the chocolate chips and blend. Add enough more flour to make a soft dough that can be formed into balls without being sticky.
4.  Roll into balls and place on an ungreased cookie sheet, leaving lots of room between the cookies. (Eleanor's card includes this note:  "Warning! Cookies spread!) Then press each cookie down with a fork in a criss-cross fashion,

OR:

ELEANOR'S ALTERATION: 
Instead of using a fork, flatten the cookies slightly with a glass and then use a fork, knife or other utensil to make letter impressions. For our family, she made some Ss, Xs, Es, and As and discovered the straight letters were much easier than the curves. As you may be able to see in the photo, these letters were not too legible after baking, but they were clear enough that each of the kids were able to pick out their "own."

5.  Bake at 350 degrees about 10 to 13 minutes.

If you make the balls about the size of a ping pong ball or slightly smaller, you should have about 30 to 36 cookies that will be around 3 inches across when baked.


Thursday, June 21, 2012

Snickerdoodles Just in Time for the Fourth of July


I guess I'm not a very traditional Grandma, but I don't often have cookies in the house. Christmas and Valentine's Day are the most common times when I make cookies, but now my daughter has provided a "new" kind of holiday cookie to add to the repertoire.

I put "new" in quotation marks because the Snickerdoodle recipe she used was one handed down a couple of generations. The newness comes from the bright addition of the colored sugars, especially the "red hots" red sugar topping, a product I had not seen before. The recipe below includes some added cinnamon to the colored sugars, in case you are not able to find this particular kind of sugar.

Snickerdoodles are good summer cookies, because the oven doesn't have to be on for a long time, and their light goodness goes wonderfully with a tray of bright fruits of the season. And the name itself can be a great discussion topic. I went to everybody's favorite reference source to find some kind of meaning for the name. Wikipedia gave us this background:
The Joy of Cooking claims that snickerdoodles are probably German in origin, and that the name is a corruption of the German word Schneckennudeln (lit. "snail noodles"), a kind of pastry. A different author suggests that the word "snicker" comes from the German word Schnecke, which describes a snail shape.Yet another hypothesis suggests that the name has no particular meaning or purpose and is simply a whimsically named cookie that originated from a New England tradition of fanciful cookie names.
 So enjoy these cookies, whether coated in colored sugars or in their traditional garb. Just be sure to use butter, if at all possible, for the best flavor.


Darcie's Snickerdoodles
(adapted from Aunt Merry's recipe)

1 c butter
1 1/2 c sugar
2 eggs
2 3/4 c flour
2 t cream of tartar
1/2 t salt
1 t soda

Holiday Topping
1/2 c white sugar
1/2 t cinnamon (optional if the red sugar has cinnamon flavoring)
2 T red sugar with or without cinnamon flavoring
2 T blue sugar

"Everyday" Topping*
2 T sugar
2 t cinnamon
* May need to double this to cover all the cookies

1.  Cream butter, sugar, and eggs.
2.  Sift dry ingredients together and blend into the creamed mixture
3.  Shape in balls by rounded teaspoonfuls.
4.  Mix your choice of Topping ingredients in a small bowl and roll the balls in this mixture.
5.  Place 2 inches apart on an ungreased baking sheet. Dip a flat-bottomed glass in the sugar and cinnamon and flatten the cookies slightly. Bake at 400 degrees for 8 to 10 minutes or until set.


Saturday, June 9, 2012

Rhubarb Banana Muffins


I feel compelled to say this at some point in every rhubarb season: I don't get the mystique of rhubarb! When young, I absolutely hated it, even as everyone else seemed ecstatic over this advent of spring ingredient for pies, breads, etc. Now, I just mostly avoid it, a fairly easy thing for one not given to many sweets. However, it is frugal (as with most Midwesterners with a yard, I have some hearty plants that need no care at all) and well-liked by others, so I continue to find ways to include it in my springtime menus.

A few weeks ago, I was asked to bake some muffins for a brunch meeting. The backyard rhubarb was producing well and there were some bananas softening rapidly on the counter, so it seemed like a time to consider something combining the two. But would they work well together?

One of the things I have learned in this internet age is to do some online searching if I am thinking of trying something that seems just a little off the wall. Fortunately, a quick search for "rhubarb banana recipe" came up with hundreds of sites, many with rave reviews and no "what were you thinking" comments in view.

Most of the recipes were pretty standard muffins, so it looked like this would be a good place to play with some healthy ingredients as well.  The final recipe was relatively low fat and at least a little less sugar-y than so many rhubarb recipes,  so these could almost be considered healthy, as least as compared to so many of the cupcakes masquerading as muffins these days.

As a final flourish, I tried a topping I'd been thinking of, and it turned out to be as quick and tasty as I thought. It should work well for lots of muffins, quick breads, even some spice or carrot-type cakes.

Bottom line: the muffins were a hit the first time they were served and got some enthusiastic thumbs up from the grandchildren test kitchen the second time around. Who knows, maybe I could even learn to like this rhubarb recipe! Hope you enjoy them too.

Rhubarb Banana Muffins

1/2 c brown sugar
1/2 c sugar
3/4 c (6 oz) vanilla yogurt
2/3 c mashed very ripe banana (about one large--or two that have turned so squishy you have to cut a lot out!)
1/4 c melted butter
1 egg
3/4 c "old-fashioned" rolled oats (see NOTE)
1 3/4 c flour
2 t baking powder
1/2 t soda
2 t cinnamon
1/2 t cardamom (optional)
2 c finely chopped rhubarb

1.  Combine the first seven ingredients (sugars, yogurt, banana, butter, egg, and oats) and allow to sit about ten to twenty minutes, until the oats are well softened.
2.  Sift the dry ingredients together and add alternately with the rhubarb to the first mixture.
3.  Spoon batter into well-oiled muffin pans. Depending on the size of your pans, this will make 15 to 18 muffins.
4.  Spread with topping, as directed below, and bake at 375 degrees about 18 to 20 minutes, until the center of a muffin springs back when you touch it lightly. Allow to cool for just a minute or two before removing from the pans.


NOTE: The "old fashioned" oats will give a little more texture to your muffins, but, if you don't have them, regular quick oatmeal (but not the instant kind) can be substituted.

Nut Crisp Topping

2 T melted butter
1/3 to 1/2 c coarsely chopped walnuts
sugar and cinnamon ("recipe" below)

Melt the butter in a one cup measuring cup or other small bowl. Toss the walnuts in the butter so they are evenly coated.
Spread the nuts evenly on the muffins. (Clean fingers are probably the very best tool for spreading these quickly!)
Sprinkle each muffin generously with sugar and cinnamon.

Sugar and Cinnamon

Mix up a batch of this and keep on hand for cinnamon rolls, topping muffins like these, or for a quick spread on buttered toast or fresh out of the oven bread. It can be a good topping for a peanut butter sandwich instead of jam, with a lot less sugar used too.

1 c sugar
1 to 3 T cinnamon, to taste (my preference is that you can never have too much cinnamon!)

Combine the ingredients and mix well.

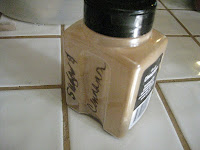
The best stirrer for this is a table knife, and it is a fun activity for kids if you do the combining in a large glass container. The patterns as the cinnamon is swirled in can be pretty fascinating--even for adults! With a tight top, this will keep as well on the shelf as sugar. (As shown in the photo below, I just mix mine in a large cinnamon container, making sure to label carefully.)


Summer Sherbets


Our weekend weather forecast is for some sweltering heat, perfect for some frozen desserts. With the stores featuring a wide variety of fresh fruits, this is a great time to try some easy homemade sherbets and ices, without the long list of unpronounceable ingredients and not as pricey as so many of the "all natural" choices in the freezer section.

Though it may seem strange to most people, I have never cared for ice cream. However, I was introduced to home made sherbets and sorbets when living in the desert southwest and found much to like in these intense but light deserts. There may be purists who will debate whether these are sherbets, sorbets, or fruit ices; I just call them delightful and will let you decide on the accuracy of my terminology.*

The recipes that follow do not require an ice cream freezer (something I have never owned) but you will need a food processor to develop the best texture. If you don't own one, consider making this your next kitchen purchase--mine seemed like an extravagance when I bought it, but it has been busy making sherbet and bread dough and soups and all manner of other things for decades, still going strong and probably ready for many more years of service. A blender may also be used, though you may have to process the sherbet in batches for best results.

Unflavored Gelatin
Why, you may ask, do I have to have the unflavored gelatin and why only half a package?
Many older recipes for homemade sherbets and sorbets include beaten egg whites, and you may also find some recipes that call for marshmallow creme--which is in essence a sweetened and flavored unflavored gelatin! The reason for any of these ingredients is the protein they contribute to reducing the size of ice crystals in the final mix. The egg whites are probably the most economical, but they are never cooked so should probably be avoided--unless you have your own backyard chickens with confidence the eggs are "germ-free."

As for the half packet--I have scaled the recipes I use to the size that best fits my full-sized processor, and a full package is definitely not needed. Just roll down the package on the remaining gelatin and put in a small jar or plastic storage container. (My guess is that, once you discover how easy and delicious these sherbets are, that second half of the package will be used in another batch very soon.)

Now, to a couple of recipes, with more to come as summer proceeds.

This week I have beautiful strawberries, mangoes, blueberries, and even a watermelon and pineapple that were all purchased at bargain prices, ready for a rainbow of sherbets. These will keep for several weeks in the freezer--if you and your family can keep from eating them for that long.

Strawberry Non-Dairy Sherbet

1 teaspoon unflavored gelatin ( one half package)
1 1/2 cups cold water
3/4 cup sugar
1/4 cup lemon juice (ReaLemon type jarred lemon juice is fine here)
1 1/2 to 2 cups crushed strawberries--about 8 ounces

1.  Combine the gelatin, water and sugar in a large microwave safe bowl (or saucepan if preparing on the stove top). Stir well and allow to stand for about 5 to 10 minutes.
2.  Heat in microwave for 3 to 4 minutes, until the mixture comes to a rolling boil and the sugar and gelatin are completely dissolved. (If cooking on the stovetop, this may take 10 minutes or so). Remove from microwave and allow to cool until lukewarm.
3.  Stir in the lemon juice and berries, place in a shallow container, cover, and place in freezer.


4.  Freeze until just mushy. Break into chunks and place in processor bowl or blender. Process, using a pulse motion, until the mixture is light and creamy.

HINTS:
Do not process so long that the mixture thaws to a liquid. This can result is losing the airy creaminess and. If it does start to liquify, not to worry though. Just refreeze and process again.
If you manage to pass the "mushy" stage, no worry. Just take the mixture from the freezer and let thaw a few minutes. Use a table knife to gently break into pieces about the size of ice cubes.


 (This is how it looks before beating, as the block is being broken into smaller pieces.)


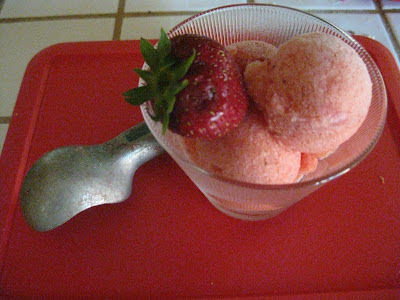
(And this is what processing does to the appearance. Note its creamy consistency, very similar to ice cream or purchased sherbet.)


5.  Return to the freezer. For an even smoother texture, you may want to allow the sherbet to refreeze and then process again. Store tightly covered in the freezer.

OPTIONAL STEP:  If you like, cut a few more strawberries in tiny pieces and stir into the beaten sherbet just before returning to the freezer.

6.  To serve, remove the sherbet from the freezer about 5 to 15 minutes ahead of time.

Variations:

This basic recipe will work for just about any soft fruit you may have--blueberries, raspberries, peaches, apricots, mangoes, plums, or any combination of these. Canned or fresh pineapple may be added; just be sure to cut in fine pieces or process lightly before freezing for best results. Fruit frozen  without sugar may be used as well as fresh.

The sugar can be reduced or increased depending on the sweetness of the fruit being used. 

For a slightly creamier, dairy version, add 1/2 c dry milk powder to the water, sugar and gelatin in step 1. This is more likely to foam as it heats, so be sure the container you are using is large enough.

UPDATE 6/19:
Instead of using dry milk powder for the creamier (sherbet) version, you can use "regular" milk. This would change slightly how you make the sherbet.

1 teaspoon unflavored gelatin ( one half package)
1/2 cup cold water
1 cup milk--whole milk will be the creamiest but skim or 2% will also do
3/4 cup sugar
1/4 cup lemon juice (ReaLemon type jarred lemon juice is fine here)
1 1/2 to 2 cups crushed strawberries--about 8 ounces

Combine the gelatin and water in a bowl or saucepan as above, and allow to stand 10 to 15 minutes. Then add the milk and sugar, stir, and continue with recipe as above. You will need to stir the mixture often if on the stovetop and will need to use a very large bowl in the microwave because this will foam up more than the non-dairy version.

Popsicles

Follow the recipe above through step 2. Turn the mixture into the processor (or blender) and process until smooth. Pour into either popsicle molds or two ounce paper/plastic cups. You can insert popsicle sticks into the cups at this point but they will be more centered if you wait until the mixture has just begun to freeze to add the sticks.

*If you really want some nomenclature clarification, here is the Barron's Food Lover's Companion definition for sherbet:
[SHER-biht] The origins of sherbet can be traced to a popular Middle Eastern drink (charbet) made of sweetened fruit juice and water. Today the term sherbet commonly refers to a frozen mixture of sweetened fruit juice (or other liquid such as wine) and water. It can also contain milk, egg whites and/or gelatin. Sherbet is lighter than ice cream but richer than an ice. See also sorbet.


One more, quite different recipe, this one adapted from a very old cookbook where it was labeled One Two Three Sherbet. Since I modified the proportions a bit, I re-christened it Tutti-Frutti Sherbet and often made this before the fruits of summer were readily available.


Tutti-Frutti Sherbet

2 cups cold water
1 cup sugar
1 tablespoon grated lemon rind, orange rind, or a mixture of the two
1 package unflavored gelatin
2/3 cup orange juice (best if freshly squeezed, but juice from concentrate can be used)
1/2 cup lemon juice
1 cup mashed ripe banana

1. Combine the water, sugar, citrus rinds, and gelatin. Stir well and let sit about 5 to 10 minutes. Bring to a boil and allow to simmer about 5 minutes on the stove top, or bring just to a boil (about 3 to 4 minutes) in the microwave.
2.  Remove from heat and allow to cool to barely lukewarm. Stir in the juices and banana and freeze in a shallow pan until just frozen.
3.  Process until smooth and return to freezer. If desired, may be processed a second time to incorporate more air and make an even creamier texture.

(This also can be made into popsicles, again processing the mixture before putting into the popsicle molds.)

Monday, June 4, 2012

Ten Minutes and Healthy to Boot

With garden tomatoes, peppers, and cilantro available in lots of our gardens or at the farmers markets or roadside stands, now is the time to rely on fresh salsa for some quick meals. We all know that salsas gain from being prepared ahead so the flavors have time to blend, but you can still enjoy a wonderful meal with just-made salsa at the center.

Here is the menu for two people:

Sauteed salmon (or similar fish) with fresh salsa garnish
Toasted tortillas with more salsa
Torn lettuce or other greens or shredded cabbage with your choice of dressing
Milk and fresh fruit of choice for dessert

So how does this all come together in 10 minutes? Take a look.

1.  Put the salmon in the microwave on your defrost setting for 8 oz of fish.
2.  As soon as the salmon is thawed, start crisping the tortillas.
3.  Heat the oil while you begin chopping the vegetables. As soon as it is hot, put the salmon in to saute. 
4.  Finish the salsa and tear the lettuce or shred the cabbage (OR use pre-prepared greens). If desired, add some of the tomatoes chopped for the salsa or other fresh vegetables to the greens before tossing.
5.  Put a salmon fillet on each plate and top with a tablespoon or so of the salsa, with the rest in a serving bowl for a dip for the tortillas. Lay three tortillas along the side. Serve the lettuce or cabbage salads in individual bowls.


Sauteed Salmon with Salsa
Salmon
2 four oz salmon filets  (In our part of the country, these four oz packets are often on sale for less than buying salmon by the pound, so I stock up. Other fish like tilapia, etc., are also available in this format and can be substituted here)
1 t canola or olive oil (may need more if you do not have a nonstick or cast iron pan)
seasoning salt (other herbs of your choice may also be used)

Heat the oil until shimmery and then lay the salmon in place. Cover lightly and allow to cook on medium high for about two minutes, depending on the thickness of the filets, until golden brown on the bottom. Sprinkle lightly with seasoning salt and any other herbs you might like and turn. Add a few drops of water, cover again, and continue cooking just until the meat flakes--about two to three minutes more.


Fresh Salsa
2 c coarsely chopped fresh tomatoes--if you have access to both yellow and red tomatoes, use some of each for a very colorful salsa
1/2 c  coarsely chopped bell pepper OR banana peppers OR jalapenos--your choice, depending on the amount of heat you desire
1/4 to 1/3 c diced onion
1 t cumin
1/2 to 1 t oregano, to taste
1 T balsamic vinegar
salt to taste

Combine all ingredients, stir well, and taste for seasoning. May be served immediately or can be refrigerated to allow flavors to blend.


Toasted Tortillas

6 six or seven inch corn tortillas

Spread the tortillas across the bottom of the microwave plate--if yours does not have a rotating base, you will need to arrange them in a circle and then rotate more often.
Microwave on high for about 2 minutes. Turn and redistribute and then continue microwaving another 3 to 4 minutes, depending on your microwave's power, until the tortillas are crisp and lightly browned. Serve while still warm for best flavor.


Salad

Is this really a recipe?

Sometimes, simplest is best, especially if going back to basics means you'll actually have a "salad" as part of the meal. Maybe you are too young to remember the Midwestern salad of choice, a wedge of iceberg lettuce with a blob of dressing (usually that sweet, bright orange "French" dressing), but you've probably heard plenty of jokes about it.

Yes, that was about as far from a salad as you are likely to get today, but it still would be better than no greens at all. So let's do an updated version of that old basic.

Most basic:  Start with whatever lettuce or greens you might have available. If they are in a bag, ready torn, dump them into the salad bowls, bring out a bottle of dressing and allow everyone to add their own or pour a small amount on each serving.

Don't forget cabbage. This has more nutritive value than a lot of the basic lettuces and can add some nice crunch to other greens or can stand on its own. Don't think you have to turn it into coleslaw either. While that is good, shredded cabbage takes to just about any bottled dressing you might like on lettuce too.

A step up:  To the greens, add some of those chopped tomatoes that might otherwise have gone into the salsa. Look in the refrigerator. Any baby carrots or broccoli crowns? A piece of that huge zucchini that you can't seem to use up? Some black olives or nuts hanging around? Toss them into the greens and then add the dressing. If you really want to go beyond and have the ingredients and/or the time, add some fresh fruit (halved green grapes, diced apple or pear, or whatever is available) or dried fruit and/or nuts. Top with some grated cheese if you'd like too.

Of course the ultimate:  Make your own dressing. While this is a great thing to do, and it can give more flavor and a lot fewer unpronounceable ingredients, don't be afraid to go with the bottled stuff for the nights when you really, really need a ten minute meal.


Zucchini Part IV--Enchiladas too?


One of the things I've been trying to learn for this blog has been the art of food photography. Since I only have my simple kitchen and a pretty basic camera, the results I'm sure have been mixed.

The photo in this entry shows I still need to work at the process. I have had a recipe for Lasagna Enchiladas (actually, more like a midwestern enchilada casserole, since I don't take time to roll up the tortillas) ready to go for awhile. However, when I downloaded the photo, I realized that these enchiladas looks remarkably like the zucchini lasagna from a couple of weeks ago. Individual servings, had I taken photos of them, would have shown the difference of course, but I didn't take that extra step. Since I have not had the opportunity to make either dish again, you'll just have to imagine that this is enchiladas ready for the oven, while the earlier post demonstrates all the steps of the lasagna. Honest.

We had a close call with frost one night last week, but most local gardens (and produce farmers?) managed to miss it, so the abundance of zucchini and yellow summer squash continues, perhaps at a little slower rate as the air cools. If you are still looking for new ways to use up these prolific producers, here is the enchilada recipe to try. Sorry I missed posting this for Mexican Independence Day on September 16, but it's always time for Mexican at my house.

A side note: This recipe is a little lighter than many enchilada recipes, because I have added yogurt and egg, cutting the cheese needed by half. You might want to try this step with your usual, no-zucchini enchiladas as well.

Zucchini Cheese Enchiladas

Enchilada Sauce
2 t canola oil
1/2 c chopped onion
1 c grated zucchini or yellow summer squash
1/2 c red or green bell pepper, diced
1 T chili powder--or more to taste
1 t cumin
1 t garlic powder
26 oz can or jar chunky vegetable or other variety spaghetti sauce
8 oz tomato sauce
1/4 c minced cilantro--optional

Cheese Sauce
1 c yogurt
1 egg
4 oz grated cheddar, mozzarella or Mexican blend cheese
1 t cumin
1 to 2 t chili powder
1 t garlic powder

7 to 10 corn tortillas
2 to 4 oz grated cheese of your choice

1. Saute the onions in the oil until just starting to turn translucent, about 5 minutes. Stir in the zucchini and continue to cook until the zucchini is quite soft, about 5 to 10 minutes more. Add the remaining sauce ingredients and return the mixture to a slow boil. Taste and adjust for seasoning as desired.

2. While the sauce is cooking, combine the yogurt, egg, cheese, and seasonings. Set aside.

3. Spread a little of the enchilada sauce on the bottom of a 7 X 11 pan or casserole dish. Arrange a single layer of tortillas over the sauce, tearing as needed to completely cover the bottom.

4. Spread half the cheese sauce over the tortillas, and then pour over about a third of the remaining enchilada sauce.

5. Add another layer of tortillas and the rest of the cheese sauce. Pour over another third of the enchilada sauce and top with one more layer of tortillas.

6. Spread the remaining enchilada sauce over the tortillas, making sure all areas are covered. Sprinkle with grated cheese.

7. Cover lightly and bake at 350 degrees about 20 to 25 minutes, until the sauce is bubbly and cheese is melted. Uncover about 15 minutes into the baking time for the best crust.

Variations:

One to two cups of diced, cooked chicken, refried beans, or crumbled, cooked ground beef or turkey can be added after each of the two cheese sauce layers.