Thursday, August 27, 2009

Making Pie in the Microwave


Yesterday was one of my grandson's fifth birthday. He had told his mom he would like a pie instead of cake (a typical request in our family) but he couldn't decide just which kind, so maybe he should just be surprised.


Xavier loves fruit, so I knew that we'd go in that direction for a filling. Then, because we'd have quite a few family members sharing dinner, I knew that two would be better than one; now, to decide on two choices that would be economical, welcomed by all...and a surprise.

The first choice was not really a surprise--raspberries from the backyard are almost ubiquitous on the dessert menu. Even though we are in the month-long gap between crops, there are plenty of berries in the freezer to draw from, so that would be one of the pies.

Green grapes are on special this week at almost all the stores, some for as little as 88 cents a pound. That brought back memories of a pie I first made decades ago and hadn't tried for years. This time I decided to update it using the microwave, and the result was a pie that was impressive in its appearance, better in its flavor and, best of all, relatively inexpensive and easy.

Each of the pies was cut into twelve thin wedges, just in case anyone would like to try a bit of both; good plan, as the dual option was the choice of everyone at the party. The red and green slices on the plates were festive and could easily be duplicated in December for a Christmas color scheme.

Some Miscellaneous Hints to Remember:

Don't be put off by the multiple layers of the grape pie; You can use the same bowl for both the custard and the glaze if you scrape it well first.

I have found that thickening flour or cornstarch mixtures in the microwave is far easier than on the stove top, with fewer lumps and consistently smoother consistency. Just a couple of things to remember--be sure to use no more than MEDIUM power and stir often.

And, whether on the stove top or in the microwave, the method for mixing eggs into a hot custard is always the same--have the eggs beaten enough that you can no longer see uncombined whites and then pour a little of the hot mixture into the egg. Stir this together well before adding it back to the rest of the hot custard. If you just pour the egg into the hot mixture, the egg begins to set as soon as it hits and you are likely to have little bits of "scrambled egg" lumps throughout your custard. Learn this little trick (which really takes no more time or bowls) and you'll be on your way to making lots of wonderful sauces without fear of lumps.

Surprise Grape Pie

Custard:
3/4 c orange juice (you can use juice made from frozen concentrate as well as fresh-squeezed)
2 1/2 T flour (OR:  1 1/2 T cornstarch for the flour)
1/2 c sugar
1 egg

1. Stir the flour and sugar together in a large microwave-safe bowl. Gradually add the orange juice.
2. Microwave, loosely covered, on MEDIUM power for about 2 to 2 1/2 minutes, stirring about every minute or so. The mixture should boil up and become thick.
3. Beat the egg with a fork just enough so that the egg yolk and white are thoroughly mixed.
4. Pour a tablespoon or so of the hot orange juice mixture into the egg and stir to combine. Pour this mixture back into the rest of the orange juice mixture and return it to the microwave. Cook on MEDIUM power another minute, or until the mixture once again begins to bubble.
Set aside to cool.


Glaze:
1 c water
1/2 c sugar
4 t cornstarch

Stir the sugar and cornstarch together and then gradually add the water.
Microwave on MEDIUM power for about 2 minutes, stirring several times. The mixture will boil up and become translucent. Set aside to cool.

Assembly:

1 9 inch baked pie crust
Approximately 1 pound green grapes, washed, stemmed, and cut in half
Custard
Glaze
1 orange

1. Pour the cooled custard into the baked pie shell.
2. Lay the grapes, cut side down, in concentric rings, over the pastry. Place the grapes so that the custard is completely covered.
3. Pour the glaze over the grapes.
4. Wash the orange well. Cut it into quarters and then thinly slice the quarters. Place around the edge of the pie.
5. Chill well before serving. Store in the refrigerator.

************************************************************************

This raspberry pie also uses the microwave and is a good one any time you have raspberries in the freezer. Could you make it with fresh raspberries? Of course. Just put raspberries in a cup and then add water around them to come up to the one cup measure. Cook for a few minutes until the berries have released all their juices and then proceed with the recipe.


Raspberry Pie

1 baked 9 inch pie crust
4 to 5 c frozen raspberries, slightly thawed--best if not completely thawed
3/4 c sugar
3 T corn starch
1 T lemon juice (may use reconstituted)

1. Combine the sugar and cornstarch, mixing thoroughly.
2. Measure 1 cup of the juices of the thawing raspberries into a large microwave-safe bowl. (If you don't have quite a cup of juice, you may add a bit of water to reach the one cup level.) Gradually stir in the sugar and cornstarch mixture.
3. Microwave on MEDIUM for 3 to 4 minutes, stirring occasionally, until the mixture bubbles up and is thick and translucent. Remove from microwave and stir in the lemon juice. Allow to cool for a few minutes.
4. Fold the remaining berries into the cooked mixture and pour into the prepared pie shell. Chill before serving.

Monday, August 24, 2009

Low Fat Applesauce Cake

We've all heard about substituting applesauce for fat in cake recipes, so I went searching for some ideas for an applesauce pumpkin cake. Several sites suggested that cakes made from scratch really don't work well using this substitution, that it works best with cake mixes.

As you may have seen from earlier posts, I like to play around with cake mixes, but these comments were a challenge. Surely I could come up with something edible and acceptable without a mix. The result was a flavorful cake that, while not really "low cal" or truly "healthy," can still be enjoyed with at least a little less guilt. And, if your garden (or that of your friends) yields "free" pumpkin and/or applesauce, the cost can be kept low as well.

Low Fat Pumpkin Applesauce Cake

2 large/extra large or 3 medium eggs
1 c pumpkin puree (canned or home-cooked)
1 c applesauce
1/4 c water
1 c sugar
1 2/3 c flour
1 t baking soda
1/2 t baking powder
1 t cinnamon
1/2 t nutmeg
1/2 t allspice
1/4 t cloves

1. Preheat the oven to 350 degrees
2. Melt 1/4 cup butter in a 9 X 13 pan.* (You can do this while preheating the oven.) Stir in 1/3 cup brown sugar and 1 teaspoon cinnamon. Sprinkle with about 1/3 to 1/2 cup chopped walnuts.
3. Combine all cake ingredients and beat with an electric mixer for about 2 minutes, until very smooth. Pour batter over butter and sugar mixture.
4. Bake at 350 degrees for about 25 minutes, until center springs back or a toothpick inserted near the middle comes out clean.
5. Cool for about 5 minutes and then invert onto a tray.

(The 9 X 13 pan makes a cake only about the height of a brownie. A 7 X 11 pan can be used if higher pieces are desired.)

Zucchini Brownies


It's that time again, when every gardener supposedly looks for ways to push zucchini on to unsuspecting neighbors, family, and friends, and the table at church yesterday was piled with lots of the ubiquitous squash.

Others may not want this bounty, but it's been good for me, since I have somehow not yet been able to find the zucchini gardener secret. In three years, I have been able to harvest a grand total of two zucchinis.

Two.

This year at least, my butternut squash is thriving and taking over most of the garden, inundating the bush beans and peppers (which weren't doing too well anyway) and threatening to keep the three red cabbage plants from ever starting to head up. So I am always happy to accept anyone's zucchini and summer squash offerings. Between a couple of donors, I have had plenty to work with this week. On my way to a meeting where I have offered to make the dessert, I decided to try my hand at zucchini brownies, having done cakes and breads and lots of main dishes in the past. The following recipe didn't rise quite as high as regular brownies and is more cake-like than fudgy-chewy, but it is also much lower in fat and higher in fiber than the usual.

I had brownie mix on the shelf from a 79 cent sale awhile ago, so these turned out to be quite inexpensive--free zucchini, two eggs at 16 cents (priced under a dollar right now, eggs are another bargain) and the mix added up to less than a dollar for at least 24 brownies. Admittedly, the nuts added to the cost, but they are completely optional; I used them only to cover over any suspicious hint of "chunkiness" that the zucchini might have given. A dusting of powdered sugar provided a quick and inexpensive topping. Start to finish, they took little more than half an hour, since the baking time is only about 20 minutes.

Zucchini Brownies

1 package brownie mix for 9 X 13 pan--do not use low fat brownie mix for this recipe
2 eggs
1/4 c water
1 c finely shredded zucchini, firmly packed
1/4 to 1/2 c chopped walnuts (optional)

1. Spray a 9 X 13 inch pan with nonstick coating and preheat oven to 325 degrees.
2. Mix all ingredients together until smooth and pour into prepared pan.
3. Bake for 15 to 20 minutes until just done; do not overbake.
4. When cool, sprinkle lightly with powdered sugar.

A couple of things to keep in mind:
These brownies are best eaten the first day or so, as they seem to become a little gummy over time. And while I only dusted them with powdered sugar, adding a chocolate frosting would probably make them more welcome to brownie purists.

Cauliflower--Special Buy of the Week

One of the supermarkets in town had huge heads of cauliflower on special this week for $1.50 each, so I bought several (they keep for weeks in the vegetable drawer). When I got them home, I weighed them, as I often do, just because I'm like that! They weighed in at over 3 1/2 pounds each, after trimming, a little over 40 cents a pound.

When I speak of "trimming," I don't mean throwing half the cauliflower away! Here's a hint to keep in mind with cauliflower--and broccoli too. All too often, cooks use only the flowerette parts of both broccoli and cauliflower, throwing away perfectly good food. Except for very woody sections (rare in cauliflower and uncommon even with all but the largest broccoli), the entire head can be used after cutting off the outer leaves. Broccoli leaves that haven't wilted don't have to be cut off either.

Yes, the stems may not be as attractive as the flowerettes, but you can slice or dice them and use them in stir fries, toss them into salads for extra crispness, or add them to soups, stews, and casseroles where their shape will blend in with the other vegetables. (If you don't have a use for these "extra" parts right away, steam the diced stems briefly in the microwave and put in the freezer for adding to dishes later.) Learning to use all the edible parts of the food you buy can be a quick way to stretch the budget!

So what did I do with this week's bounty? The first one was cut into flowerettes to go on a vegetable tray with baby carrots, fresh green beans, and some cucumber slices from the garden. One of the women at church had brought fresh dill to share, so there is a yogurt dill dip to go with the veggies. The stem sections were diced and added to a stir fry with--of course--zucchini, corn, carrots, onions, sweet banana peppers, Swiss chard, garlic, and lots of herbs and seasoning.

Next up will be the following dish that has become a favorite side at Thanksgiving. It's easy, colorful, and high in nutrition. Note that there is no salt or fat; the mixture of flavors makes any such additions unnecessary.
I'm not sure what is the magic in the lettuce leaves, but they do seem to make the peas especially taste very fresh. If you cut the onions in thin rings, the dish is especially attractive, but you can also chop them if that is quicker and easier.

Cauliflower and Peas
1 small to medium head cauliflower
12 to 16 oz frozen peas (do not thaw)
1 large sweet onion, cut in thin rings
1 t Italian seasoning
2 to 3 T water
3 to 4 large lettuce leaves (the darker green, the better)

1. Cut or break the cauliflower into small flowerets about 1 to 1 1/2 inches in diameter.
2. Put the cauliflower, peas, and onions into a large heavy saucepan with a tight fitting lid. Sprinkle with seasonings and add water. Lay the lettuce leaves over the top, completely covering all the vegetables.
3. Cover and bring to a boil; turn heat to low and simmer 12 to 18 minutes, until the cauliflower is just tender--do not overcook.
4. Remove and discard lettuce leaves before serving.

Thursday, August 20, 2009

Lemon Meringue Pie

Seems like I'm on a dessert binge here, but this is a good finale for warm summer days. We have had several weeks recently with lemons on sale (though you can easily use reconstituted lemon juice in a bottle here for even more savings), and eggs have continued to be quite reasonable this summer.

When I have mentioned making lemon meringue pie, a few people have said they like it but find it to be "too much trouble." I guess that's one of the things I like about this recipe: it is easier than it looks, especially if you remember just a couple of things about separating eggs:

  • Egg whites are easy to beat into a meringue ONLY if they have absolutely no fat in them. This means avoiding plastic containers (they are porous enough to sometimes have tiny amounts of fat residue) and being sure that not even a drop of egg yolk is allowed into the whites before beating. If the yolk of one of the eggs breaks while you are trying to separate it, just put that egg aside and use it for another purpose.
  • While eggs separate most easily while fresh and chilled, they beat up to the highest volume when at room temperature. You can use these facts to best advantage by taking the eggs from the refrigerator and separating them as the first step. Then begin to prepare the sugar syrup and lemon juice. By the time you are ready to beat the whites, they should be at an optimal temperature.

There is one other thing to remember in following this recipe: Gradually is a key word, both when adding the cornstarch and water to the boiling syrup and when adding the sugar to the frothy egg whites. Take these steps slowly and you should have no problems.

What about the pie crust? I have a favorite recipe that I mix up when I am in the mood for pies, but there are many times when a premade crust in the refrigerated or frozen sections of the store is no more expensive than homemade. Watch for specials and keep these on hand if it will help you choose a pie for a special occasion dessert. (OR...look below and try your hand at your own homemade crust when the mood strikes and butter or margarine is on sale.)

Classic Lemon Meringue Pie

9 inch baked pie shell
1 1/2 c sugar
1 1/2 c water
1/2 c cornstarch
1/3 c water
4 egg yolks
1/2 c lemon juice
1 t grated lemon peel

Meringue:
4 egg whites
1/2 c sugar

1. Separate the egg whites from the egg yolks and put the whites in a large mixing bow; set aside.
2. Combine the egg yolks and lemon juice and stir until mixed; set aside.
3. Combine the sugar and 1 1/2 cups water in a pan and bring to a boil. While it is heating, stir the cornstarch into the 1/2 c water so that it forms a smooth paste. When the sugar syrup is boiling, gradually add this mixture, stirring constantly. Cook until the mixture is thick and clear.
4. Gradually add the egg yolk and lemon mixture to the sugar syrup, stirring constantly, until the mixture returns to a boil. Stir in the lemon peel and allow to cool to lukewarm, approximately half an hour or so.
5. When the filling has cooled, beat the egg whites until frothy. Gradually add the sugar and continue beating until the mixture is glossy and forms peaks. Fold a few tablespoons of this mixture into the filling.
6. Pour the lemon filling into the baked pie shell and spread the meringue gently over the top, making sure it touches the crust at all edges. (If you don't "fasten" the meringue to the crust, it will shrink away from the edges during baking.)
7. Bake at 325 degrees for 12 to 15 minutes, until just starting to turn golden in spots. The pie should be completely cooled before cutting. Store any leftovers in the refrigerator.

Frugal tip: Whenever you buy fresh lemons to use for juice and/or pulp, be sure to save the rind. If you are like me, I sometimes have trouble getting much of the lemon peel off when I try to grate it. If so, just cut away the very top yellow layer of the peeling and then cut into thin shreds. Put the shredded or grated rind in a resealable plastic bag and freeze. You can then break off the amount you need for future recipes.

Homemade Pie Crust

Want to try your own pie crust? This recipe is a large one, which means I can make enough for up to four pie shells at a time, freezing the extras for later use.

Since the only hard fats I keep in the house are butter and, rarely, margarine, that is what I use for my pie crust. Many cooks swear by lard or Crisco, but I will stick with these. No pie crust could ever be considered "healthy," but there are even more negatives to lard and Crisco than the other two. As long as you don't overmix (something to remember no matter the fat being used), you'll have good results.

Note that there is no salt in this crust--the butter and margarine will provide more than enough!


Country Crusts

4 c all purpose flour
1/2 t baking powder
1 T sugar
1 1/4 c butter or margarine
1 egg
1 T vinegar
1/2 c cold water

1. Blend dry ingredients. Cut in butter until the largest particles are about the size of peas.
2. Combine the egg, water, and vinegar and stir until smooth.
3. Sprinkle the egg mixture over the flour a tablespoon at a time, tossing lightly with a fork to mix. Gather the dough with your hands, so that it cleans the bowl and forms a ball.
4. Chill well before rolling.

Makes four single crust 9" pie shells or two double crust 9" pies.

To freeze: Roll a quarter of the dough into a circle between two pieces of waxed paper and place, flat, in a freezer bag. Several crusts can be stacked in the same bag, as long as they are separated by two sheets of waxed paper between each. Remove from freezer and use just as with purchased frozen crusts.

Friday, August 14, 2009

Strawberry Applesauce Cupcakes

Two factors came together today for an easy, relatively inexpensive dessert that has been a real hit: first, I had some 99 cents a pound strawberries that needed to be used up quickly and I needed to find a dessert that I could make and finish within an hour and a half. Fortunately I still have a lot of frozen unsweetened applesauce that needs to be used up to make room for this year's harvest, so I modified a cake mix recipe to fit what was on hand and came up with some light, refreshing cupcakes. This would make at least 2 dozen regular sized cupcakes, but I made a dozen miniature cupcakes and still had enough for 19 regular ones.

The applesauce thawed quickly, but the microwave could have been used if necessary. This would probably work just as well with frozen strawberries (NOT in syrup) when fresh ones are not available at a good price.

Cupcakes can be a good choice in the summer, since they do bake a little more quickly than full-sized cakes and can be frozen so that you can thaw only as many as you need on a really hot day without heating up the oven again.


Strawberry Applesauce Cupcakes

1 package yellow cake mix
8 ounces unsweetened applesauce
approximately 8 ounces strawberries
2 eggs

Process strawberries and applesauce in blender until smooth. You should end up with one and a half cups of puree; if you need more, you can add more strawberries or just enough water to make that amount.

Combine the cake mix, eggs, and strawberry applesauce puree; when all the ingredients are well-mixed, continue to beat with an electric mixer for 2 minutes.

Preheat oven to 350 degrees. Place paper liners in muffin tins; spray each paper lightly with nonstick cooking spray. Spoon the batter into the cups, filling each just over half full. Bake for 15 to 18 minutes, until the center springs back (or use a toothpick or skewer to test for doneness). If using miniature muffin pans, bake for only 10 to 12 minutes.

Remove from oven and cool. When ready to frost, pull the liner away from the side of each cupcake just far enough to cut a slit in the middle of the cupcake--don't cut all the way through. Spread a little frosting into this slit and press the cupcake together, pressing the paper liner back against the cake. Spread the top with frosting. Makes about 24 cupcakes. Store in the refrigerator.

Strawberry Frosting and Filling
1 T soft butter
3/4 c fresh strawberries, finely chopped
powdered sugar--approximately 2 to 3 cups
1/2 t almond extract
1 t lemon juice (may use bottled or fresh)

Stir strawberries and butter together and then mix in a cup or so of powdered sugar, the almond extract and lemon juice. Beat with a fork until quite smooth. Continue adding powdered sugar until quite thick. Place in refrigerator for at least half an hour. As this stands, the acid in the strawberries may cause the mixture to thin out, so you may need to add more powdered sugar. Warning: this will probably never develop a really creamy consistency, staying much more like a glaze.

If desired, add a small strawberry or strawberry slice to the top of each just before serving.

Monday, July 27, 2009

Coffeecakes, Blueberry and otherwise

Coming to the end of July, we are still in a time when some kind of berry can usually be found at a bargain price in the supermarkets, at the farmers' market or, if you are really lucky, in your own backyard or nearby country roads. Strawberry season may be coming to a close, but there are still reasonably priced blueberries, raspberries, mulberries, and blackberries most weeks.

Today's recipe is infinitely adaptable to any kind of berry--as well as many other fruits--and can be used to stretch a precious cup or so of berries across a lot of servings. It is a good one to keep around in the winter months too, as frozen berries are easily substituted for fresh.

This is a great recipe for a weekend breakfast, with just some juice and coffee, or as a dessert after a light salad meal. It's also an always welcome addition to a potluck brunch. It's a very basic cake that can be found in multiple variations in most comprehensive cookbooks, so it is also a good one for kids who are learning to cook to prepare as a special treat for the family.

Is the house too hot to think about turning on the oven? I've included some instructions for the microwave too. This variation probably isn't as attractive, but it still can bring some variety to summer meals.

Berry Coffeecake

1/2 c oil
1/2 c sugar
1 egg
2 1/2 t baking powder
1/2 c water
1/4 c nonfat dry milk (OR use milk instead of water and omit dry milk)
2 c flour--may substitute up to 1 cup whole wheat for white flour
1 to 2 c blueberries

Crumb topping
1/2 c sugar--may use white, brown, or a mixture of both
1/4 c butter
1 t cinnamon
1/2 t nutmeg
1/2 c white flour, whole wheat flour, oatmeal, or a mixture of these
1/4 c chopped nuts (optional)

Beat oil, sugar and egg together and stir in the dry milk powder. Sift the four and baking powder together and add alternately with the water, stirring just until smooth. Fold in the berries and pour into a well-oiled 7 X 11 1/2 inch pan.

Cut all the crumb topping ingredients into the butter and spread evenly over the cake. Bake at 350 degrees for 40 to 45 minutes.

If frozen berries are used, allow to thaw only about 5 minutes (should still be quite firm) and then add 5 to 10 minutes to overall baking time.

Variations:

Spread half the batter in the pan, top with most of the crumb mixture, and then cover with remaining batter. Sprinkle remaining crumb mixture over top.

Use crushed cereals whole grain cereals like wheat flakes as a substitute for part of the flour in the crumb mixture.

Other fruits that can be used: any berries, including sliced strawberries, sliced or chopped cranberries, raspberries, mulberries, or blackberries. Finely chopped peaches, apples, nectarines, pears, or plums may also be used instead of the berries.

Instead of whole fruit, decrease water to 1/4 cup and stir in 1 1/2 cups applesauce in its place. Add 1/2 to 1 teaspoon cinnamon or apple pie spice to the batter.

Microwave version:

(Best if made in a deep 9 inch round baking dish, though the rectangular pan can be used.)

Prepare coffeecake batter and crumbs as in main recipe, but do not fold fruit into the batter. Spread about one third of the crumb mixture in the bottom of the pan, then layer the fruit over the crumbs. Cover with half the batter, then add a layer of all but 1/3 cup or so of the remaining crumbs. Finish with the rest of the batter and then sprinkle with the remaining crumbs. Microwave for 7 to 9 minutes at power level 7 (medium to medium high), until a toothpick inserted in the center comes out clean.

Do not overbake--the cake will not be as brown as in the oven. The color will be much improved if you use brown sugar in both the cake and the crumb topping.


Wednesday, July 22, 2009

Mulberries this time

Summer travel, a crashed hard drive, and suddenly it's the end of July with only one post since May--not the way to run a blog!!

I am in the middle of the first crop of my everbearing raspberries and enjoying the luxury of going out to pick a handful just for snacking. Sometimes I bring the berries in first and weigh them (yes, part of my secret weirdness I guess, this love of measuring and counting) and think of how much that little pile would cost at the store. Once again, I can't stress enough that, if you live in raspberry country and have even a little space, start some plants this year.

Today's recipe, however, has nothing to do with raspberries but instead features two other "crops" that are often close to free if you have them in your yard or know others who grow them: rhubarb and mulberries.

Mulberries are an often forgotten fruit that many see as only a mess maker in the yard. Their flavor is very mild but they can be substituted for blackberries or other berries in a lot of recipes. Adding quite a bit of lemon juice will help perk up whatever you put them in, and I noticed a lot of the recipes online include good dashes of almond flavoring.

Rhubarb of course is that great Midwestern backyard staple that needs a lot of help to make it palatable. Still, it is so common here in MN that it isn't too hard to find someone with plenty to spare.

I was the recipient this weekend of a few cups of shiny purple mulberries, and I wasn't up to making pie, the usual use for these berries around here, so I went looking for ideas and found a recipe for a quick jam that I adapted slightly. "The boys" (grandsons ages 3 and almost 5) sampled it with peanut butter on whole wheat bread and were ready for more, more. With something this easy and inexpensive, it seems like a good thing to keep on hand in the summer.


Mulberry Rhubarb Jam

2 c sugar
1 c finely chopped rhubarb, packed
1 c mulberries, packed
1 3 ounce package lemon gelatin

Combine the sugar, rhubarb, and mulberries in a saucepan and stir. Bring to a boil and simmer for 15 minutes. Stir in the gelatin, return to a rolling boil, and remove from heat. Store in the refrigerator.

Makes about one pint.

I still have some mulberries left so I plan to use them in place of blueberries in this tried and true coffee cake recipe based on one from the 1962 Better Homes and Garden New Cook Book, Revised Edition.


Berry Buckle

1/2 c butter (may substitute 1/3 c canola oil)
1/2 c sugar
1 egg
1/3 c nonfat dry milk powder
1/2 c water (use milk if you aren't going to add dry milk powder)
2 c flour--up to 1 cup may be whole wheat
2 1/2 t baking powder
1/2 t vanilla OR almond extract
1 t lemon juice (optional)
2 c berries, fresh or frozen (see NOTE)

Crumbs:
1/4 c butter
1/2 c sugar (may use white or brown sugar)
1/2 c flour
1 t cinnamon
1/2 t nutmeg (optional)
1/2 c chopped nuts (optional)

Cream butter and sugar and stir in egg, vanilla, and dry milk powder. Beat well. Sift flour, baking powder, and spices and add alternately with water. Fold in berries.

Combine all ingredients for the crumbs.

Pour half of batter into a well oiled 7 X 11 OR 9 inch square pan. Spread about a third of the crumbs over this layer and then drop the rest of the batter evenly over the top. Finish by spreading the rest of the crumbs evenly over the top. Bake at 350 degrees for about 45 minutes.

NOTE: This works well with blueberries, raspberries, blackberries and mulberries. Chopped apples or even finely chopped peaches or plums can also be used. For these latter fruits, you may want to spread the fruit over the first layer of batter rather than stirring the fruit in.

If you are using frozen berries, do not thaw them before adding; add about 5 minutes or so to the baking time.

Monday, June 15, 2009

Not too late for rhubarb

A crazy month and a lot of catching up to do! There is still time to use the rhubarb in your backyard...or your neighbor's--here in the upper Midwest, it seems like rhubarb is sometimes like the zucchini of spring, with many gardeners so overly blessed with these ruby red stalks, they are delighted to share with whoever can use the stuff.

I'll admit that I have never been a very big rhubarb fan, but everyone I know seems to love the stuff. If you live far enough north to be able to grow it, by all means start a couple of roots, as it becomes a virtually free food source after the first year. The plants grow easily here in Minnesota, with some homeowners still harvesting stalks for decades. Once established, the "fruit" is virtually free, so it is a good choice for frugal breads and desserts. It freezes well too; just wash, slice, and wrap tightly, squeezing out as much air as possible from the bag.

Another advantage of rhubarb is the nutritional boost it provides for only 26 calories per serving. Of course, its natural tartness means that virtually every recipe that includes it will also have quite a bit of sugar. Still it does qualify as a good nutritional choice, with a lot of vitamin C. You can find a full breakdown of its attributes at http://www.nutritiondata.com/facts/fruits-and-fruit-juices/2056/2

Strawberries are often teamed with rhubarb, a good way to make the generally more expensive strawberries go further. The Strawberry Rhubarb Cake is extremely quick to make and is a good last minute recipe to keep in mind. If you use frozen rhubarb or strawberries, drain the fruit and use that for part of the liquid in the cake mix.

Strawberry Rhubarb Cake

1/4 c butter
1/2 c brown sugar
1/2 c white sugar
3/4 t cinnamon
2 c diced rhubarb (my cake today actually had only about 1 3/4 cup)
2 c sliced strawberries
white or yellow cake mix, two layer size
eggs, water, and oil as directed on cake mix
1 t cinnamon
1/2 t nutmeg

Preheat oven to 350 degrees. Dice the butter into the bottom of a 9 X 13 pan and put in oven just long enough to melt. Remove and mix with sugars and cinnamon in the pan, spreading the mixture evenly.
Dice the rhubarb and slice the strawberries and spread evenly over the sugar and butter mixture. Press the fruit down into the mixture with a fork, so that it is well mixed.
Prepare the cake mix as directed on the package, adding the cinnamon and nutmeg with the other ingredients.
Pour the prepared cake batter over the fruit and bake at 350 degrees for about 35 to 45 minutes, until a toothpick inserted in the center comes out clean.
Allow to cool in the pan for about 10 minutes and then invert on a serving platter. Serve warm or cold, with whipped cream if desired.
NOTE: This cake is so tender, I used about a tablespoon or so less oil in the batter, still with good results.

With a cake mix I had gotten on sale for less than a dollar a few weeks ago and the strawberries and eggs on special this week, the total cost of the cake came to just over $2; the "free" rhubarb really helped to keep the cost down.

The rhubarb pie my kids grew up loving came from their grandmother who had herself received it from generations before. It is a simple dessert and also can be made inexpensively if you have backyard access to rhubarb. Though I don't mind making piecrust, this is an area where the convenience of a pre-made crust may not be much more costly than from scratch—and it may mean the difference between you trying the recipe or passing it by. Since even homemade piecrust is not really what anyone would call a health food, opting for the more preservative-laden pre-made crust might be worth an occasional splurge.


Grandma's Rhubarb Custard Pie

2 to 3 c diced rhubarb
2 to 3 large eggs, beaten
1 1/2 c sugar
3 T to 1/4 c cornstarch
1/2 c milk
cinnamon
9 inch unbaked pie shell

Spread rhubarb in the prepared pie shell. Mix all the other ingredients, except cinnamon, together until smooth. Pour over the rhubarb, sprinkle liberally with cinnamon, and bake at 400 degrees for 10 minutes, then 350 degrees for 30 minutes or until set. To test custards like this, insert a table knife near the center. The blade should come out with none of the mixture clinging to it.

NOTE: As you can see, this is one of those old-fashioned recipes where everything is VERY approximate! I have found that three cups of rhubarb is a good amount to make the filling a generous depth. With the larger amount of fruit, you will want to use three eggs and the full quarter cup of cornstarch. The key is to be sure that you don't end up with a filling that never quite sets.

Oh--and the original recipe called for "top milk," that creamy layer on top of farm milk that had not been homogenized. I have always used skim milk, but you will have a richer custard by using half and half or whole milk.

Saturday, May 9, 2009

A Beef-Stretching Meal

As you may have noticed in prior posts, one of the ways that I like to keep food costs under control is by reducing the amount of meat in recipes. In addition to the positive effects on the budget, these kinds of adjustments can often make the dish much healthier as well.

The following recipe served almost 20 people with only three pounds of a very inexpensive cut of beef, resulting in almost seven servings from each pound of the roast. At least three things worked to make the final dish seem full of meat:
  • The meat was cut into a relatively small dice, so each forkful was likely to have at least one piece.
  • The browning of the meat and then using the drippings from that step to flavor the vegetables extended the meaty flavor throughout the entire dish.
  • Finally, adding barley gave an overall meatier mouth feel; combined with a good mix of hearty vegetables, the dish satisfied even the most confirmed carnivores among the group. No one was asking "where's the beef" after this meal.

This dish reheats well, so it is a good one to prepare on a weekend and then freeze in meal-sized portions for quick reheating on busy weekday evenings.

Inspired-by-Mexican-Cooking Beef and Vegetable Stew

Canola oil
3 lb boneless chuck roast, cut in 1/2 inch cubes (see NOTE)
4 c onion, chopped—about 3 medium
3 c diced or thinly sliced carrots (about 3 large carrots)
1 to 2 c diced celery
1 c pearl barley
water
6 large garlic cloves, minced
4 c finely shredded cabbage
2 15 oz cans diced tomatoes and chiles
1 4 oz can diced green chiles
8 to 12 oz frozen corn
1 to 2 T Worcestershire sauce
2 T sugar
2 T mixed dried herbs (my usual mix of basil, thyme, rosemary, and marjoram)
2 t cumin
1/4 c dried parsley (optional)
2 T chopped cilantro or to taste
salt and black pepper to taste

1. Heat the oil to almost smoking in a cast iron or other heavy pan. Brown the beef cubes on all sides. You don't want to crowd the pan, so you may need to do this in batches.
2. Remove the meat from the pan, turn the heat to medium, and add the onion, celery and carrots. Cover and stir occasionally until the onions are golden and the onions are beginning to get tender. Return the meat to the pan.
3. Stir in the garlic and cabbage, cover, and simmer for another 5 to 10 minutes.
4. Stir in the barley, the tomatoes and green chiles and about 3 to 4 cups of water. Add the seasonings and turn heat to low. Cover and simmer for 25 to 35 minutes. Taste for seasoning and add more water as needed (you will probably end up using a total of at least 6 cups of water). Continue cooking until the barley is softened, perhaps another 30 to 45 minutes.
5. Taste again for seasonings. Some adjustments you may want to make could include adding more salt or dried herbs, more Worcestershire sauce, a little sugar, maybe even a little more onion or another can of chiles. More cumin or even hot sauce might be additions that will suit your own tastes too.
6. About 15 to 20 minutes before serving, stir in the corn.

Provide grated cheese, chopped cilantro, diced onions, and hot sauce as desired for toppings.

NOTE: To cut the meat into even pieces, use a frozen roast. Remove it from the freezer an hour or so before starting to cook, long enough for it to begin to still be quite firm but not so hard that it can't be cut. Then just slice it in half inch or so slices, turn each on the side and dice.


And to go with the stew, serve lots of rice. Here is an easy method to follow when you are planning to cook a large quantity and don't have a rice cooker.

Brown Rice for a Crowd

Brown rice (I used 2 pounds for 20 people and had about 3 cups left over)
Salt- about 1 to 2 teaspoons per pound of rice; if you will be serving the rice with a highly seasoned dish (for example, some Chinese dishes with a lot of soy sauce), you may omit the salt or reduce it substantially)
Water to cover (you will need two to two and a half times as much water by volume as rice)
  1. Put the rice and salt in a large pot and cover with the water. Cover and let it sit for about 30 to 45 minutes.
  2. Preheat the oven to 350 degrees and put the rice in the oven. Bake for about 30 minutes. Check for doneness and fluff lightly with a fork. Add a little more water if necessary to be sure rice is not too dry. Return to oven if needed for another 10 to 20 minutes.

(For white rice, just put the rice and salt in the pot, measure out about twice as much boiling water as rice, cover, and bake at 350 degrees for 30 to 45 minutes, checking about halfway through to be sure there is enough moisture.)

"Taste and Dump"--The "professional" way to cook

This stew is a good recipe for the "taste and dump" approach that will help you become known for your wonderful cooking! As noted in step 5, your own preferences may guide you into all kinds of adjustments to the original recipe. Some days you may find yourself choosing a little more of the herbs, another day craving even more garlic. Never be afraid to taste your recipes like this after the ingredients have had a chance to begin cooking together. Better to do the checking at the stove than getting the dish to the table and then discovering that you really would have liked just one more dash of Worcestershire in the mix.

Friday, May 8, 2009

More Soups--With Carrots This Time

Soups have been made since antiquity, most often by people without cookbooks, measuring cups, or modern markets. Still, many people seem to be intimidated by the thought of preparing a pot of homemade soup, so they continue to reach for an overpriced can of some variety or another when the urge for a warming bowl hits them.

Many years ago, when my children were still very small and our budget was, as usual, very tight, I set a goal of making soup at least once a week. Though I didn't always achieve this, I have had lots of opportunities to discover how easy—and enjoyable—soup making can be.

Do you really need a recipe to make a good soup? No. Are recipes helpful? Yes, especially when you are new to the process or when you are looking for a new idea or two to spark your menus. To help for anyone in either of these categories, here are a few variations of carrot soup that I have made—and written down—over the years.

Carrot Soup I

1 T olive or canola oil
4 to 5 large cloves garlic, minced
1 1/2 to 2 c chopped onions
1 to 1 1/2 c chopped celery
2 to 3 c finely diced (or grated) carrots—the more carrots, the brighter the soup will be
3 bouillon cubes or seasoning packets
1 to 2 c shredded cabbage
1 ca rich chicken broth
water
1 to 2 T tomato puree or paste
1 T chopped fresh basil
1 t Italian seasoning
black pepper to taste

  1. Saute the garlic and onions in the oil until browned. Stir in the carrots, celery, and cabbage and continue to cook, stirring occasionally, for a few minutes.
  2. Add the broth and about a cup of water along with the other ingredients. Cover and simmer until the vegetables are quite soft.
  3. Add 4 to 6 cups more water, depending on thickness desired, taste for seasoning, and allow to simmer for 20 minutes or more to develop the flavors.

Carrot Soup II
2 c concentrated chicken broth
2 medium to large onions, chopped
2 ribs celery, chopped
1 red bell pepper, chopped
1 small jalapeno, seeded and chopped (opt)
4 to 6 medium carrots, thinly sliced (or grated)
4 c water
1 c super sweet corn, fresh or frozen
garlic powder, salt, cumin, and Italian seasoning to taste
chopped parsley

  1. Simmer all but parsley until vegetables are very tender, adding a bit more water if too thick.
  2. Puree in blender and serve with parsley sprinkled over the top.
Serve with sour cream if desired. This soup has a beautiful bright color and is great in the fall when fresh corn is available and the nights are cool and just right for soup.

Carrot Soup III
1 lb. carrots, peeled and coarsely chopped
1 medium potato, peeled and coarsely chopped
1 medium onion, chopped
salt, to taste
1/4 tsp. freshly ground pepper
3 c. chicken stock
Salt—optional, depending on how much salt is in the stock
1/4 c. yogurt, for garnish (optional)

  1. In a 2-quart saucepan over medium-low heat, place carrots, onion, and potato with enough water to cover. Simmer gently until the vegetables are very soft. (This may also be done in the microwave instead—use less water and start out at about 10 minutes, stirring occasionally. The exact length of time will depend on the microwave.)
  2. Purée vegetables in a blender or food processor. Return to saucepan and stir in chicken stock. Taste for seasoning, adding salt and pepper as needed. (Be sure to wait to taste until after adding the stock, as there is a wide variation in the saltiness of both purchased and homemade stock!)
  3. Place over medium heat; heat through.
  4. Serve immediately, garnished with a dollop of yogurt. Add a sprig of fresh oregano or dill if desired.

Dairy variation: None of these recipe uses any milk or cream, but all could be made creamier with a can of evaporated milk added near the end of cooking or with the addition of dry milk powder stirred in late in the simmering process.

Vegan variation:  Simply substitute vegetable stock or bouillon cubes and water for the broth in any of the recipes above. 

As you can see, just a basic "carrot soup" can mean all kinds of dishes. The recipe with "super sweet" corn uses ingredients more likely to be less expensive at summer's end when gardeners are harvesting their bounty and the farmers' markets are full of sweet corn and peppers and fresh herbs. The recipe with cabbage is more likely to be a "frugal" choice in the winter (especially after the St. Patrick Day cabbage sales!), as is the potato and carrot choice.

The choice is yours; check out what's in your refrigerator and what's on sale in the stores or farmers market and develop your very own recipe.

Thursday, May 7, 2009

Soups for Spring

Soup is a wonderful food on a cloudy, snowy day in winter, but it can be an equally welcome choice when the sun is shining on an early spring day. As part of my experiment to see how many good meals I could get from one four pound chicken, I had some wonderfully concentrated broth (stock) to work with. Add in some showy bright bunches of broccoli on special and this was the ideal time for cream of broccoli soup.

Cream of Broccoli Soup

Canola oil
2 c chopped onion
1/2 c sliced celery
1 c peeled and diced potatoes (may use more if a thicker soup is desired)
6 c water
1 c rich chicken broth
1 T Worcestershire sauce
2 t mixed dried herbs (basil, rosemary, thyme, and marjoram, or your own mixture)
Seasoning salt and black pepper to taste
Broccoli stems—I used 11 1/2 oz, about 3 cups chopped
1/2 c flour
1 c water
Approximately 1 1/2 c dry milk powder
Broccoli flowerets—I used 9 1/2 oz, about 4 cups, cut into bite-sized pieces

1. In a large soup pot, sauté the onions and celery in the oil until golden brown. Stir in the potatoes and continue simmering for a few minutes. Turn the heat to medium and add the broth and 6 cups of water along with the seasonings. When the mixture has returned to a slow boil, add the broccoli stems, cover, and let simmer about 35 to 35 minutes, until the broccoli is very tender.
2. Working in batches, process the soup in a blender or food processor until it is a smooth puree. Return all the soup to the pan.
3. Combine the flour, water, and dry milk powder to make a smooth paste (add a little more water if the mixture is very thick) and stir into the soup. Continue stirring until the soup is thickened.
4. Steam the broccoli flowerets in the microwave for about 3 minutes or until just barely tender.
5. About 15 to 20 minutes prior to serving, stir the flowerets into the soup and taste for seasoning.
This recipe makes about a gallon of soup, enough for at least 8 servings.

Variations: if you prefer, the soup does not need to be pureed. Carrots, squash, or even sweet potatoes may be added in this version—I suggest eliminating them in the pureed version, as they will cause the puree to be a rather unattractive brown.
Two cups of grated cheddar or other sharp cheese may be stirred in with the flowerets.

Serve with crusty garlic bread rounds or plain saltine crackers and baby carrots for color contrast.

(The bread rounds? Just day old rolls that are sliced into rounds, brushed with a mixture of butter, olive oil, and crushed garlic and then toasted in the oven until light golden brown.)


Another spring soup that is especially good if you have a ham bone in the freezer from your Easter ham is Fresh Pea Soup. While I will save the full recipe for another time, you can use any basic split pea soup recipe but substitute frozen peas for the split peas, adding them near the end of the soup making process instead of at the beginning.

Hospitality on a Budget

So our small group from church was going to be meeting for our biweekly shared meal, and I was in the middle of an experiment: I was trying a series of menus to see how many meals I could get from one four pound ($3.21 on sale) chicken. I had used some of the stock to make broccoli soup for eight the night before and now would be serving nine children and six adults.

The following dish was enough for everyone to enjoy with seconds and at least two servings left over for the next day's lunch. And still in the freezer: 12 ounces of boneless breast meat and almost 3 cups of stock.

Budget Chicken Cacciatore

1 to 1 1/2 c chopped onion—one medium
1 c celery, sliced
1/2 large green pepper, diced
Canola oil and/or chicken fat (see NOTE)
2 26 to 28 oz cans or jars spaghetti sauce
1 lb whole-wheat spaghetti
Mixed herb seasoning
Approximately 1 T Worcestershire sauce
2 c coarsely cut cooked, boned chicken
1 to 2 15 oz cans garbanzo beans, including liquid
Seasoning salt, to taste

Sauté the onion, celery, and pepper very slowly, over medium low heat, in a little bit of canola oil or chicken fat.
Meanwhile, break the spaghetti into 3 to 4 inch pieces and cook until just barely tender. Drain, reserving liquid.
Combine the pasta with all remaining ingredients and simmer for 20 to 30 minutes to allow flavors to blend. Add some of the reserved pasta water if the mixture is too dry. Taste for seasonings and adjust as necessary. Serve with grated Parmesan or mozzarella cheese and freshly ground black pepper.
NOTE: If you have cooked the chicken ahead of time and chilled or frozen it, there may well be some fat that has hardened on it. Use this instead of oil for browning the vegetables for a little more chicken flavor.


You may have seen some attempts to stretch the meat in main dishes that end up saving very little money because of the cost of other ingredients. However, for only $6.50, I had enough food to serve 15 people with leftovers. Even if we divided the "little people" into half servings, this would have been enough for 12 or so adults for barely 50 cents a serving.

Obviously, prices change continuously and will not be the same in different parts of the country, but the ingredients in this dish all can be budget friendly with only a little effort. For example:
  • Watch for grocery store specials on onions and stock up. That hearty country kitchen look in decorator magazines, with a crock or basket of onions piled next to one with oranges or other fruits? That's not just for looks; it's the best way to store these; they will usually last far longer on the counter than in the refrigerator and should never be kept in plastic, where they will quickly get soft and moldy.
  • Spaghetti sauce—again, watch for sales and stock up. And don't feel you have to buy the pricey name brands for dishes like this one. Adding a few fresh ingredients like the onions, celery, and pepper here will make the final outcome as tasty with the 79 cent can of sauce as with the $2.98 gourmet brand jar.
  • Garbanzos—another stock up item; I used canned beans, but you can save even a little more money by cooking up some dry beans.
  • Whole-wheat spaghetti—if your budget is really tight, you can use plain spaghetti, but I have been finding the whole grain varieties on sale almost as often as the other. For this dish, I probably spent 30 cents more for the whole-wheat option, and that seemed worth the price.
For more details, here are my costs to prepare the dish in Minnesota in May 2009:

Onion $.18
Celery $.20
Pepper $.35
Spaghetti sauce $1.58
Spaghetti $.99
Garbanzo beans $1.00
Chicken $2.00 (I am going to assume about 2/3 of the $3.21 chicken went into this dish)
Seasonings $.20 (this is probably far more than the actual cost, but I buy the dried herbs and Worcestershire sauce in large quantities so am going to guess on the high side)
Total: $6.50

But of course, the main dish needs some sides. For this shared meal, I prepared fresh string beans in a light cheese sauce. The sauce was especially for the kids, since I have discovered that almost any vegetable has a better chance of being eaten if it comes sitting in a cheesy base that reminds them of macaroni and cheese. Then one of our group made a light salad of lettuce and some of the strawberries that have been on sale for a few weeks. A loaf of good whole wheat bread topped off the main course. The budgetary theme continued here too, as the lettuce, green beans, strawberries, and bread were all featured sale items for the week, and cheese continues to drop in price in our area.

For dessert, another group member brought her own experiment: a chocolate two-layer cake with butter cream frosting and fondant decorations. She wanted to "practice" before using the fondant for a graduation cake she will be making for her niece in two weeks. Her own particular budget secret is that she uses cake mixes for her cakes, buying them when on sale, and then adds her artistic expression to the decorations themselves.

Perhaps you shudder when you think of inviting others for a meal when your budget is already tight, especially if you feel you must spend a lot of money on these company dinners. But our group of friends ended the meal feeling as if we had feasted luxuriously—as we had, compared to so many in the world.

And so we sat for an hour or more, watching the kids playing on the lawn made bright with an afternoon rain, enjoying coffee and conversation—and after all, isn't that what you really want your shared meals to accomplish?

Sunday, May 3, 2009

Raspberry Coffee Cakes


I seem to be stuck in the breakfast mode these days, but now a couple of sweet breads to balance yesterday's savory recipes.

The first is a coffee cake I've been making for 30 years or more, and the inspiration at that time came from a decades old cookbook. This is one of those lovely recipes that stand up to all manner of tinkering, my favorite kind. Today's version has raspberries, but it can be made with lots of other fruits or without any fruit at all. The nicest part of it is that, if you have a food processor, it takes about five minutes to stir up. Even without that great appliance, this is a very quick bread that looks like it took a lot longer.


Crumb Coffee Cake

3 c flour
1 T baking powder
1 1/2 c sugar—may use all white sugar or a mixture of white and brown sugars
1 to 2 t cinnamon
1/2 t nutmeg
1/2 c butter, cut in thin slices
3 large eggs
1 c milk
1 t vanilla
1/2 c almonds—see preparation comment below
1 c fresh or frozen raspberries—do not thaw

To prepare almonds: If using a food processor, put whole almonds in and chop coarsely. Set aside in a 2 cup measure. If you do not have a food processor, use sliced or chopped almonds for this recipe.

Combine dry ingredients in the bowl of the processor (or in a large mixing bowl). Cut in the butter until the mixture has the consistency of coarse meal. Remove some of the crumb mixture to the measuring cup with the almonds so that you have a total of 1 1/2 cups of crumbs and almonds. Set this aside.

Put the three eggs around the top of the dry ingredients and pour the milk and vanilla over. Process or beat by hand just until smooth. The batter will be quite thin.

Spray a 9 X 13 pan with cooking spray and pour the batter into the pan. Sprinkle the raspberries evenly over the top and then spread with the nut/crumb mixture, covering all the batter. Bake at 350 degrees for about 25 to 30 minutes or until done. (If using frozen berries, you may need to add a few minutes of baking time.)

Some other variations to consider: Any berries can be substituted for the raspberries, as can finely diced apple, raisins or other dried fruit. The nuts can be omitted or walnuts or pecans used instead. Applesauce can be substituted for the milk; with this variation, add 1/2 teaspoon baking soda and reduce the baking powder to 2 1/2 teaspoons. Add more or less cinnamon or substitute almond for the vanilla.

Now for a coffee cake that will require only a little more time but more preplanning. I recently stirred up enough sweet dough for two loaves of bread and made it into two raspberry filled coffee cakes. The shaping was amazingly easy, but the results were really very attractive.

Raspberry Filled Yeast Coffee Cake

1 batch sweet yeast dough, enough for 2 loaves of bread
Raspberry filling
Powdered sugar frosting

When the dough has risen and is ready to be shaped, divide in half. Roll each one into a square about 12 inches or so on each side. It should be no more than one half inch thick. Transfer the square to a well-oiled baking sheet.
A couple of hints:
  • Be sure you transfer the dough before filling and cutting! If you don't, you will have a lot of difficulty getting the coffee cake onto the baking sheet without a mess!
  • Do not use an insulated baking sheet for this recipe. These are large loaves and the bottom will not brown adequately with insulated sheets. In fact, if you have a pizza stone, put the pan directly on the stone when you are baking these loaves for the best crust.

Now for the final shaping. Imagine the square as being divided in thirds. The center third is where you will place the filling, while the two thirds on the sides will be slashed and folded over the center.

Spread half the filling down the center of the dough, stopping just before the ends of the dough.

With kitchen scissors or a very sharp knife, make cuts on each side, about 1 inch apart and ending just before the filling.

Beginning at one end, fold the cut strips over the filling, alternating from the left and right sides. Allow the strips to overlap slightly and let a little bit of the filling peek through as you go. Pinch and fold the dough at both ends to keep the filling form leaking out. Repeat with the second half of the dough and filling.

Cover lightly with a towel and let rise until doubled. Bake at 350 degrees about 25 to 30 minutes, until golden. Remove from oven and brush with melted butter. When cooled, drizzle thick powdered sugar icing over the coffee cakes, allowing the filling to peek through between the squiggles of icing.

Raspberry Filling

12 ounces frozen raspberries, thawed; reserve juice
1/2 to 3/4 c sugar, according to your tastes
2 T cornstarch
water

Place the drained juice from the raspberries in a measuring cup and add enough water to make 1 cup.
In a large microwave-safe bowl, stir the sugar and cornstarch together until well blended. Gradually add the water and raspberry juice mixture and stir. Microwave at low to medium power for about 2 to 3 minutes, stirring once or twice. The mixture should bubble and become clear and thick.
Remove from microwave and stir in the berries. Set aside until cool.

Powdered Sugar Icing

2 T butter, softened or melted
approximately 1 pound powdered sugar
milk
1 t vanilla

Gradually stir some powdered sugar into the butter until it is creamy. Add the vanilla and a very little milk and then some more powdered sugar. Continue beating together, alternating powdered sugar and a few drops of milk until the powdered sugar is used up.

If you have never made this kind of icing before, be VERY careful! It takes only a few drops of milk to turn the icing from "just a little too stiff" to a soupy mix that will run right off of whatever it is you want to ice. Slow and steady is the rule here. The good news is that you can correct icing that is too thin by just adding more powdered sugar. The bad news of course is that you either have no more powdered sugar to add or you will end up with enough icing for half a dozen cakes! (If the latter occurs, cover the icing tightly and refrigerate; it will keep for a week or more, until your next baking session.)

Saturday, May 2, 2009

Savory Breakfasts

In my last post, I included both a sweet and a savory brunch dish. While my usual quick morning start is a bowl of mixed cereals topped with fresh or dried fruits and a quarter cup or so of rolled oats, a special breakfast for me always leans toward the savory rather than sweet side. When I go out for breakfast or want something out of the ordinary on a weekend or when guests are present, I don't crave pancakes or French toast or lots of pastries. Instead, give me real hash browns (not those grease-soaked patties from the fast food places), moderately spicy salsa and maybe an egg or two. Another alternative is a vegetable-heavy frittata with more salsa and a sprinkling of cheese.

A package of purchased sweet rolls, a couple of cereal boxes set out with a carton of milk--it's hard to beat the ease of these options, but here are a couple of ideas for foods that really don't take too much more time or effort, especially after you have made them a few times. They are casual mixtures that don't require lots of measuring, and they are a good way to use up some leftover vegetables or even meats that aren't quite enough for a full meal on their own. Best of all, the cost can be quite low for the amount of nutrition provided. Feel free to experiment using whatever is at hand and in season.

Frittatas
Basic ingredients:

Eggs—probably about two per serving, with an extra one added in for each two or three people
Oil for the pan (or bacon or ham fat if you want added flavor)
Seasonings
  • Herbs—I like to use a little basil, thyme, and rosemary mixed together
  • Minced garlic—a little or a lot, depending on your family's preference
  • Black pepper
  • Salt (optional)
Onions—about 1/8 to 1/4 cup of chopped onion per person
Vegetables: any (or all?) of the following. These may be fresh, frozen, or (pre-cooked) leftovers:
  • Bell peppers, chopped
  • Celery
  • Green chilis, diced
  • Mushrooms, sliced
  • Broccoli flowerets
  • Diced carrots
  • Cauliflower flowerets
  • Peas
  • Sugar peas
  • Corn
  • Zucchini
  • Cherry or grape tomatoes
  • Shredded cabbage
How many vegetables? For a really veggie dish, you may want as much as a cup of vegetables for every two eggs; for a dish that is more like an omelet, the amount of vegetable may be less.

Optional ingredients could include:
• Cheese—mozzarella, cheddar, Monterrey jack, etc.
• Leftover ham, bacon, chicken, etc.
• Black olives

1. Slowly saute the onion in the oil in a large skillet. Add whatever vegetables you will be using, starting with those that will need the longest time to cook (raw carrots, peppers, broccoli and cauliflower), then adding others with shorter cooking time (shredded cabbage, grated or diced zucchini, etc.). Turn the heat down and cover the pan, letting the vegetables simmer until just tender. If you are using frozen or pre-cooked vegetables, add them just before stirring in the eggs.

2. While the vegetables are cooking, beat the eggs until the yolks and whites are well mixed. Add whatever seasonings you plan to use.

3. Stir the eggs into the vegetables and mix well. Fold in the meat and cheese.

4. Microwave instructions: Turn the mixture into a well-oiled microwave safe casserole dish. (To be sure that the mixture will cook evenly, the eggs should probably not be more than 2 inches deep in whatever dish you use.) Cover loosely and microwave on medium heat for about 3 to 4 minutes. Stir the mixture with a fork and continue cooking. The total length of time will depend on the amount you are making. Four to six eggs will probably not take much more than another minute or so, while a dozen eggs with a lot of vegetables could take 10 or 11 minutes. The key is to be sure not to use too high power and to stir frequently so that the mixture cooks evenly.
Oven instructions: Preheat oven to 350 degrees. Sprinkle the top of the frittata with additional grated cheese if desired. . If the skillet that was used for the vegetables is oven-safe, simply slip the pan into the oven. Otherwise, turn the mixture into a well-oiled casserole dish, and bake for about 25 to 30 minutes, until set in the center.

Veggie Hash Browns with Eggs
Canola oil, enough to coat the bottom of the pan well
Chopped onions
Sliced potatoes (see NOTE)
Thinly sliced carrots or sweet potatoes
Diced bell pepper (optional)
Diced celery (optional)
Seasoning salt or seasoning blend
1 egg per person

1. Prepare the vegetables, allowing one medium potato, about 1/2 cup sliced carrot or sweet potato and 2 to 4 tablespoons of onion per serving.

2. Heat the oil on medium high in a large skillet. Saute the onions and carrots or sweet potatoes, stirring often, until the onions are golden and the carrots are just starting to become tender. Stir in the potatoes (and peppers and celery if used), sprinkle lightly with seasoning salt and turn heat down to medium. Cover lightly and cook about five minutes, until the bottom is well-browned. Turn the mixture and continue cooking until the second side is browned and crispy.

3. Push the vegetables to the edge of the pan. If necessary, add a little more oil to the open center and then add the eggs, one at a time. Cover the pan and turn the heat down (for eggs with a firm yolk) or off (for eggs with a soft yolk). Allow about five minutes for the eggs to be cooked. Grated cheese may be sprinkled over the top just before serving.

NOTE: "Southern style hash browns" in the frozen food section are simply grated potatoes, usually without any added fat, and can be substituted for the potatoes in this recipe.

Tuesday, April 21, 2009

Breakfast/Brunch Main Dishes--Sweet and Savory

Eggs are always on special somewhere the week before Easter, so they were an easy choice for the basis of two main dish offerings I would be taking to our congregation's annual Easter breakfast.

Frittatas and French toast are always good budget main dishes, and both can be scaled up or down pretty easily, so it wasn't hard to decide on the following two dishes to take to breakfast.

The next question was what to add to the basic ingredients, so I started looking through the pantry and refrigerator to see what was available. Out of those forays, I came up with the following main dishes, both of which were quickly eaten--always a sure sign of a food everyone likes.

With the eggs and cheese both on sale and lots of raspberries still in the freezer from last year's garden, I was able to make both dishes for less than $7 total--not bad for so many servings!

Raspberry French Toast

Since I still have a lot of raspberries in the freezer from last year's garden, I can be pretty generous with them. You could probably substitute other berries or even spread some berry jam in place of the sugar and frozen raspberries.

2 T butter
Approximately 12 slices dry bread
1 c raspberries
1 apple, diced--or more
Sugar and cinnamon
1/3 c chopped walnuts--or more
8 eggs
1/2 to 3/4 c dry milk powder
Approximately 2 c water
1/3 c sugar
Maple syrup (I used "maple-flavored" pancake syrup rather than the "real" thing for this recipe, but it still turned out with a pleasing flavor)
1/3 c raspberry syrup
1 c raspberries

Melt butter in bottom of 9 X 13 casserole. Spread broken up pieces of dry bread over to make a thin layer. Spread with 1 cup of raspberries, apple, walnuts and sugar and cinnamon. Cover with another layer of bread pieces.

Beat together the eggs, dry milk, water, and sugar until well blended. Pour over the bread, making sure all areas are moistened. (If necessary, beat another egg or two with a little milk and add.) Drizzle the top generously with maple and raspberry syrups. Cover tightly and refrigerate overnight.

Remove cover, spread with another cup of raspberries and sprinkle generously with sugar and cinnamon.

Put in microwave (loosely covered) for about 11 minutes on power level 7, until center is set. Check for doneness by inserting a table knife near the center; the knife blade should come out clean.
(If using conventional oven, bake at 350 degrees about 45 to 55 minutes.)

NOTE: The raspberry syrup was made from the juices drained from an earlier package of frozen raspberries. Combine about 1/2 cup raspberry juice with 1/2 cup water and about 1 c sugar. Cook in microwave or on stovetop until mixture boils and cooks down to a syrupy consistency. If desired, omit this syrup and increase the amount of maple syrup drizzled over the top.


Savory Eggs and Vegetables

These were the vegetables I had on hand, so these are the ones I used this time. The nice thing with frittatas is that you can make a different dish every time, just by varying the add-ins based on what you have on hand.

4 carrots, thinly sliced
Approximately 4-5 c shredded cabbage
1 large onion, diced
1/2 large green pepper, coarsely chopped
3 large cloves minced garlic
Mixed herbs, black pepper
18 eggs
12 ounces shredded cheese—Mozzarella and taco cheese
Additional cheese for topping

Saute vegetables in a little oil in a large skillet, until carrots are crisp tender and onion is translucent. Transfer to a large (11 X 14) baking dish. Sprinkle with herbs and pepper.

Beat eggs together as for scrambled eggs. Stir in cheese. Pour this over the prepared vegetables. Sprinkle with a little more cheese.

Bake at 325 degrees for approximately 45 minutes or until center is set. If the casserole begins to brown before completely done, cover with foil.

NOTE: The dried herbs I used were a mixture of rosemary, thyme, basil, and marjoram, pounded together in a mortar and pestle. I used a generous teaspoon or so of the mixed herbs for this recipe.

Monday, April 20, 2009

Black-eyed Susan Cake


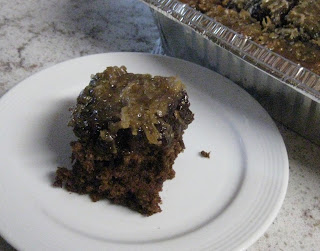
Tonight we had a much delayed corned beef and cabbage dinner, and I wanted to make a dessert that would be a little festive after this rather peasant-y kind of main dish. I ended developing a variation on the Lazy Daisy cake my mother often made for meals such as this; it seemed like the flower in the title should reflect the addition of cocoa to the cake, so we now have a new family favorite, Black-eyed Susan Cake.

Though the cake looks a little like German Chocolate, it has a deeper chocolate flavor. It can also be made using chopped nuts instead of coconut, but I prefer the coconut, perhaps because that was my mother's choice.

This is a relatively economical dessert, especially if you buy the coconut when it is on sale (which it often is before the Christmas and Easter holidays). You may substitute margarine for the butter in the cake, but the topping really is best if you use real butter. As noted, I did not use half and half but instead cut costs (and only slightly made the cake a little healthier) by using dry milk powder added to milk--which in my house is always nonfat. If you have whole milk or even 2%, you could leave out the dry milk.

And the apple? I added that mostly because I had one that was starting to get a little soft at this end of winter storage. While it could be omitted; it added to the overall moistness of the cake and I definitely recommend including it.


Since the cake is really quite rich, it can easily be cut into 24 pieces, another way to stretch the budget--though it will be hard for many to stop with just one serving!!

Black-eyed Susan Cake
1 1/2 c boiling water
1 c oatmeal
1/2 c butter or margarine
1/2 c cocoa
1 1/2 c sugar
2 eggs
1 t vanilla
1/2 t cinnamon
1 1/3 c flour
1 t baking soda
1 medium apple, cored and finely chopped or grated--about 3/4 to 1 c (optional)

Bring water to a boil in a stainless steel mixing bowl. Immediately stir in the butter, cocoa, and oatmeal. Stir to combine and melt butter.
When the mixture has cooled a little beat in the sugar and chopped apple. Meanwhile, sift the flour, soda, and cinnamon together.
Add the eggs to the sugar and butter mixture and beat well. Then stir in the flour and beat until smooth. Immediately pour into a greased and floured 13 X 9 pan and bake at 350 degrees about 25 minutes, until just done.

Take the cake out of the oven and use a fork to poke small holes all over the surface. Spread topping evenly over the still hot cake and return to the oven—set on broil—for two to five minutes, just until the topping is bubbly and starting to turn golden. Watch closely because this begins to darken (and then burn!) very quickly.

Topping:
1  c brown sugar
1/2 c butter
3 T milk plus 1 T dry milk powder for added richness OR 3 T half and half)
1 1/2 to 2 c shredded coconut

Combine butter, brown sugar, and milk in a large bowl and microwave on medium power about 4 minutes, until very bubbly. If you try it in a two cup measure as in the picture, you will need to watch the mixture VERY closely to avoid a messy boil-over!


(If cooking on top of the stove, allow to boil about two to three minutes.)
Remove from microwave or heat and stir in the coconut. Spread evenly over cake as noted above.

Monday, March 30, 2009

Lemon Raspberry Bars/Torte/Dessert

What's in a name? Sometimes, in baking, the shape of the pan in which a recipe is baked will affect what the final product is named. Today's main recipe is like that. Baked in a springform or other straight-sided round pan, it is likely to be called a torte; in a 7 X 11 pan, it becomes a bar cookie. Either way, my variation is a simple and fast to make dessert that is rich yet relatively inexpensive.

Raspberry Lemon Dessert

Crust:
1/3 c butter
1/2 c sugar
3/4 c flour

12 oz frozen raspberries, thawed and drained (See NOTE)

Filling:
3 eggs
Juice of 2 lemons, enough for 1/3 c juice
Zest of 2 lemons
3/4 c sugar
1/4 c flour

1. Prepare the crust:
Melt butter in 7 X 11 pan. Cut in the sugar and flour with a fork and then use your fingers to press the well-mixed dough evenly over the pan.

Spread with the well-drained raspberries and bake at 375 for about 10 minutes.

2. Meanwhile, beat the eggs and 3/4 cup of sugar until thick and light colored. Fold in the lemon juice and zest and the 1/4 cup flour, stirring just until blended. Pour over the raspberries and crust and bake at 325 degrees for about 20 minutes, until a knife inserted in the center comes out clean. (If the top begins to brown too soon, cover lightly with a piece of aluminum foil.)

3. When cool, sprinkle with powdered sugar. Cut in small squares after cooling. Store, tightly covered, in the refrigerator.

Makes 18 to 24 squares, depending on the size serving you prefer.

NOTE: I have raspberries in my garden and freeze them in 8 to 12 oz bags. I thaw the berries and then, while still in the bag, allow the juice to flow into a bowl, squeezing the berries to be sure they are well-drained. You could also put the berries in a colander and press lightly with the back of a spoon. The berries should not be very juicy for this recipe, but you also do not want to squeeze out all the pulp and be left only with the seeds!

What to do with the Raspberry Juice?
I usually have as much as half a cup of raspberry juice left from the squeezing. That is just too wonderful to throw away so here are a couple of uses for the juice:

Stir a half cup in with the water used to reconstitute a 12 oz can of frozen lemonade concentrate for a brisk summery cooler.

Add the juice to your next slushy drink; this is especially good with an orange or apple juice and frozen banana combination.

Make a raspberry sauce for serving over a basic cake, ice cream, vanilla yoghurt, or even rice pudding.

Raspberry Sauce

1/2 c raspberry juice
1/4 c water
1/4 to 1/3 c sugar--to taste
1 T cornstarch

Combine the sugar and cornstarch in a microwave-safe bowl. Because the sauce will bubble up when cooked, be sure the bowl is large enough. Stir in the water to make a thick paste and then gradually stir in the raspberry juice. When well blended, put in microwave on medium power for 2 to 3 minutes, stirring once or twice, until it has bubbled up and become clear. Store in the refrigerator.

Variations: May add a half teaspoon of lemon juice or a quarter teaspoon of almond extract.

Monday, March 23, 2009

A Basic Tutorial on Separating Eggs

Cracking an egg seems about as basic as boiling water, but separating yolks from whites can seem a little trickier, especially if you have never been able to watch someone else do this. Since the separation step is probably the hardest part of the Lemon Pudding Cake, here are a few hints to

1. If you will be separating more than one egg, you will need three bowls. The good news is that one of these will be the bowl you will be beating the egg whites in. The other bowls can be quite small.

2. Crack the egg, holding it over one of the smaller bowls. Then, shifting the yolk from one side of the shell to the other, let the egg white flow into the bowl.

3. When as much of the white is removed from the shell as possible, put the yolk into one of the other dishes and pour the saved egg white into the mixing bowl.
Here is the reason for the three bowls: When you are separating the eggs, it is possible that the yolk may break and some of the yolk will fall into the egg white in the bowl. However, even the tiniest bit of egg yolk will keep the whites from forming the foamy texture you want when beating them. By putting each egg white into another bowl as you separate the eggs, you avoid having all the egg whites spoiled should a bit of yolk get in them.
If you want to see some videos with a couple of other methods—including using your hand instead of the shell to do the separating, go to http://www.wikihow.com/Separate-an-Egg
One more thing: if you do get egg yolk into one of the egg whites, DON'T throw it out! If you have no other baking to do right away, an egg out of the shell like this can be tightly covered and refrigerated for a day or two or used for an impromptu scrambled egg supper.

Pudding Cakes


Over the years, one of our family's favorite comfort foods has been a brownie pudding cake from a very old edition of the basic Betty Crocker cookbook. It's a good recipe to use when there isn't an egg in the house. It doesn't cost a lot, and is fun and easy for kids to help make—as long as there is an adult around to handle the very hot water. (And do be sure the water is very hot, even boiling.)

Hot Fudge Pudding

1 c flour
3/4 c sugar
3 T cocoa
2 t baking powder
2 T melted butter (or oil)
1/2 c milk
Topping:
1 c brown sugar
4 T cocoa
1 3/4 c very hot water
1 c chopped nuts (optional)


1. Sift dry ingredients and stir in milk, butter, and nuts. Spread in oiled 9” square pan.
2. Mix brown sugar and cocoa and sprinkle over batter.
3. Pour hot water over entire batter.
4. Bake at 350 degrees for 45 minutes. Serve warm or cold.


The following Lemon Pudding Cake results in a similar cake over sauce dessert, but it uses a slightly different method. It does involve some beating of egg whites but is still very easy--and a lot quicker than lemon meringue pie!

Lemon Pudding Cake

4 eggs, separated
1/3 c lemon juice
1 t lemon zest
1 T butter
1 1/4 c white sugar
1/2 c sifted all-purpose flour
1 1/2 c milk

Prepare oven and pan. Place a large baking dish in the oven and add hot water to about 1 inch in depth. Preheat oven to 350 degrees.

1. Beat the egg whites until stiff and set aside.
2. Combine egg yolks, lemon juice, lemon rind, and butter or margarine and beat until thick and lemon colored.
3. Add dry ingredients alternately with the milk, beating well after each addition. NOTE: Batter will be very thin; don't worry!!
4. Fold in egg whites until just blended.
5. Pour into 8 inch square baking dish and set this into the pan of hot water.
6. Bake at 350 degrees F for 40 minutes. If the pudding begins to brown a little too much before the time is up, cover the pan loosely with foil.

Note: I used 1/2 cup nonfat dry milk powder and 1 1/2 cups water for the liquid. For a stronger lemon flavor, use an extra 1/4 cup of lemon juice and reduce the water to 1 1/4 cups, keeping the dry milk powder amount the same.


Why do I need to bake this in a pan of water?

Don't eliminate this step! Using a "water bath" ensures even cooking for delicate dishes like custards and this pudding. The water "insulates" the edges so that they do not become too brown or even burned before the center is adequately baked.

The biggest challenge this method presents is in finding the right combination of pans to hold both the pudding and the water bath. Here are a few suggestions you might have available:
• A 12 inch straight sided—and ovenproof—frying pan
• A small roaster
• A Dutch oven
• If your pudding will be baked in an aluminum or steel 8 inch pan, a 9 X 13 pan may be large enough to accommodate it. An 8 inch square glass or ceramic baking dish will probably not fit.
Remember, there will need to be water on all four sides of the pan, so don't use something that is just barely bigger than the pudding pan itself.

If you don't have anything large enough to accommodate your 8 inch square pan, try an 8 inch round pan in some of your options. Another way to address the problem is to bake the pudding in 6 to 8 individual ramekins. (If you use this alternative, the baking time should be reduced to 30 to 35 minutes.)

Tuesday, March 17, 2009

A Note on Salt

I probably should have included a comment in yesterday's Cabbage Rolls recipe, that it was no typo that there is no salt added anywhere. Then I decided the subject of salt is important enough to have its own entry.

An article in the August 1, 2008, Woman's Day quoted our own Mayo Clinic with these statistics: 6% of our daily salt intake comes from what we add at the table and another 5% is added while cooking. Meanwhile, fully 77% comes from processed and already prepared food we buy at the supermarket. (I guess the remainder must come from the meals we eat out--the article doesn't give us info on the missing 12%!)

One of the ways that I have found to cut back at least a little on overall sodium levels in my recipes is to rely on all that salt in the processed ingredients. Spaghetti sauce is one of my favorite "convenience" foods, but almost all brands are high in sodium. There are only a few low sodium options, and these are both expensive and not always well-seasoned in other ways. However, I have learned never to add salt to any dish where I will be using spaghetti sauce until I have tasted the final product. For example, there is enough salt in the Cabbage Roll sauce to season the pound of meat and all the other ingredients as well.

Other sodium lowering tricks:

I never salt the water in which I cook pasta and often eliminate the salt in rice if the food being served over it will be high in salt--think of all those wonderful Chinese dishes that include very salty soy sauce.

Mexican food ingredients--salsa, enchilada sauce, canned beans--can be very high in salt but there are ways to get around this. If you prepare your own pinto and other beans (really very easy and something I'll be covering soon), don't add salt. Most cooks will tell you that salt added too early when cooking beans is a problem for getting them soft anyway. Don't salt the guacamole, and use fresh tomatoes whenever possible. Make taco meat with chili powder, oregano, and garlic and don't add any salt.

Unless you buy expensive (and often not too flavorful) low sodium cheese, you will be getting a lot of salt when you include cheese in your dishes. Try using aged cheddar instead of mild and you can cut the total amount of cheese and thus sodium--along with a lot of unnecessary fat. Stir some plain yogurt into your casseroles (hotdishes) along with a reduced amount of cheese and you'll have a creamy sauce without as much salt. Add more pepper or some extra seasoning (oregano, cumin, basil, etc.) to boost the flavor if necessary.

Never salt vegetables that to which you will be adding sauce. Skip the salt even for those that will be served steamed and plain. A little pepper, a favorite herb combination, even a dollop of yogurt might be enough to cover for the "missing" salt. If you butter your vegetables, try using unsalted butter.

Never add salt to scrambled or fried eggs. It may sound strange, but you might just find you like these better without. Even if you do add salt at the table, you probably will be able to get by with using less at this point, since you will be able to get that "salty" taste on the tongue from the grains added afterward.

A lot of pie and other fruit desserts include salt; just don't include it and see if anyone even notices. Sometimes a tiny amount of lemon juice or vinegar can enhance the flavor more than any salt would have.

In other baking, I long ago stopped putting added salt in anything that includes baking powder or baking soda--those both already have plenty of sodium in them, and I would guess you will not miss the salt at all. If you really worry about the final result being too bland, add a few extra drops of vanilla or lemon juice or an extra shake of cinnamon or other spices already included in the recipe.

Don't however, eliminate salt in any yeast breads. Here, salt is not just a seasoning but also a control over the growth of the yeast. If you really have to eliminate salt from your diet, you may need to do a little research and testing to find an acceptable recipe for salt-free bread. I found one recipe at http://www.lowsodiumcooking.com/free/HoneyWheatBread.htm but have not tested it myself to know if it will work.


Above all, of course, try to use fresh or unadorned frozen foods as much as possible. The more of these you use in your recipes, the more you can "dilute" the saltiness of any processed ingredients you may include. For those processed ingredients you do use and for which you can't afford salt-free substitutes, try a few of these hints to lower your sodium intake without blowing the food budget.

June 4, 2012 update:

Here is a very interesting article on the topic of salt:

We only think we know the truth about salt