Thursday, March 17, 2016

Happy St Patrick's Day Cabbage


I find it very interesting to see how we Americans take festive or historical days from other cultures and give them our own spin and importance, Cinco de Mayo for example.
Today we celebrate another of these adaptive holidays, St. Patrick's Day. While lots of people will be celebrating with sometimes raucous parades and lots of green beer, some of us frugal types will relish the opportunity to buy some of those "Irish staples"--cabbage, potatoes and corned beef--at their lowest annual prices.

Several years ago, the New York Times carried an article that praised the lowly cabbage and gave some suggestions for using this versatile vegetable. Before we get to the many options I have here on the blog, you might want to check that item out:
http://www.nytimes.com/2011/01/12/dining/12vege.html?ref=dining

For now, I have once again stocked up, buying as many heads of cabbage that I could store in my refrigerator and garage "root cellar." Kept cold, cabbage will stay fresh and ready to eat for weeks, so I can be assured of a supply for salads, soups, and more.

Use the Search box above to find all the many entries for cabbage-containing dishes I have included over the years. Or just go to one or more of the few selected links below:

Cole Slaw
First, whas it probably the most frequent use for cabbage today, cole slaw. The following post includes the non-creamy kind of slaw with no mayo. It's a great piquant side for sandwiches or "casserole" main dishes.
http://frugalfastfun.blogspot.com/2014/03/the-best-cole-slaw-ever.html

 
Maybe this year you could make corned beef sandwiches (on rye of course) with a side of cole slaw instead of the "traditional" corned beef and cabbage that many people really don't like.


Soup
Another old standby for cabbage is as an ingredient in vegetable soups. Here, the variations are endless, and you could start by just adding finely shredded cabbage to your favorite soup recipe, along with the vegetables that need up to an hour of cooking. Use a little if you are trying to introduce your family to this "new" addition and more as you begin to find out how much added good flavor the cabbage provides.

The soup found at the following link is a surprising one if you think of cabbage as only a smelly, slimy side your mother forced you to eat. Here, the combination of squash, cabbage, and onions results in a flavorful soup that will have everyone coming back for seconds. As a vegan option with lots of bright-colored vegetables, it's a nutritious power house as well.
http://frugalfastfun.blogspot.com/2015/03/sweet-and-simple-vegetable-soup.html

This Potato Soup post includes cabbage only down in the bottom list of variations; I think I would move it up to a more prominent place if I were to write the entry again. In fact, I just made the clam chowder variation this week with several cups of finely shredded cabbage included, and it was a winner.
http://frugalfastfun.blogspot.com/2015/02/basic-potato-soup-with-lots-of.html

And then there is this soup, made with lots of "leftover" vegetables and beans. While the recipe calls for just a cup of shredded cabbage, I almost always include at least double that amount. Again, as noted in the comments, this is just a starting guide for making wonderful soups using the foods you have in your kitchen at any given time.
http://frugalfastfun.blogspot.com/2014/05/rainy-day-soup-weather.html

No beans? Then let's try barley as an added, vegetarian, protein boost.
http://frugalfastfun.blogspot.com/2014/05/black-bean-and-barley-vegetable-soup.html


Sides
Not ready for soup? How about this?
http://frugalfastfun.blogspot.com/2015/04/curried-cabbage-and-carrots.html


Well, you get the point. Cabbage is something that can be a great addition to your menus, now or any time of year.  So pick up a head or two and start shredding away!


Still to come:  Stuffed Cabbage! With all these wonderful outer leaves, I am ready to spend the weekend preparing several batches to pop in the freezer. Watch for it here on the blog soon.

Monday, March 14, 2016

Raspberry Cranberry Preserves


Sometimes I include recipes here that barely fit my overall blog objective, and today's entry is one of those. It is not particularly fast and, if you don't have raspberries in your yard or in the gardens of friends or family, it is unlikely this would ever fit the "frugal" definition. (And I did have a lot of frozen cranberries because I had been able to get several bags on sale for 39 cents each after the last holiday season, keeping my overall cost very low.)

 It is fun, however, to be able to produce jars of this sparkling and slightly tart spread that goes well on toast, waffles, or as a side to a pork roast or other meats. It is also a superb ice cream topping, as the tartness combined with the ice cream really emphasizes the fruit flavor.

Even though neither raspberries or cranberries are in season right now, my freezer needed some clearing out, and so cooking some up into an almost jam was a perfect wintery afternoon project.

Probably the trickiest part of this recipe is the need to be sure to stir the cranberries and sugar pretty constantly in the first 10 minutes or so, because the sugar can quickly burn if left unattended. Use a good heavy pan if you have one.

While the amount of sugar may seem large, remember that this is a kind of jam, and many recipes of this kind (especially those with commercial pectin) have more sugar than fruit. While I would never call these "low sugar" preserves, the sweetener amount is lower than for most mixtures of this type. And remember, both cranberries and raspberries are very tart fruits.

As with other jams, the best test to see if the mixture has "jelled" is to put a small plate in the freezer and then drop a teaspoon or so of the hot fruit mixture on the plate. If running your finger through the middle of the jam leaves a clear path, the preserves are done.

Raspberry Cranberry Preserves

6 c raspberries, fresh or frozen without sugar
3 c cranberries, fresh or frozen
5 c sugar, divided
1/2 t cinnamon
1/2 t cardamom
1 t ground ginger
1/2 t nutmeg
2 T frozen orange concentrate--do not dilute

1.  In a large bowl, stir 3 cups of sugar into the raspberries and allow to sit for about an hour.


2.  Meanwhile, add the remaining 2 cups of sugar to the cranberries in a heavy, deep pan--the final mixture will boil up, so be sure your pan is large enough. Turn the burner to medium low and begin cooking the cranberries and sugar while stirring pretty constantly. In about 10 minutes or so, the sugar may be completely dissolved and the cranberries will begin "popping." You may turn the heat up to medium high at this point to hasten the overall process.

3.  Continue cooking the cranberries until all the berries have popped and the mixture is beginning to thicken, about 5 or so additional minutes. Pour in the raspberries and sugar mixture and continue cooking on medium high until the mixture has returned to a rolling boil.

4.  Stir in the spices and orange concentrate and continue cooking for another 20 to 30 minutes, until the mixture sheets off a spoon or until a finger or rubber spatula drawn through a few drops put on a chilled plate hold their shape.

5.  Pour into hot jars and seal. If you plan on keeping this for an extended period, process in a hot water bath canner for 15 minutes.

This makes about 4 to 5 pints.

Variation:  If desired, stir in one to two teaspoons of vanilla or almond extract after taking the preserves off the heat.


-->

Old-fashioned Bran Muffins


When preparing to make some quick bread for a morning coffee, I started my usual online search, looking for muffins using the apple butter and raisin bran that I wanted to use up. While there were lots of recipes using these, almost all were unfortunately much higher in sugar and fats than I wanted.

Not that I should have been surprised.

I'm not sure when it started, but the lowly muffin has evolved over the past decade or so from pretty basic and sturdy individual breads to be a side for unpretentious meals into giant sweets that often differ from cupcakes only by having a streusel type topping instead of frosting. Nothing I saw in my search was very inspiring.

Fortunately, I still have my recipe card file, pretty frozen in time, with very few entries added in the past 5 to 10 years. There, in the large bread section, was a subtab for "Muffins, Biscuits, Cornbread." These were the decades old recipes I had used over and over for after school snacks for my kids.

One of the most used recipes was one cut off the back of a raisin bran cereal box and taped to pretty now battered index card. It was a good basic recipe but without the apple butter I wanted to use up.

No problem. As usual, I ended up playing with the original recipe and ended up with muffins that were a hit with kids and adults. They aren't covered with lots of streusel and they have only a couple of tablespoons of oil, but they are tasty snacks you can feel pretty comfortable giving to the kids as a filler food while they wait for dinner.

Apple Butter Raisin Bran Muffins
 
2 c raisin bran
¼ c raisins
1 c water and ½ c dry milk powder (OR see Substitutions below)
½ c apple butter (OR see Substitutions below)
1 egg
¼ c sugar
2 T oil
1 1/4 c flour
1 T baking powder
1 t pumpkin pie spice
¼ c walnuts

1.  Stir the raisin bran, raisins, water and dry milk powder in a large mixing bowl and set aside for 20 to 30 minutes.

2. Fold the apple butter, egg, sugar, and oil into the raisin bran mix and beat until evenly blended.


3.  Sift the flour, baking powder, and pumpkin pie spice together and gently sift it into the liquid ingredients. Add the walnuts and then mix only enough to moisten all the dry ingredients. Don't overbeat.


4.  Drop the batter into well-oiled muffin pans and bake at 375 degrees for 15 to 18 minutes for large muffins, 12 to 15 minutes for mini-muffins. Allow to cool a minute or two before removing from the pans.

This recipe makes 12 to 15 full-sized muffins or 12 full-sized and 12 mini-muffins. It probably would make about 4 dozen mini-muffins though I haven't yet made the entire recipe into the smaller muffins.

Substitutions:

Instead of dry milk and water, use 1 c milk, skim, 2% or whole, whatever you have.
Instead of apple butter, substitute applesauce and increase the amount of sugar to 1/2 cup. Increase the amount of pumpkin pie spice to 1 1/2 to 2 teaspoons, depending on your preference for spiciness.


Some general muffin hints

As noted, muffins need a gentle hand once the dry and moist ingredients are mixed. Overbeating can lead to tougher breads and sometimes relatively large "tunnels" in the muffins that are not too attractive.

If you don't have enough pans to bake the muffins all at once, don't worry. You can let the remaining batter sit on the counter while the first batch is baking.

Be sure you have oiled (or sprayed) the pans well. With the low fat content here, the breads are going to be much more likely to stick if you don't do this. You can use cupcake liners if you'd like, but the muffins are more likely to stick to the papers than cupcakes might--for the same reason that there is less fat in the batter. If you'd like, you can use the cupcake liners and then spray those lightly with non-stick spray.


Apple Oatmeal Bar Cookies--or Cake


Long ago and far away, I copied this recipe on to a scrap of paper that I later glued to a standard recipe card that went into the file with the rest of recipes I collected. As much as possible, I always tried to document my sources, but this one says only,  "From a magazine in a dr's waiting room about 72 or 73."
 
From the first time I tried it, I realized the original was quite bland, so I have continued to increase spices and make other changes until I arrived at this more interesting version.

From the start, I also realized that the name, "Apple Oatmeal Bars," seemed misapplied. Given the 8 inch square pan it called for, this was much more like a cake, and I usually served it as such. However, one day, when I was looking for a bar cookie recipe using apples and oatmeal, I decided to try this one in a different pan. The result was a much more satisfying bar cookie, especially with the addition of a light powdered sugar frosting topping.

Whichever way you decide to serve it, this is an excellent recipe to keep around for a dessert that will fill your kitchen with old-fashioned home-baked aroma.

Apple Oatmeal Bar Cookies--or Cake

1/3 c oil
3/4 c brown sugar
2 eggs
3/4 c flour
3/4 t baking powder
1/2 t baking soda
1 1/2 t cinnamon
1 t ground ginger
1/2 t nutmeg
1/4 t cloves
1 c oatmeal
1 1/2 c finely diced apples (pack lightly in measuring cup)
1/2 c coarsely chopped walnuts

1.  Beat the oil, brown sugar, and eggs together until smooth and light colored.

2.  Stir in the oatmeal and diced apples and stir just until they are evenly mixed in.

3.  For cake:
Pour the batter into a well-oiled 8 inch square pan. Sprinkle the nuts evenly over the top and press in lightly with the back of a spatula. Bake at 350 degrees for 32 to 35 minutes, until the center springs back when pressed lightly with a finger.

For bar cookies:
Pour the batter into a  well-oiled 9 X 12 inch pan. Sprinkle the nuts evenly over the top and press in lightly with the back of a spatula. Bake at 350 degrees for 18 to 20 minutes, until the center springs back when pressed lightly with a finger.
NOTE:  For this version, you may want to increase the amount of nuts sprinkled over the top.

4.  Serving suggestions:
For cake:
Serve warm or cooled, topped with whipped cream or ice cream. (If you REALLY want to make this special, serve it warm with ice cream and then a drizzle of caramel sauce over the top.)

For bar cookies:
Make a thin powdered sugar icing and drizzle lightly over the bars. Allow the frosting to set before cutting.


Saturday, March 5, 2016

Bruschetta


Sometimes, having leftovers is not a bad thing. 

Leftover breads, for example.

Earlier this week, I made whole wheat hard rolls for pulled pork sandwiches. Not knowing exactly how many people would be at lunch, I made a large batch of dough--when you're working with yeast breads, it takes hardly any effort to make more. So we had plenty of rolls and there were more for a light supper with a friend. Still, there were three large buns waiting to be used. My first thought was to freeze them, but then I remembered that I would need to take some finger foods to a fellowship gathering.

Hearty rolls = great base for bruschetta. All the other things I'd need were also in my refrigerator, so it didn't take long to turn three large sandwich buns into twenty four appetizer-sized bruschettas.

A key to bruschetta is to use good bread as a base. However, the bread can be a little dry, and that's okay; in fact, it might just keep your base a little firmer.

You also don't want to have the bread layer too thick, because the real flavor should come from the toppings. When using leftover rolls or buns, this will almost always mean you will want to slice the rolls into more layers than for a sandwich.

To begin, I cut each of my unsliced rolls into four thin pieces. When using pre-cut rolls from the store, just cut each half into two slices. Then, because these were large, sandwich-sized rolls, I cut each of these slices in half.

As for the toppings, I had several "basic" ingredients already in the house. There are many options in putting together bruschettas, but mine are at least a little Italian in character. Use what you have in the refrigerator, experimenting a bit until you get the flavor combination you like.

I bought some sun-dried tomatoes packed in oil when they were on a great sale awhile ago. These will keep for quite a long time in the refrigerator so long as you always keep a good layer of oil over the top of the tomatoes. As you will see in this recipe, that oil becomes an important, flavor-adding ingredient too. I also had gotten some fresh tomatoes on sale, so I could use those to stretch the more expensive sun-dried ones and also get the benefit of the brighter color the fresh ones brought.

Mushrooms have been on sale so I had some of those, and I buy black olives in a large bag from Costco. These two will keep for an extended time in the refrigerator so long as you make sure there is always bring covering the olives. If either of these are not available or too pricey for this week's budget, they can be omitted.

As for the garlic powder: definitely plan to use minced fresh garlic if you have it, but always have garlic powder on the shelf for those times when the fresh cloves have all been used up for the last recipe.

As for the cheese: There seems to be a little bit of a split opinion on whether "real" bruschetta has cheese. To be honest, one of the main reasons I include cheese is that putting it under the broiler just long enough to melt the cheese is to hold the overall topping ingredients together. Without that "glue," I sometimes feel that half the tomatoes and other toppings all end up falling back on the plate--or the floor or my lap or anywhere except where I want it to be.

One side benefit of doing a little research on whether or not real bruschetta has cheese, I discovered that the original Italian dish was developed as a means to use up leftover bread and marinary sauce. So I guess today's recipe is extra authentic in that regard! A perfect recipe: tasty, quick to make, and frugally using the best of yesterday's bread!


Mushroom and Sun-dried Tomato Bruschetta

4 oz fresh mushrooms, chopped
1/2 medium onion, finely chopped
1/4 c sundried tomatoes, packaged in oil
1 T oil from the sundried tomatoes
1/2 t garlic powder, or to taste
1/2 t dried basil
1/2 t dried Italian seasoning
seasoning salt, to taste
2 Roma tomatoes, diced
2 to 3 T sliced black olives--optional
app 1 c shredded mozzarella cheese
3 large hard rolls

1.   Saute the onions, sundried tomatoes, and mushrooms in the sundried tomato oil over medium to low heat for about 15 minutes, until the onions are beginning to caramelize. Add the seasonings about 5 minutes before removing the mixture from the heat.


2.  Meanwhile, slice each hard roll into four thin slices.

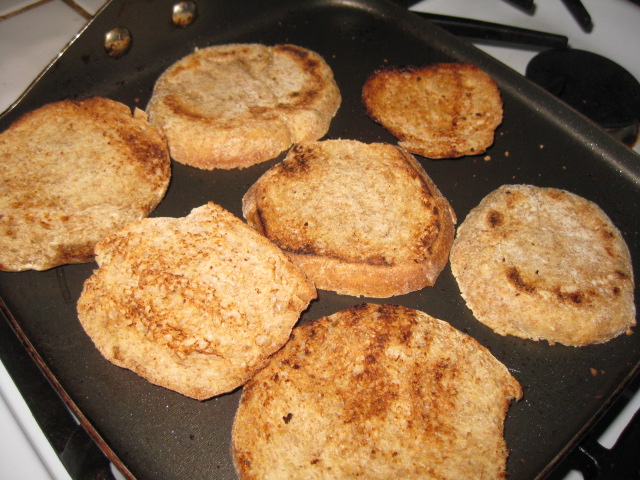
3.  Heat a very lightly oiled griddle or cast iron skillet until quite hot. Lay the roll slices in the pan (you will need to do this in batches) and allow to brown on one side. Turn the slices over and brown on the second side.


Remove from skillet or griddle and cut each toast in half, making half moon slices. Place on a baking sheet.

4.  Preheat the oven to 450 degrees OR turn on the broiler.

5.  When the rolls are all toasted, stir the diced Roma tomatoes into the mushroom mixture. Place a generous spoonful of this mixture on each slice of the rolls and spread over the surface.


6.  If using the olives, sprinkle a few slices over the top of the mushroom mixture. Sprinkle the mozzarella over each bruschetta, covering the filling evenly.

7.  Place the tray in the oven and bake/broil just until the cheese is melted and barely starting to color. Do not allow to turn too brown!


Best when served fresh from the broiler.  Makes 24 bruschetta servings.


Saturday, January 23, 2016

Cranberry Pie


Have you ever thought of how much we tend to associate certain foods with specific seasons or holidays, often serving them only during a limited time period?

Cranberries are like that. Make some cranberry relish to go with the Thanksgiving feast, maybe make a cranberry dessert during the Thanksgiving to Christmas festive season, but then, except for the dried ones substituting for raisins, cranberries pretty much drop out of sight the rest of the year. 

Because of this seasonality, however, I learned long ago that fresh cranberries are often on sale at really low prices after Thanksgiving and, sometimes, after Christmas as well.

This year was no exception. I found the standard 12 ounce bags of cranberries at one store for only 35 cents each. Grabbing up several bags, I brought them home, froze some, and put the rest in the produce drawer of my refrigerator. (If purchased in good condition, the berries will last for more than a couple of weeks in the refrigerator.)

One of the reasons I like to stock up on cranberries has to do with another seasonal food: cherry pie is often featured around Presidents' Day, in honor of the George Washington cherry tree myth, and sometimes Valentines Day,  just because of the all-things-red kinds of menus.


The recipe that follows is one that will substitute very well for cherry pie, at a much lower price. Don't skimp on the almond flavoring, and do try my daughter-in-law's innovation of a graham cracker crust instead of the standard pie crust. In order to enhance the almond flavor that enhances the cherry-like flavor, I have subbed in some ground almonds for part of the graham crackers.  Of course, if you want the pie to really look like a classic cherry pie, you can spend lots of time making a lattice crust, but why bother when you can so much more quickly make this one that will taste just as good--or even better.

Cranberry Pie

12 oz bag cranberries--about 3 cups
1 3/4 c sugar
2 T cornstarch
3/4 c water
1 t. almond extract
graham cracker crust for 9" pie

1. Combine sugar, cornstarch, and water in a large saucepan and stir until all the sugar and cornstarch are dissolved. Bring to a boil over medium high heat.

2.  Meanwhile, wash the cranberries, sorting out any that may have spots. Drain and add to the boiling sugar mixture. Continue cooking until all the berries have popped, about 5 to 10 minutes. Stir often.

3.  Remove from heat and add the almond extract. Pour into the prepared crust and place the pan on to a pizza pan or cookie sheet.

4.  Put the pie and the pan beneath it, in a 400 degree oven for about 20 minutes, until the filling is bubbly all around the edges. If the edges of the crust begin to darken, place a ring of aluminum foil loosely over the edges.

Graham Cracker Crust

 1/3 c butter, melted
1 c graham cracker crumbs (about half a 12 oz package)
1/2 c ground almonds (approximately 2 to 2/12 oz)
3 to 4 T sugar
1/2 t cinnamon

1.  Prepare the crumbs by whirling in a blender or food processor. You may also place the crackers in a heavy plastic bag and roll over the bag with a rolling pin. Try to get the crumbs as even as possible.

2.  Melt the butter and pour into the bottom of a 9 inch pie pan. If using a glass pan, you can just melt the butter right in the pan in the microwave.

3.  Stir in the remaining ingredients and, using a fork or your fingers, toss the ingredients together until they are well blended. Press the crumbs firmly against the bottom and up the sides of the pan.


 (If desired, you can reserve a few crumbs for the top of the pie. However, I don't do that because, as soon as the pie is cut, I always manage to have some of the crumbs "migrate" to the top of each slice anyway, as seen in the photo below.)


Potato Soup, and Variations


Winter weather has finally arrived, the richness of holiday meals is mostly past, and the time has come for simpler, more nutritious, frugal, and warming comfort foods. Here in Minnesota, we have the promise of weather perfect for being outside, enjoying the snow, even as our friends in the east are facing the "other side" of winter, with heavy snow to shovel, roads unsafe for traveling, and generally treacherous walks underfoot.

What better time for all of us to stay home and make some soup!

Potato soup is one of my favorite winter comfort foods. What I also like about it is the opportunity to make a giant batch and then toss things throughout the week to turn it into something else again. Cream of broccoli soup, New England clam chowder, corn chowder--all are soups that can start out with a basic potato soup.

Best of all, there are few "exotic" ingredients needed to bring bowls of steaming potato soup to the table, and, if you choose to go "rustic," i.e., without peeling the potatoes, making a large batch will take relatively little time to prepare.

So let's get cooking. Here is the link to my post from last winter.

http://frugalfastfun.blogspot.com/2015/02/basic-potato-soup-with-lots-of.html

(And, if you don't want to bother to go to the link, here is the recipe. For the variations, however, you will just have to give in and go to the earlier post.)


Creamy Potato Soup

(For the various vegetables, I have included several different measures to help you have a guide to amounts. However, feel free to adjust as you like.)

1/4 to 1/3 c canola oil
1 large or 2 medium onions, coarsely chopped (13 oz. or about 2 1/2 c)
4 stalks celery, diced (8 oz or about 1 1/4 c)
3 lb potatoes, cut into about 1 inch cubes (approximately 8 c)--I had a mixture of white, red, and russet potatoes for this batch
1/4 c chicken or vegetable bouillon powder OR 4 to 5 bouillon cubes
approximately 2 1/2 quarts water
12 to 16 oz pureed butternut squash (about 1 1/2 to 2 c)--if frozen, no need to thaw
3 oz chopped fresh spinach (app 2 c after chopping)
3 to 4 cloves garlic, minced (I used bottled minced garlic today)
1 t dried basil
1 t dried oregano
1 t black pepper
1 12 oz can evaporated milk, either fat free or "regular"
1 to 1 1/2 c nonfat dried milk powder
4 oz processed cheese (like Velveeta in the rectangular yellow box)


1.  Pour enough canola oil into a large pot to just cover the bottom of the pan. Add the onions and celery and saute over medium high heat until the onions just start browning and the celery is slightly tender.


2.  Meanwhile, scrub the potatoes, cut out any spots and eyes, but do not peel. Dice into approximately one to two inch cubes. Add to the onions along with about 2 quarts of water and bouillon powder. Cover the pan and allow to simmer for about 20 minutes, until the potatoes are very soft.
3.  If desired, use a potato masher to break up most of the chunks of potato. (An immersion blender can also be used for this.) Be sure to do this before adding the spinach, to avoid ending up with a kind of murky green colored soup!
4.  Stir in the squash, spinach, and garlic, along with the basil, oregano, and pepper. Continue to simmer for another 5 to 10 minutes (or until the squash is completely thawed if it is put in frozen).

5.  Mix the dry milk powder with a cup or so of water and add it, along with the evaporated milk, to the soup. Stir well. Cut the cheese into a couple of pieces and add. Stir until the cheese is melted and the entire mixture has returned to a slow simmer.
6.  Taste for seasoning and then serve or allow to simmer together for another 10 to 15 minutes. This is also very good the second day as well.

Ah. But no potatoes.

But...I have been asked, what if you don't have any potatoes in the house? While what my mom always said was "the Irish in me" leads me to always having potatoes--just as I always have onions and celery--I suppose this could happen in the event of an unexpected (or expected) blizzard. So, what to do without potatoes?

This basic recipe can easily be turned into a Cream of [insert your favorite vegetable here] Soup just by omitting the potatoes and replacing them with another hearty vegetable. Carrots, squash, even corn will work well. Parsnips or turnips? Hmmmm. I still haven't cooked with them so can't make any promises--would love to hear how these might turn out.

When omitting the potatoes, the soup will lose some of its creaminess. To replace this, stir about 2 to 3 tablespoons of flour (or corn starch) into a half cup of cold water or milk and then add this slowly to the rest of the soup ingredients about 20 to 30 minutes before serving.

OR...just look up a good recipe for a non-potato soup, like one of these:

http://frugalfastfun.blogspot.com/2012/05/creamy-mexican-corn-soup.html

http://frugalfastfun.blogspot.com/2011/01/italian-lentil-soup.html

http://frugalfastfun.blogspot.com/2011/11/spaghetti-and-meatball-soup.html

Whatever you choose, enjoy a house full of the wonderful aroma of homemade soup, the best way to celebrate a snow day!


Wednesday, December 16, 2015

Cranberry Applesauce Mini Muffins/Cakes


In this time of holiday gatherings, office potlucks, and a desire to share home-baked gifts, finding recipes that are fast, relatively inexpensive, and even just a little healthy (or at least less unhealthy) can be a challenge.


Enter mini-muffins.

These bite-sized morsels are especially good for times when we want to try all the foods on offer at the buffet and can easily over-indulge as a result. Using unsweetened applesauce and reducing the amount of fat in the original recipe ups the nutrition, as does the inclusion of lots of cranberries and walnuts. The added step of dipping each one in melted butter and sugar and cinnamon does add some calories but lifts these little bites into the dessert category.

They also stretch the budget at a time when spending on gifts and trappings of the season take priority. I found cranberries marked down the week after Thanksgiving--a common occurrence most years--so that helped reduce the overall cost of the recipe. The original recipe was for a single loaf of a basic cranberry bread that would have yielded no more than 16 or so slices. Making mini-muffins results in almost 5 dozen of these little nuggets, yet another way to stretch the budget. 

Best of all, these are easy to make yet make a lovely addition to any tray of mixed cookies and candies. The blend of tart fruit and sugary topping is a good counter point to the many super sweet choices that can become overwhelming.

A processor is the best tool for chopping the cranberries, though a blender could also work. After they are chopped, the batter comes together very quickly. Even the final step of dipping each little muffin in the butter and sugar and cinnamon is a pretty easy task. Best of all: you should have some of both the butter and sugar and cinnamon left after dipping--just right for making some cinnamon toast for breakfast tomorrow morning!


Applesauce Cranberry Muffins

3/4 c sugar
1/3 c canola oil
1 egg
1 t vanilla
1 1/2 c unsweetened applesauce
 2 c flour
1 t baking powder
1 t baking soda
1 t  cinnamon
1/2 t nutmeg
2 c fresh or frozen cranberries, chopped
1 cup walnuts, chopped

Topping

1/2 c butter, melted
1 c sugar
2 to 3 t cinnamon, to taste

1.  Put the cranberries in a blender or food processor and process until well chopped. Set aside.

2.  Combine the sugar, oil, egg, vanilla, and applesauce and beat well.

3.  Sift together the flour, baking powder, baking soda, cinnamon, and nutmeg and stir into the applesauce mixture. Stir just until completely blended.

4.  Fold in the cranberries and walnuts.

5.  Prepare mini-muffin pans by oiling well or spraying with a product like Pam. (Even non-stick pans will benefit from this step.)


6.  Spoon the batter into the pans and bake at 350 degrees for about 13 to 15 minutes. Allow the cakes to cool in the pans about 5 minutes before turning on to a cooling rack.


7.  While the muffins are baking, prepare the topping. Place the melted butter in one bowl and combine the sugar and cinnamon in another. 

8.  Place each mini-cake top down into the butter and then into the sugar cinnamon mix.  


 This recipe makes about 5 dozen mini-muffins/mini-cakes.


Saturday, December 5, 2015

Upside Down Apple Pumpkin Cake


Over the years, I watched the Pillsbury Bake-off reward bigger and bigger prizes, often for what seemed like easier and easier dishes to make.

It would be fun, I thought, to have a recipe that would just get me to the final bake-off, a room full of cooks and mocked up kitchens, chaotic and fragrant and, well, just plain fun.

As the contest's emphasis on mixes grew, I decided to try a recipe that would be a "can't fail" entry. From the first time I baked my "million dollar cake" recipe, it was a hit with everyone who tasted it. I even got serious enough about this that I laughingly said I wouldn't share the recipe until I was sure it was/wasn't going to make it.

The testing was done, the recipe had been tried over and over, and I was ready for that year's bake-off. Not having seen any paper entry forms as in years past, I checked the Pillsbury site and discovered they were now running the contest only every two years, so I would have to wait. I continued to make the cake for various gatherings and meals and continued to hear compliments and, yes, of course you need to submit this!

So I waited. Finally, it was time to get my entry in. Imagine, then,  my chagrin when I discovered that Pillsbury cake mixes were no longer eligible products for the contest!

What?

A little research and here is what I learned (as summarized on everyone's favorite research site, Wikepedia):
"Pillsbury is a brand name used by Minneapolis-based General Mills and Orrville, Ohio-based J.M. Smucker Company. Historically, the Pillsbury Company, also based in Minneapolis, was a rival company to General Mills and was one of the world's largest producers of grain and other foodstuffs until it was bought out by General Mills in 2001. Antitrust law required General Mills to sell off some of the products. General Mills kept the rights to refrigerated and frozen Pillsbury products, while dry baking products and frosting are now sold by Smucker under license."
So, Pillsbury cake mixes are not really "Pillsbury" products at all. Or rather, the "Pillsbury bake-off" is really the General Mills (ie, Betty Crocker!) bake-off. Really!?!

Whatever the corporate decisions, what this meant was that my wonderful million dollar cake would never make the grade as an entrant in this high power contest. 

I wasn't exactly crushed, but it did take the fun out of making the cake for awhile. Then, when I was stirring it up for an event this week, I realized that I had not even included the recipe here on my blog. What a strange omission, since the cake really does fit into the frugal, fast, and fun criteria:
  • Frugal? This is the season to get the best buys on apples and canned pumpkin (or for making your own pumpkin puree from the last of the Halloween pumpkin decorations). 
  • Fast? If you don't spend too much time agonizing over the arrangement of the apple slices, the cake goes together pretty quickly, and there is no need for making frosting. 
  • Fun? It really is fun to make this relatively easy dessert that turns out so beautifully. In fact, this could be a great cake to make with children--and they may have a lot more patience in getting the apples arranged just so. 
So here it is, just in time for the last of the "harvest" kinds of desserts before we fully move into Christmas cookies and breads, is the recipe. A couple of hints:
  • Though you start out with a cake mix made for just a 9 X 13 pan, you will want to use the larger pan size(s) to emphasize the apple part of the cake. Using round pans gives an especially elegant way to arrange the apples.
  • I prefer to use glass pans, just because I can see, in step 6, when the apples have completely dropped off the pan and onto the tray.


Million Dollar Upside Down Cake

1/2 c butter
3/4 c brown sugar
1 1/2 t cinnamon
approximately 1/2 to 1 c broken walnuts
4 to 5 medium apples, cored and sliced (about 12 slices from each apple)

1 yellow or white cake mix
2 eggs
2 c pumpkin puree (15 oz can)
1/3 c water
2 t cinnamon
1/2 to 1 t ginger, depending on how much you like ginger
1/2 t nutmeg


1.  Melt butter and stir in the brown sugar and 1 1/2 teaspoon of cinnamon. Spread the mixture evenly in the bottom of a 12 X 15 cake pan (or two 7 X 11 pans or two 9" round cake pans).

2.  Arrange the apple slices in rows (or in a circular pattern for the round cake pans) over the butter/sugar mixture so they cover the pan with as few spaces as possible. Sprinkle the walnuts evenly over the top and set aside.


3.  Combine the cake mix and all remaining ingredients together, stirring with a mixer just to combine. Then beat for the length of time noted in the cake mix package directions. The batter will be quite thick.


4.  Drop spoonfuls of the batter evenly over the apples. Then use a spatula or knife to spread the batter evenly.
It is important to do this gently, to avoid moving the apples around and undoing all that careful work you put into arranging them so beautifully!

5.  Bake at 350 degrees (325 for a glass pan) for 35 to 40 minutes, until a toothpick inserted in the center comes out clean.


6.  Allow the cake to cool in the pan for about 5 minutes. Have a tray or serving plate ready.


Place this over the top of the pan and then quickly invert the pan and tray. The cake should easily drop on to the tray; leave the pan on top for a few minutes, perhaps even shaking slightly if a few of the apples continue to cling to the pan.


Hint:  As soon as the cake has dropped on to the tray and you remove the pan from on top, use a spatula to scrape off any of the caramel-y layer from the pan and spread it over the cake--this is way too good to leave in the pan!


 Serve the cake warm or cold.


Tuesday, December 1, 2015

Golden Clam Chowder


I love clam chowder, the white and creamy New England style, so the beginning of winter weather this weekend was a great time to make up a batch.

Now it happens that I also have lots of butternut squash and am always looking for ways to add this sweet, high vitamin and fiber ingredient to old standard recipes. Why not make that creamy chowder just a little richer, a little more colorful, and even a bit healthier?

Voila. Golden clam chowder.

I had found some bargains on seafood stock and canned clams so had the makings of a reasonably priced chowder. Add in the specials on evaporated milk, celery, potatoes, and onions in preparation for Thanksgiving feasts, and this became a pretty frugal and nutritious main dish.

With the over-eating many of us may be anticipating on Thanksgiving, an evening meal of chowder, applesauce, and crackers (oyster crackers, of course!) could be a good choice. Note the variations if you have pescatarians (vegetarian plus seafood diets) in the house or if you don't regularly have seafood stock on hand.


Golden Clam Chowder

  • 3 slices lean bacon, diced
  • 1 T canola oil  
  • 1 large onion, chopped--about 1 1/2 to 2 cups, depending on your taste
  • 3 large ribs of celery, sliced
  • 10 to 12 oz butternut squash, peeled and cut into 1/2 to 1 inch cubes
  • 1 1/4 lb diced potatoes--do not peel
  • 1 quart seafood stock
  • water
  • 1/3 c flour
  • 1 12 oz can fat free or regular evaporated milk
  • 12 oz canned clams, including liquid
  • salt and pepper to taste--start with about 1 t salt and 1/2 t freshly ground black or white pepper

1. Place the bacon in a large pot along with the oil. Add the onion, celery and squash and saute over low heat until the onions are golden and the squash is just starting to soften.

2.  Stir in the potatoes and about a cup or so of water along with half the stock. Cover and allow to simmer for at least 15 to 20 minutes, until the potatoes and squash are quite soft.

3.  Blend the flour and 1/2 c water (or milk) until smooth. Gradually stir into the chowder and continue stirring until the mixture begins to thicken.

4.  OPTIONAL STEP: If you prefer a very smooth, creamy chowder, put about half of the mixture in a food processor and blend until smooth. You may also use an old-fashioned potato masher. Return the processed mixture to the pot.

5.  Add the remaining stock, clams, and clam liquid and simmer for another 10 minutes or so.

6.  Reduce the heat and stir in the evaporated milk, along with water as needed to reach the desired thickness. Taste and add salt and pepper as needed.


This is very good reheated. Note that, as with many creamy soups of this type, a thin film or "skin" may form on the surface. You can usually just beat this in without any problem. The quicker you cover and refrigerate any leftover soup, the less likely this is to occur.

Variations:

Omit the bacon and use 3 to 4 tablespoons of canola oil.

If you don't have access to seafood stock, you can substitute vegetable or chicken stock (purchased or homemade) and use an additional 6 to 12 ounces of clams.

Add about 1/3 to 2/3 cup dry milk powder to the water you add in step 4 and mix well before stirring into the chowder.

12 to 16 oz of frozen corn may be added with the evaporated milk. If you really want to be non-traditional, you could also stir in 8 to 10 oz frozen chopped spinach or kale at this point as well.

For a gluten free chowder, omit the flour and increase the amount of potato by another 4 to 8 ounces, mashing the potatoes as in step 4, to achieve a chowder-y thickness.

If you really, really, really don't want to see those pieces of potato peeling in the chowder, you can peel the potatoes...but before you pick up that peeler, think of all the extra work and reduced nutrition!